HOTH! That’s hot off the hook, just in case you didn’t know. 😉
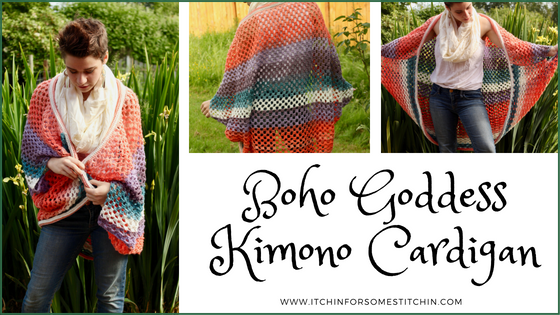
I’m so excited to share my new Boho Goddess Kimono Cardigan pattern with you today!
*This post may have affiliate links. See my full Disclosure Policy for details.
Let me tell you a little about how this beauty came about.
I was looking to add a splash of color to my summer wardrobe this year and I really like cardigans or flannels that I can just throw on for a little warmth and style.
Looking for lots of crafty inspiration, tips, tutorials, and a great crochet community? Join my Facebook group!
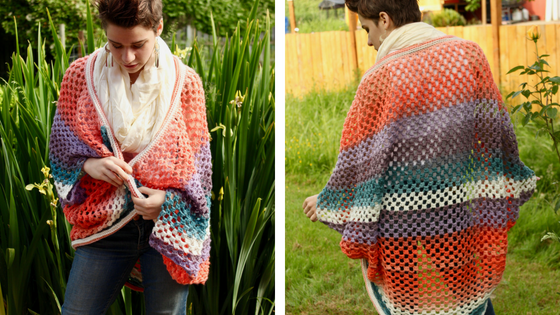
As luck would have it, my wonderful hubby had just brought home with a whole bag of this gorgeous Lion Brand Mandala yarn.
I was instantly in love! And knew exactly what I wanted to do with it.
So I whipped this really easy blanket sweater. And I do mean EASY folks!
Even if you’re an absolute beginner you can do this one!
Check Out These Other Patterns I LOVE!
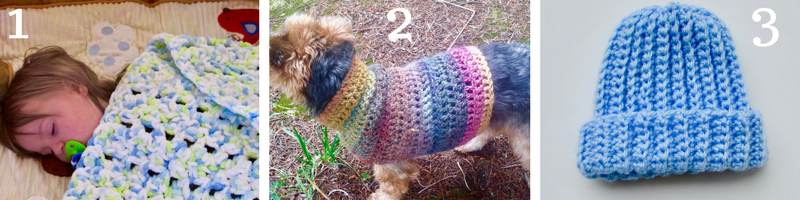
- Crochet Seed Stitch Baby Blanket / 2. Quick & Easy Small Dog Sweater Pattern / 3. Ribbed Baby Beanie Pattern for Beginners
~ I am so pleased to announce that the crochet seed stitch baby blanket is now available on Allfreecrochet.com as well as the blog! Find it HERE.
How to Crochet The Boho Goddess Kimono Cardigan
**THIS IS AN ORIGINAL PATTERN. Please see my Copyright Statement for details.
Prefer a PDF?
This pattern is available as a large print, ad-free, printable PDF pattern.
Get it in these places:
Love Pinterest? I do!
PIN this pattern to your Pinterest boards for later HERE.
You can also follow all my boards!

Add this pattern to your Ravelry que HERE.
Not a member of my crochet community?
Click on the button below to sign up and receive a my free crochet journal, as well as all future updates, freebies, promos and more!

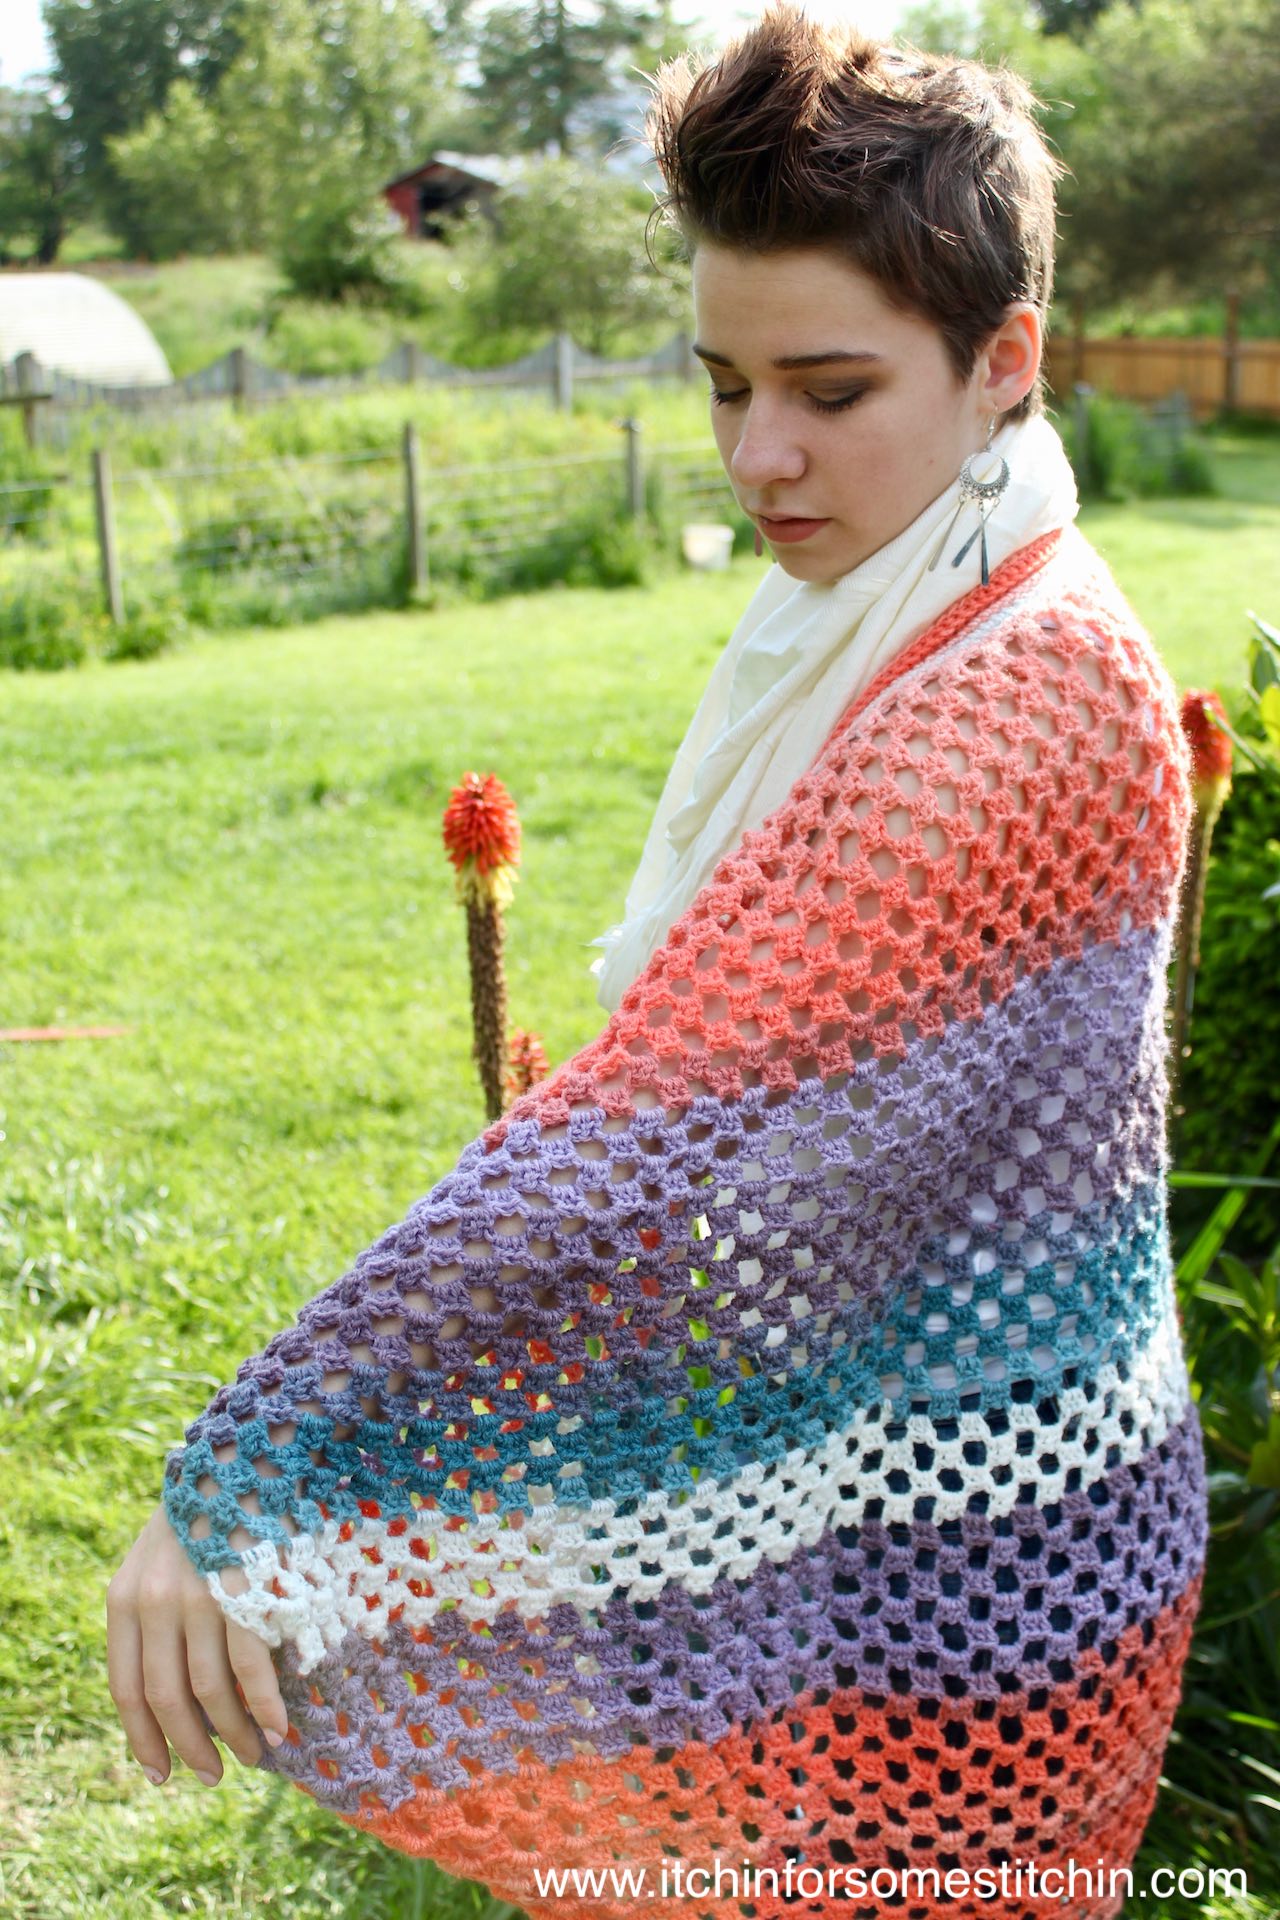
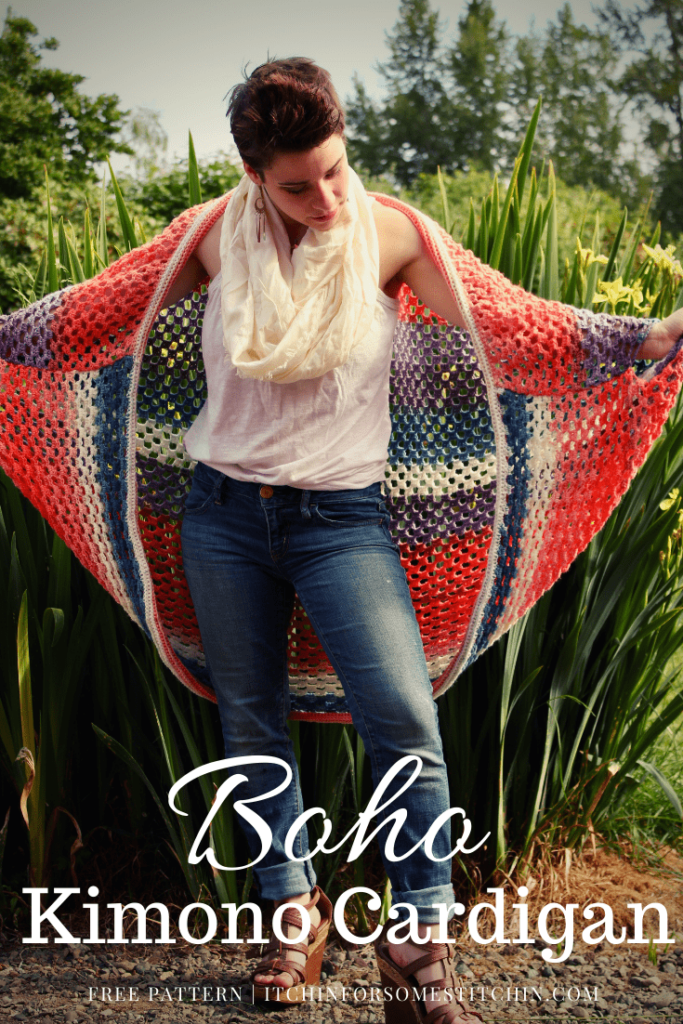
Boho Goddess Kimono Cardigan Pattern
Summary:
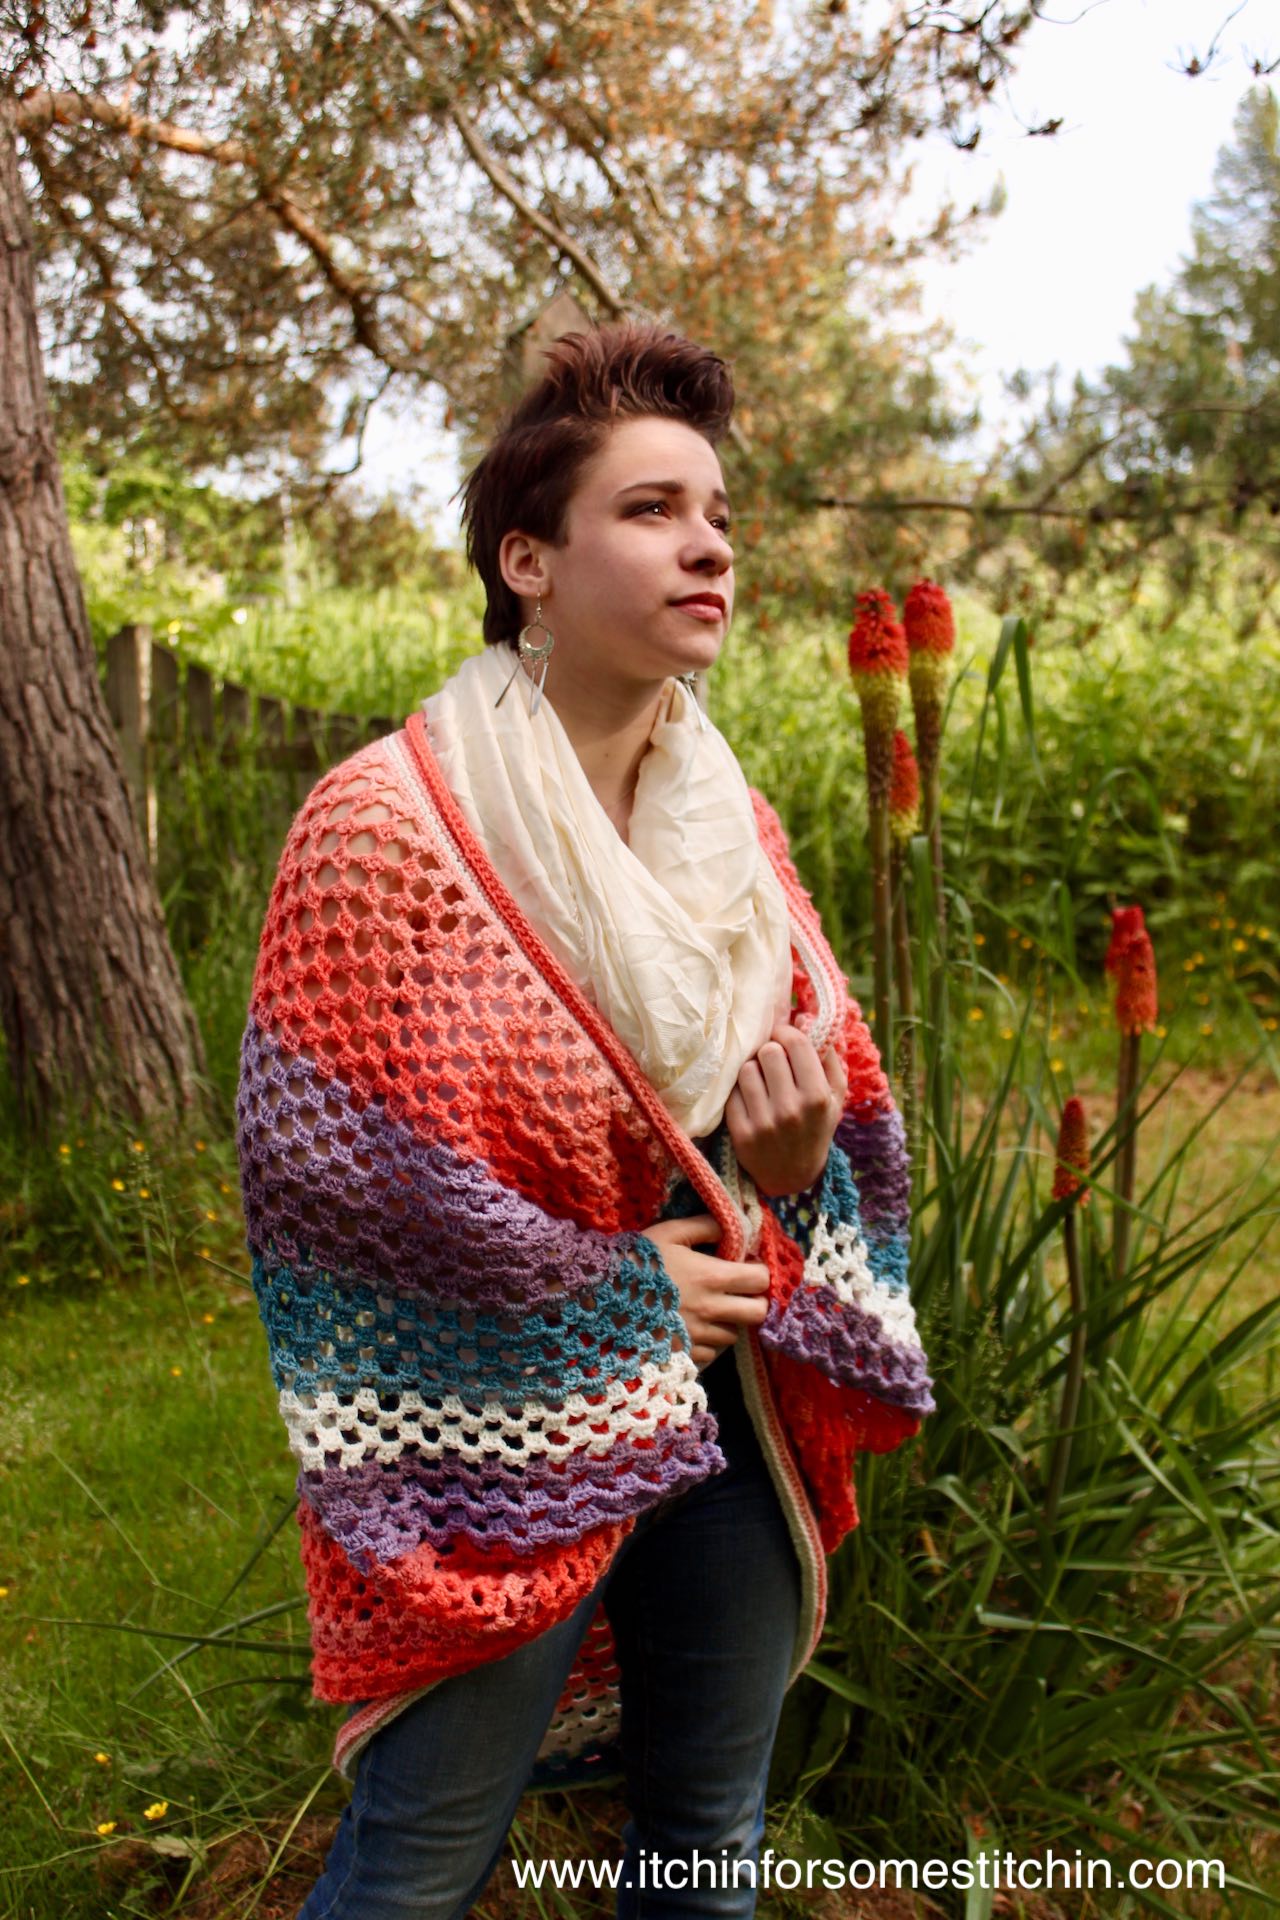
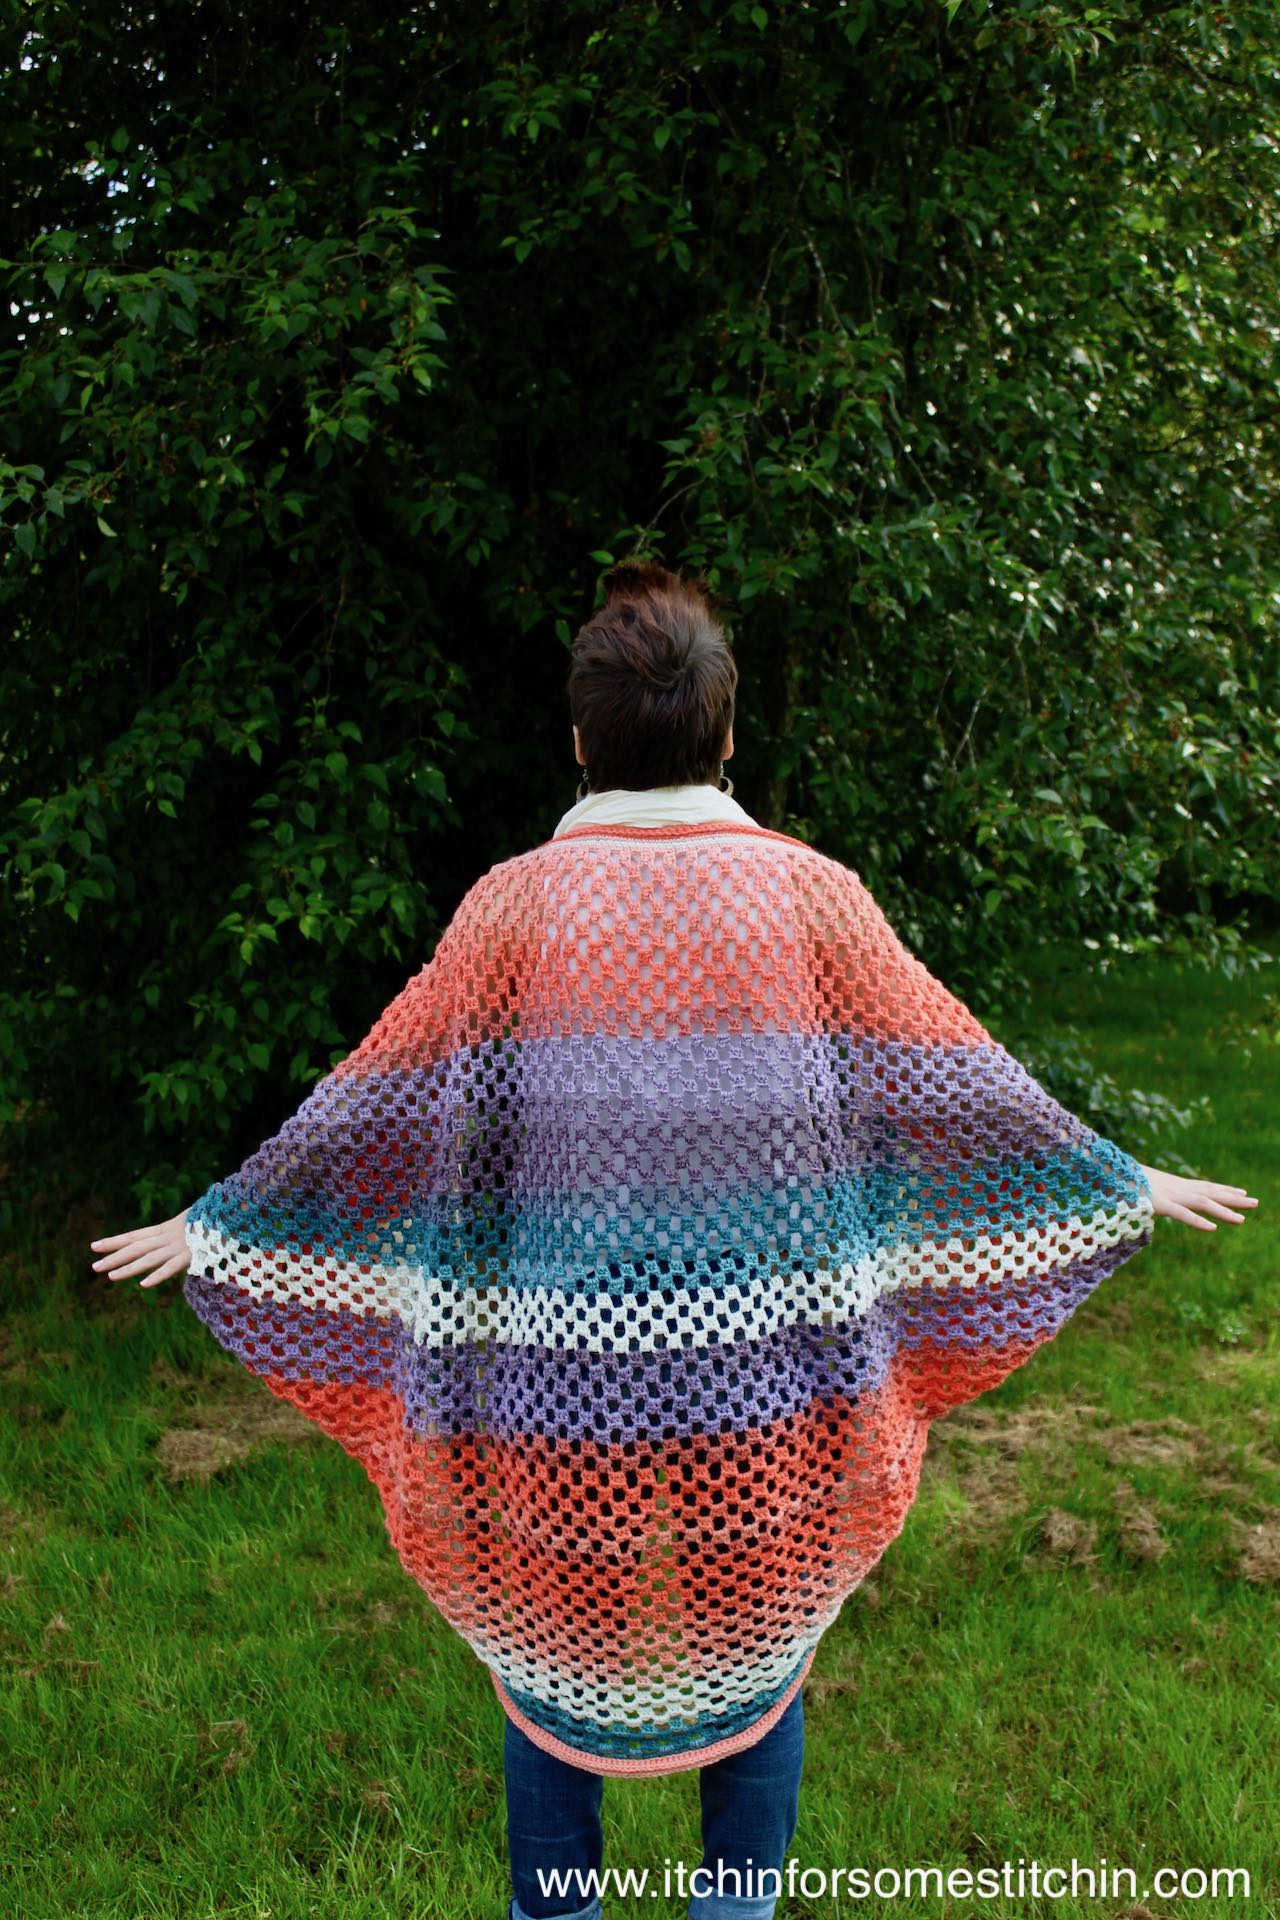
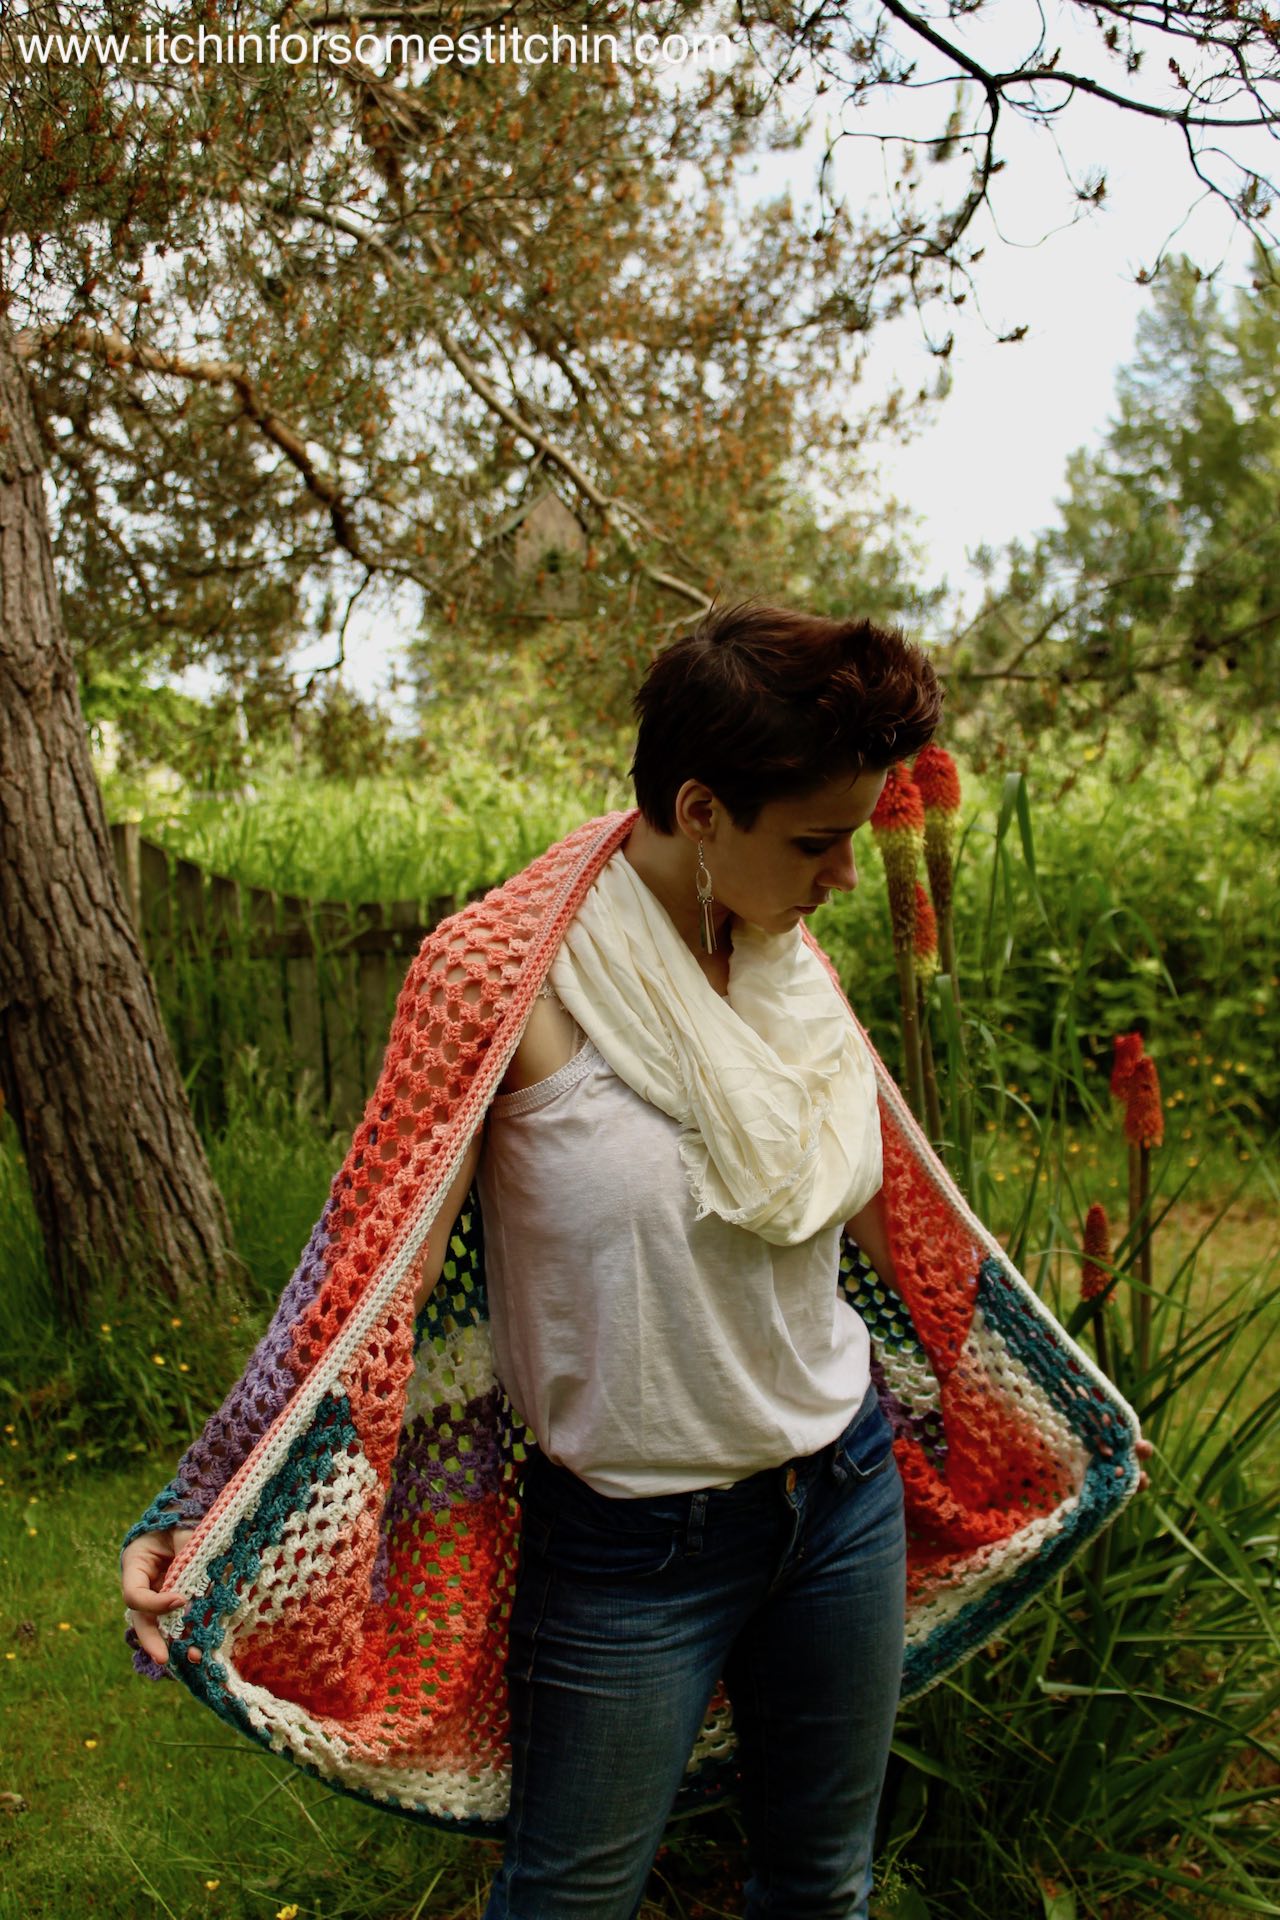
Are you a Bohemian Goddess? You’ll feel like one in this Boho Goddess Kimono Cardigan! The cascading sunset colors and flowy feel give this summer cardigan a little touch of paradise. Plus, it’s made from super simple crochet stitches so even the newest of beginners can make it! Whether on the beach or just lounging around the house this stylish kimono is the perfect addition to your boho wardrobe.
Difficulty level: Level 1 – Beginner
Finished Dimensions:
- Measures about 39-inches (L) X 54 (W)
- Length (L) includes collar
- Width (W) is measured from arm hole to arm hole
NOTE: the pattern is made to the Craft Yarn Council Standards for Women size Medium, but is easily adjusted to almost any size. See additional notes below.
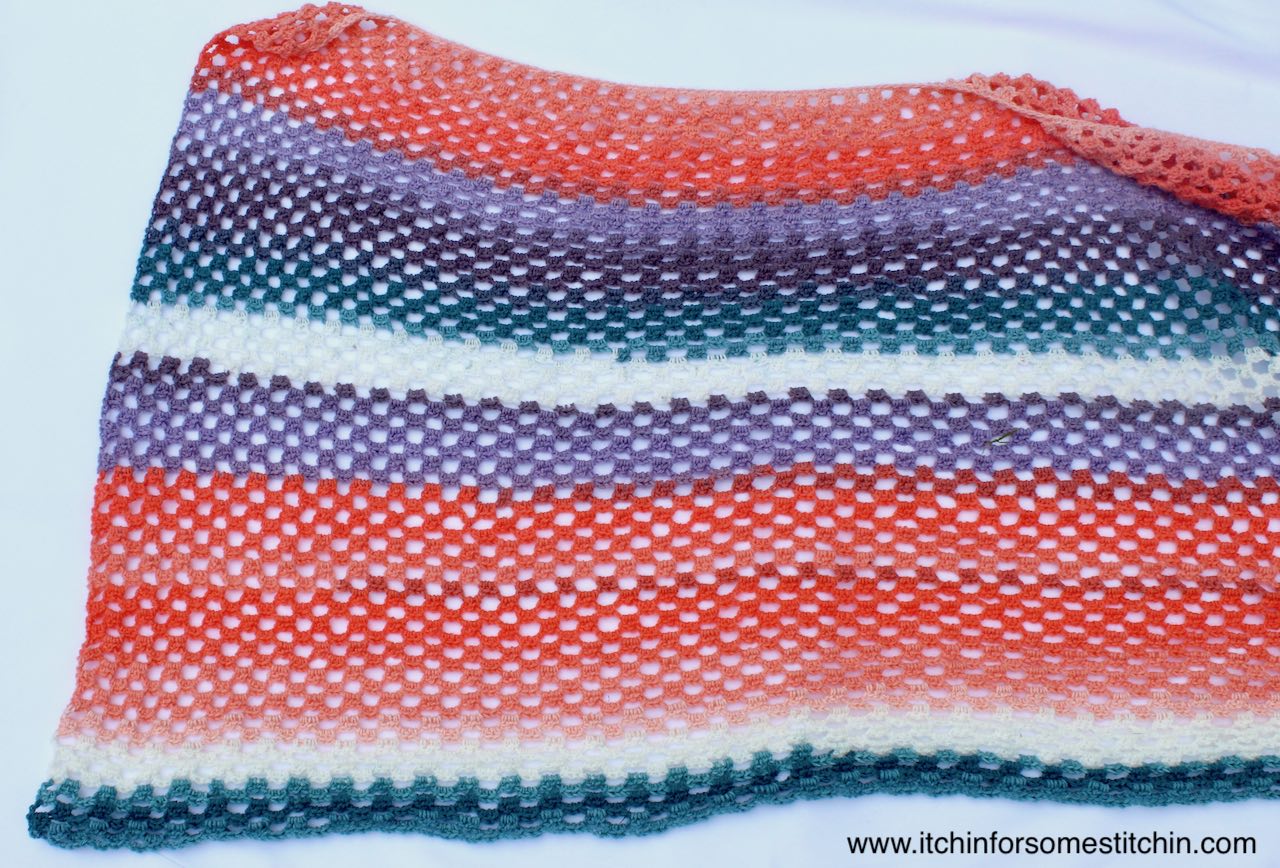
Gauge: 3 clusters and 9 rows = 4-inches x 4-inches
Materials:
- 3 skeins Lion brand Mandala – color is Pegasus
- Each skein is 5.3oz/150g, 590 yards
~ All yarn in this pattern is lightweight (3)
- Crochet Hook size H – 5.0 mm (I use a hook made by Nelsonwood) or whatever hook you need to obtain the gauge (some people have used an F – 3.75mm hook)
- Crochet Hook size E/4 – 3.50mm hook
(Click HERE to find my favorite crochet tools & resources)
Abbreviations:
Additional Notes:
- In this pattern (hdc, dc, hdc) creates a cluster.
- Length of the kimono is entirely your preference. The 37 – inch length should fall just below the buttocks of a person of average height (5’3”) and medium build.
- Width of the kimono is also your preference. To increase the width for someone of larger build or longer arms, you will need to add extra chains to the foundation chain.The kimono extends longer and looks over-sized on the model in the pictures as the model is 4’10” and of small build.**Keep these details in mind when crocheting this pattern as you may want to adjust both the width (arm to arm) and length of the kimono to suit the individual who will be wearing your creation.
Instructions:
With H/5.0mm hook: Loosely Ch 140, turn work.
Row 1: Dc in the second ch from the hook, *ch3, skip the next 2 chains, and then (hdc, dc, hdc) in the 3rd ch* Repeat from * to * across to the last 3 chains. Ch3, skip the next 2 chains, dc in the last chain. (45 clusters, 46 ch3-spaces)
Row 2: Ch 2 (counts as first hdc), turn work. (Dc, hdc) in the first ch-3 space, *ch3, skip the (hdc, dc, hdc) cluster, then (hdc, dc, hdc) in the next ch-3 space* Repeat from * to * across to end. Make a ch3 after the last cluster and then work one hdc in the top of the ch3 turning chain of the previous row. (46 clusters, 46 ch3-spaces)
Row 3: Ch3, turn work, (hdc, dc, hdc) in the first ch-3 space, *ch3, skip the (hdc, dc, hdc) cluster, then (hdc, dc, hdc) in the next ch-3 space* Repeat from * to * across to end. Make a ch3 after the last cluster and then work one hdc in the top of the ch3 turning chain of the previous row. (46 clusters, 46 ch3-spaces)
Row 4: Ch2 (counts as the first hdc), turn work, (dc, hdc) in the first ch3-space, *ch3, skip the (hdc, dc, hdc) cluster, then (hdc, dc, hdc) in the next ch-3 space* Repeat from * to * across to end. Make a ch3 after the last cluster and then work one hdc in the top of the ch3 turning chain of the previous row. (46 clusters, 46 ch3-spaces)
Row 5: Ch2 (counts as the first hdc), turn work, (dc, hdc) in the first ch3-space, *ch3, skip the (hdc, dc, hdc) cluster, then (hdc, dc, hdc) in the next ch-3 space* Repeat from * to * across to end. Make a ch3 after the last cluster and then work one dc in the last stitch of the previous row, which should an hdc. (46 clusters, 46 ch3-spaces)
Row 6: Ch3, turn work, (hdc, dc, hdc) in the first ch-3 space, *ch3, skip the (hdc, dc, hdc) cluster, then (hdc, dc, hdc) in the next ch-3 space* Repeat from * to * across to end. Make a ch3 after the last cluster and then work one dc in the last stitch of the previous row, which should an hdc. (46 clusters, 46 ch3-spaces)
Row 7: Ch 2 (counts as first hdc), turn work, Dc, hdc in first ch-3 space, *ch 3, skip cluster, (hdc, dc, hdc) in the next ch3-space* Repeat from * to * across to end. Should end on a ch 3 and then hdc in the last stitch of the previous row, which should be a dc. (46 clusters, 46 ch2-spaces)
Row 8: Ch 3, turn work, (Hdc, dc, hdc) in first ch3-space, *Ch3, skip (hdc, dc,hdc), (Hdc, dc, hdc) in next ch3-space*
Repeat from * to * across to end. Should end on an ch 3 then dc in the last stitch of the previous row, which should be a hdc. (46 clusters, 46 ch3-spaces)
~ Repeat Rows 7-8 until fabric measures 37-inches long or whatever length you prefer.
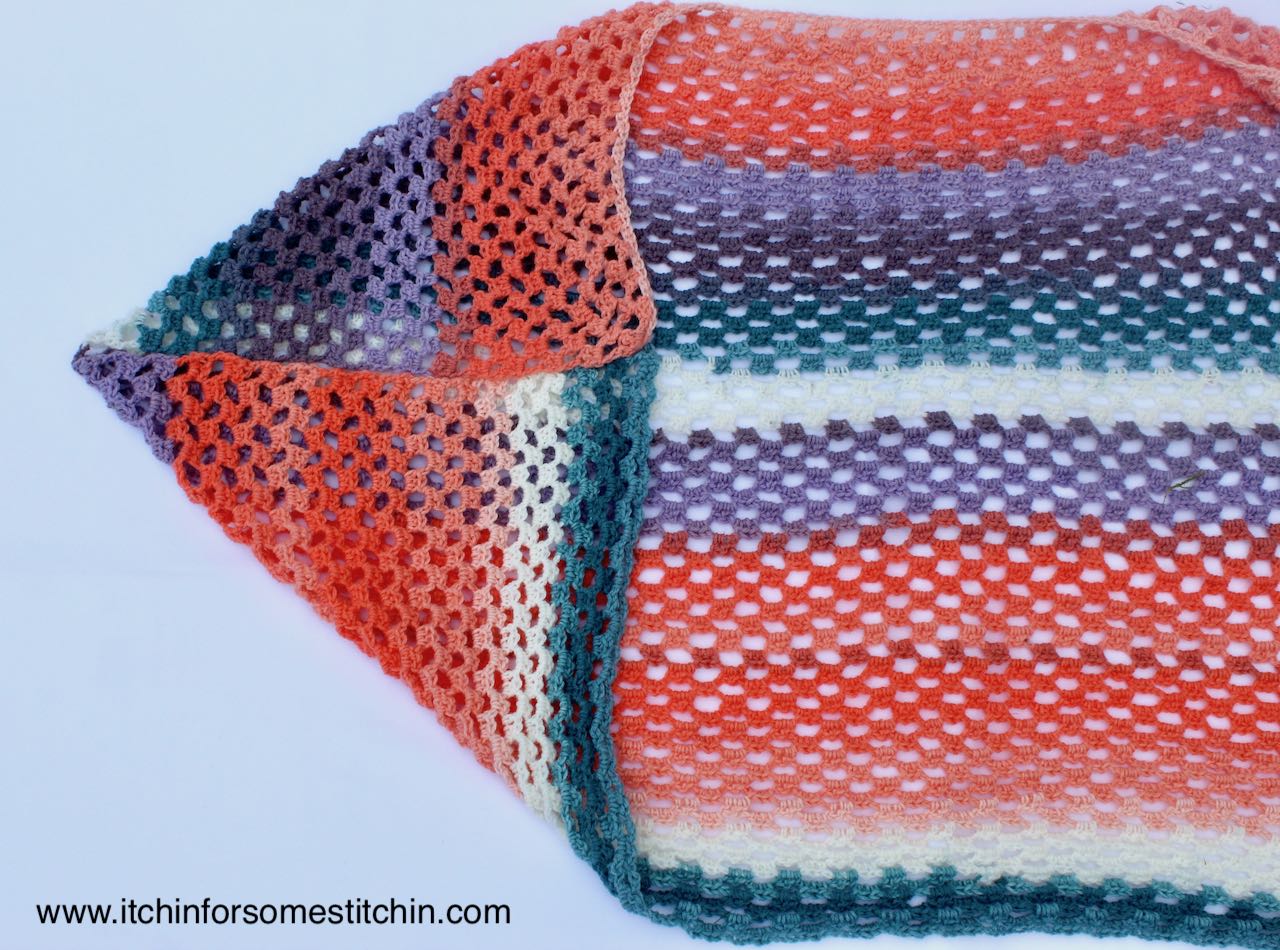
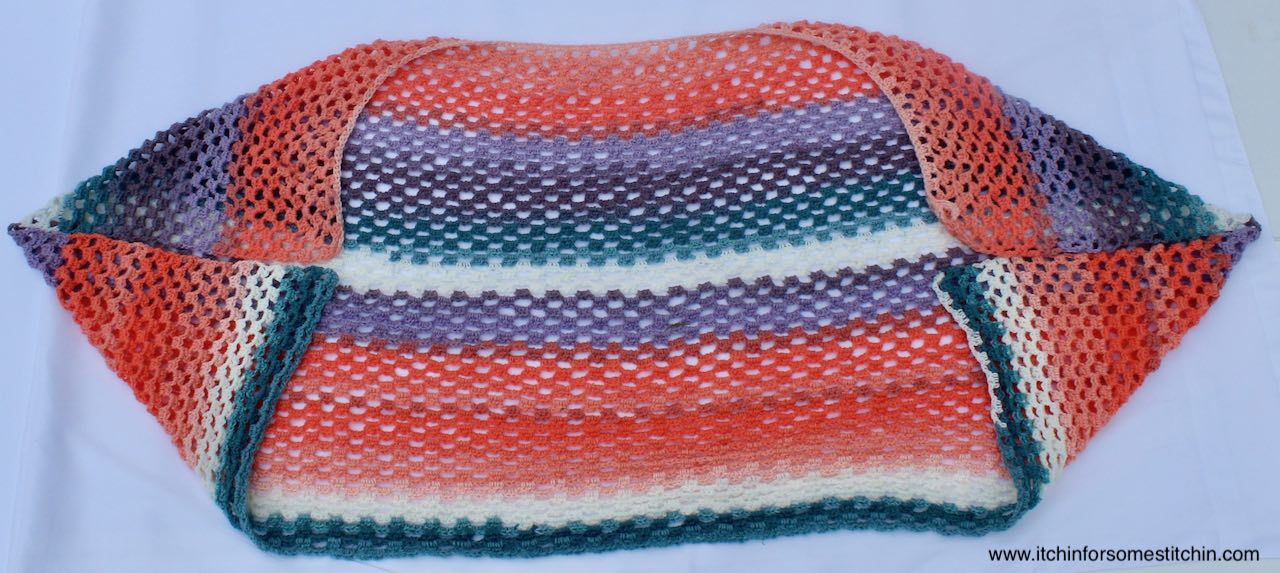
Form Arms:
- Lay project right side down. Fold arms as indicated in photos B and C.
- Change to an E/4 3.50mm hook.
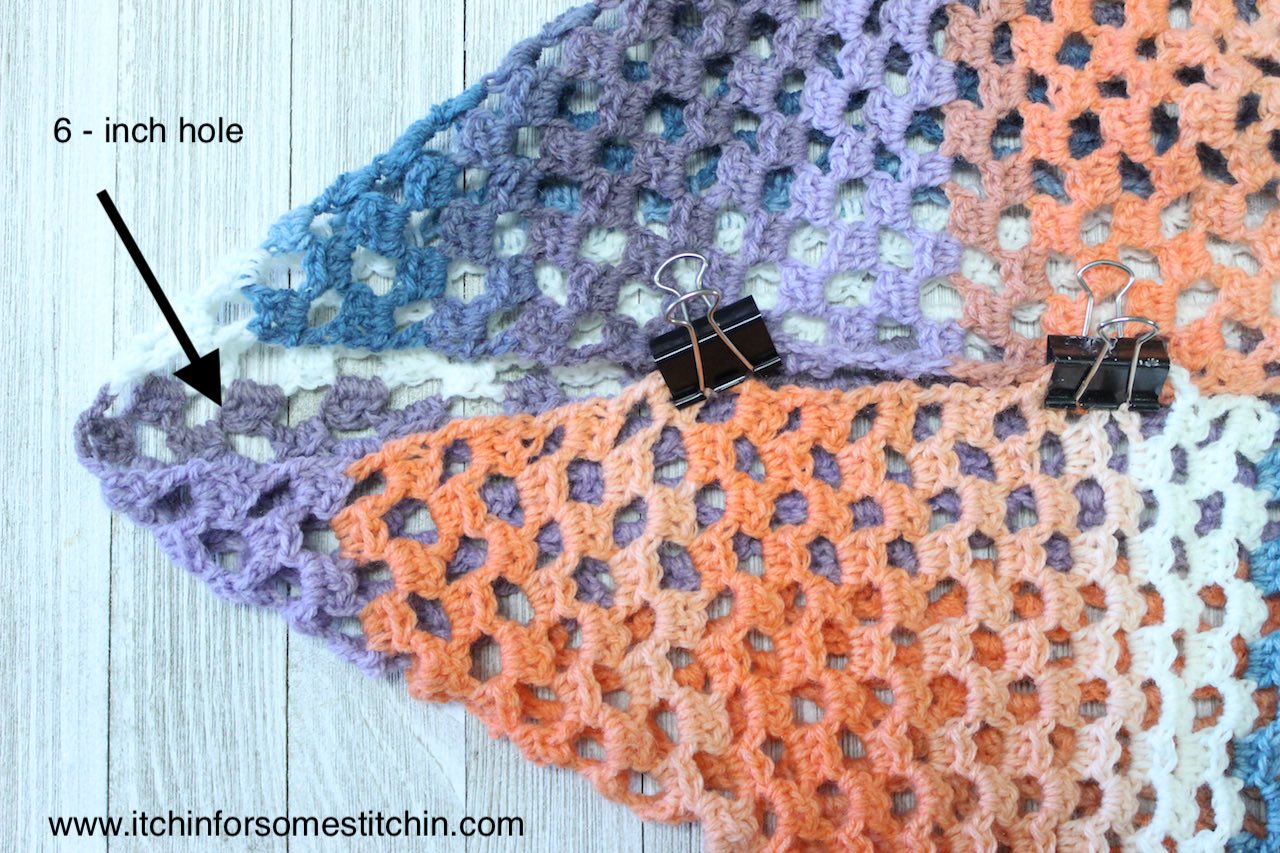
- Slip-stitch the arms together leaving about a 6-inch hole for the arms. See photo D.
NOTE: I used binder clips to hold my arms together while I seamed the edges, but I am sure you have something a little fancier. 😉
4. Bind Off and Weave in ends
Collar:
- Attach new yarn with a slip-stitch wherever you like. I choose to do it at the seam of the right arm.
- Slip-stitch all the way around the edge of the kimono cardigan until you end up back at the original slip-stitch that you made when joining the new yarn.
- Ch1, turn work, sc around the entire kimono edge until you get back to the start.
- Ch1, turn work, slip-stitch around the entire kimono edge until you get back to the start.
- Repeat steps 3-4 until the collar measures approximately 2 – inches long or until your desired length.
- Bind off and weave in ends.
Additional Notes: The collar will roll in on itself, making it about 1- inch in length. If you would prefer it to be flat, you will need to block it. Alternatively, you could skip the ribbing effect, and simply slp st or sc only around the collar until it is to your liking. I have found that this often keeps the collar from rolling up.
Lastly, weave in all tails. Want to learn how to weave in ends so they don’t come out? See How to Bind Off and Weave in Ends in Crochet.
There, now don’t you feel like a Bohemian Goddess? I know I do in this gorgeous kimono cardigan! 🙂
Interested in more stash buster and/or summer projects?
Check out:
11 Refreshingly Fun & Fashionable Summer Cardigans
15 Stash-buster Projects to Keep You Busy While “Staying in”
29 Quick Crochet Projects You Can Do In a Weekend or Less!
31 Quick and Easy Crochet Projects That’ll Keep Your Hook a Hookin’!
33 Easy Crochet Patterns That Will Bust Your Stash!
Thank you for coming to my blog! By sharing my content and/or making a purchase you are making it possible for me to continue producing and sharing free content for everyone to enjoy. I sincerely appreciate your support!
Until next time… Happy Crocheting!


Please Share!
Brandy Decker
Thursday 7th of May 2020
I understand that to make it bigger you need to measure to the arm length of the wearer. But what is the stitch count multiple? Yes i wanna make it bigger. But it needs a specific amount of stitches to work correctly right? Can you please let me know the multiple count.
Itchin4Stitchin
Friday 8th of May 2020
Hi Brandy,
I didn't design this with a stitch count multiple. If you use the gauge you can figure out what you need. For instance - if you need to extend the arm length 4 inches then you would need to add 3 more clusters. Does that make sense?
If not, email me at [email protected] so I can better assist you.
Thanks so much,
RaeLynn
Mary
Thursday 13th of February 2020
Debbie, You had mentioned that for larger sizes to see additional notes but I didn't see any additional notes in reference to the the larger sizes, you had said the model was 4'8" and the size is a medium I'm 5'10" and would need a extra large how would I adjust the pattern
Itchin4Stitchin
Thursday 13th of February 2020
Hi Mary,
Thank you so much for your comment! I didn't realize I had two "Additional Notes" sections. I have deleted the second section and moved the adjustment notes to the top so they should be easy to find. To adjust width, you simply need to measure from arm to arm and create a foundation chain to cover that width. For length, simply continue the pattern repeats until the length of the kimono reaches the length you desire.
Let me know if you have any other issues!
Best wishes,
RaeLynn
Liz Shackelford
Monday 30th of September 2019
Any kind of yarn can be used?
Itchin4Stitchin
Monday 30th of September 2019
Hi Liz,
I think any lightweight 3 yarn should be fine. Lion Brand Mandala will give you some beautiful striping.
You could use medium 4 as well, but it will be heavier & thicker - which may make the project overall slightly larger.
Does that make sense?
Sincerely,
RaeLynn
Debbie Closner
Saturday 9th of February 2019
It is so easy and fun and beautiful !!!!!
Itchin4Stitchin
Sunday 10th of February 2019
Hi Debbie,
Thank you so much! I am so glad you enjoyed the pattern. I would absolutely love to see photos of your cardigan!
If you want you can share them in my Facebook group at https://www.facebook.com/groups/ItchinforsomeStitchin.Crochet/ or even on my business page at https://www.facebook.com/itchinforsomestitchin/
:)
Best wishes,
RaeLynn