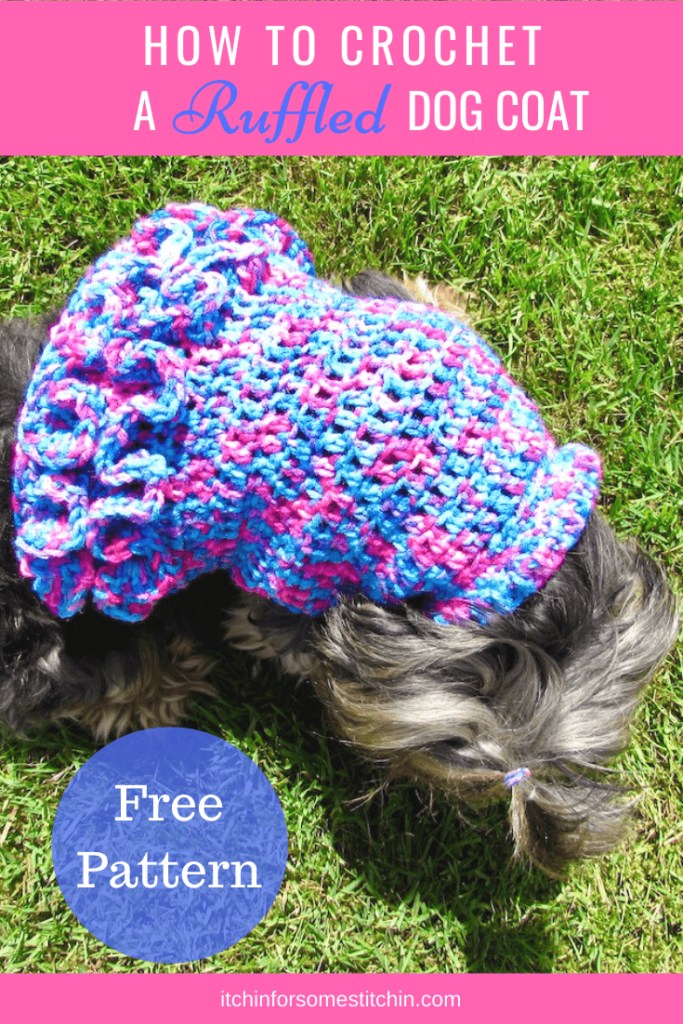
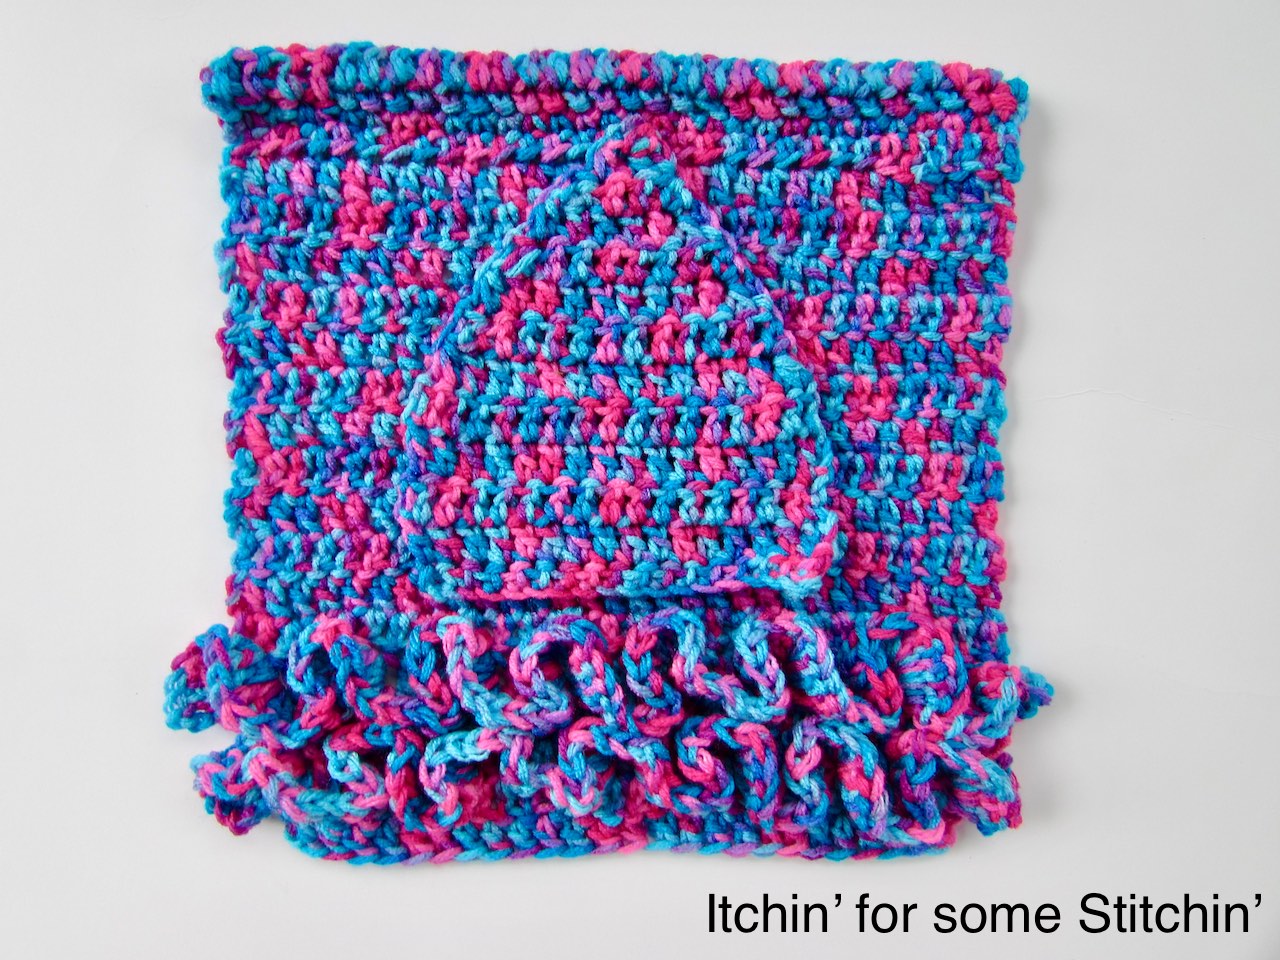
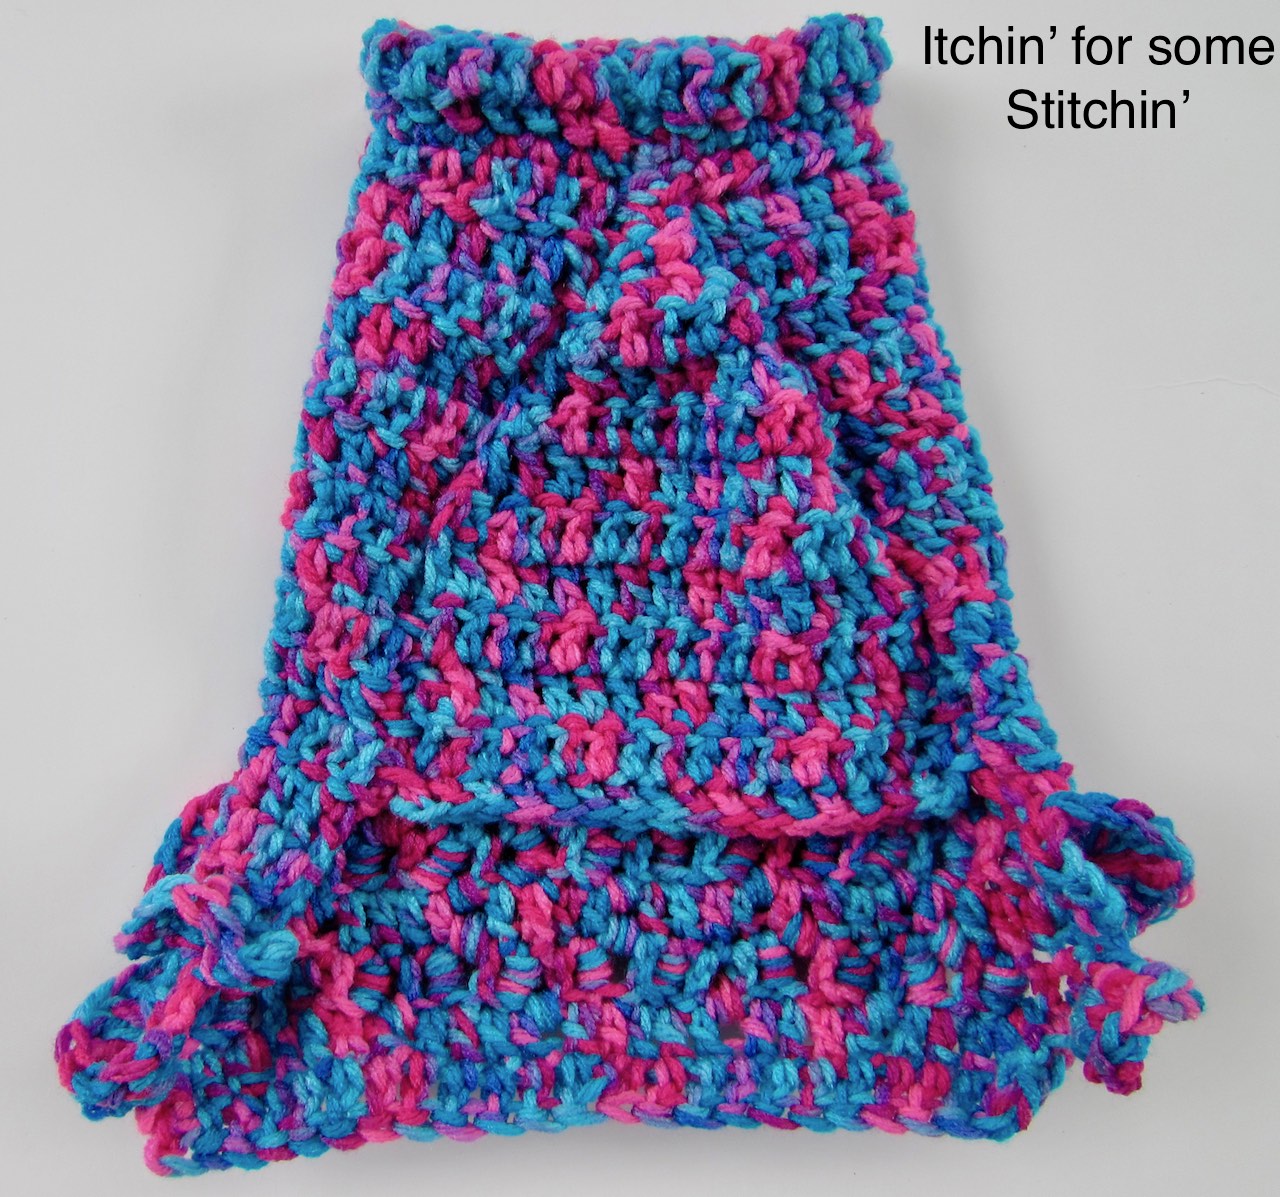
This crochet small dog sweater with ruffles adds a playful twist to a classic, cozy fit for tiny pups.

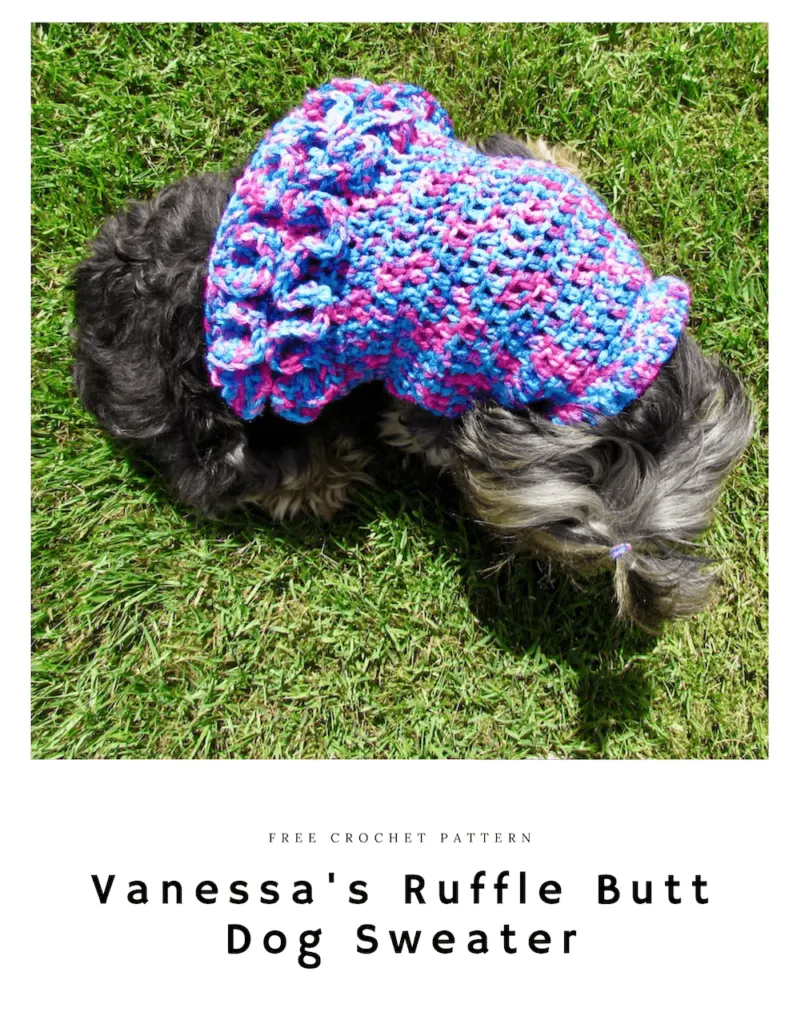
This crochet small dog sweater with ruffles combines warmth, structure, and a sweet decorative trim designed especially for tiny breeds.
If you love the clean construction of the classic small dog sweater but want something with a little extra personality, this ruffled version builds on that same reliable fit with a soft, feminine finish.
Designed for small dogs who need both comfort and coverage, this pattern walks you through the sweater construction, then shows you exactly how to add the ruffle trim for a polished final look.
Whether you’re crocheting for a Yorkie, Chihuahua, or other small pup, this design keeps the shaping simple while giving your finished sweater a touch of charm.
The Story Behind the Ruffles
This crochet small dog sweater with ruffles began as a variation of my original small dog sweater design — a simple, structured fit I created years ago for my two Yorkshire Terriers, Jack and Jake.
That original sweater became a staple. It was practical, cozy, and easy to customize.
Then came Vanessa — lovingly known as “Nessa.” She needed something softer. Sweeter. A sweater with a little extra personality.
The ruffle trim was added to that same trusted base construction, creating a small dog sweater with ruffles that keeps the reliable fit while adding a playful finish.
Now, you might be a little nervous about the ruffles. Don’t be!
They are actually super easy to do.
Once you finish your first row, you’ll be amazed at how little effort it took to make these fabulous embellishments!
If you’ve seen this design on Pinterest under the name “Nessa’s Ruffle Butt Dog Sweater,” this is the same pattern — now updated and streamlined to align with the original Quick & Easy Small Dog Sweater that serves as its foundation.
Prefer a clean, classic version without the decorative trim? The Quick & Easy Small Dog Sweater uses the same base construction without the ruffle detail.
Where to Go Next With This Pattern
This sweater can be enjoyed as a simple one-off project, or used as a starting point for deeper exploration — depending on how you like to crochet.
At a Glance

Materials
To make this Crochet Small Dog Sweater with Ruffles, you will need:
Recommended Yarn:
- Crochet Hook: Size J/10 (6.0 mm)
- Yarn: Red Heart Super Saver – Bon Bon (variegated print)
(100% Acrylic)
#4 Medium / Worsted Weight
5 oz / 141 g (236 yards per skein)
Total yardage required: 100–160 yards
Yarn Alternatives (Worsted Weight #4):
This crochet small dog sweater with ruffles uses a #4 medium worsted-weight yarn for durability and structure while still allowing the ruffle trim to hold its shape beautifully.
Any sturdy, washable worsted weight yarn will work well. Because this is a dog sweater, durability and easy care are especially important.
Acrylic Options (Durable & Washable)
- Red Heart Soft
- Lion Brand Heartland
- Hobby Lobby I Love This Yarn
- Paintbox Simply Aran
Wool Blend Options (Warmer & Softer)
- Lion Brand Wool-Ease
- Knit Picks Brava Worsted
- Cascade 220 Superwash
You can substitute any #4 medium worsted weight yarn that matches gauge.
Optional additions you may want to include:
Yardage Requirements
One of the best things about this crochet small dog sweater with ruffles is that it uses a relatively modest amount of yarn while still creating a structured, cozy finished sweater.
For this pattern, you will need:
Approximately 100–160 yards total
(depending on size and any length adjustments)
The original sample was made using Red Heart Super Saver (236 yards per skein), so one skein is more than sufficient for either size.
Because yardage can vary slightly based on gauge, tension, and whether you add extra rows for length, it’s always wise to have a little extra yarn available.
If you plan to extend the back length or add additional ruffle rows, additional yardage will be required.
Skill level
Level of Difficulty – Advanced Beginner


Gauge / Tension for the Small Dog Sweater with Ruffles
Because this crochet small dog sweater with ruffle trim is written specifically for small breeds, gauge plays an important role in achieving the intended fit and proportions.
13 stitches and 4 rows = 4 inches in double crochet
- Size Small: J/10 (6.0 mm) hook
To measure your gauge:
- Crochet a swatch using double crochet.
- Measure 4 inches across the center of your swatch.
- Measure 4 inches vertically.
If your stitch count is higher than 13 across, your fabric is too tight — try going up a hook size.
If your stitch count is lower than 13, your fabric is too loose — try going down a hook size.
Since small dog sweaters have less margin for size variation, matching gauge helps maintain proper chest width, back length, and overall balance — especially once the ruffles are added.
Abbreviations
Pattern is written in Standard US crochet terms.
*Click on abbreviation names for tutorials
Special Stitches and Techniques:
Back Post Only (BPO) – Work the stitch around the post of the stitch from the previous row instead of under the top two loops. This creates texture and stretch, ideal for ribbing and structure in the sweater.
Single crochet 2 together (Sc2tog) – Insert hook into next stitch, pull up a loop. Insert hook into the following stitch, pull up a loop. Yarn over and pull through all loops on the hook to decrease by one stitch.
Pattern Instructions – Small Dog Crochet Sweater with Ruffle Trim
Follow the step-by-step instructions below to crochet your own small dog sweater with ruffles.
This design uses the same trusted base construction as the original small dog sweater, with the addition of a decorative ruffle trim worked directly onto the back panel. If you’re comfortable with basic stitches like double crochet and simple decreases, you’ll find this project approachable and rewarding.
Small Dog Sweater Construction
This crochet small dog sweater with ruffles is worked in separate flat sections and then assembled for a structured, comfortable fit.
The sweater begins with the collar and back panel, worked in rows from neckline to tail. Simple shaping creates a gentle taper toward the lower back.
Next, the chest panel is worked separately and shaped to fit comfortably along the belly. The pieces are then seamed together, leaving openings for the legs.
Once the base sweater is complete, the ruffle trim is added directly onto the back panel.
Want Extra Help?
The ad-free printable PDF includes detailed construction photos and a clean, easy-to-print layout. It’s perfect if you prefer to work offline or want a visual reference while crocheting.
Finished Dimensions
Using the recommended yarn and hook size, the finished sweater measures approximately:
Back Length: 9.5″ from neck to end
Chest Length: 6″ from neck to belly
All measurements are taken flat and are approximate. Because tension varies from crocheter to crocheter, checking gauge and measuring your dog before beginning is strongly recommended.
Plan Your Dog Sweater Fit First
Before you start crocheting, it helps to take a few quick measurements of your dog so the sweater fits comfortably.
This sweater was originally designed for my Yorkies, Jack and Jake, but small dogs can vary quite a bit in chest width, back length, and neck size.
If you’d like help organizing those measurements before you begin, download my Dog Sweater Fit Planner.
It walks you through:
• The key measurements to take
• How to record them before starting your project
• Notes for adjusting sweater length or width if needed
You can grab the free planner here and keep it handy while you crochet.
Slightly Larger Small Dog Option (10–12 lbs)
Over the years, several readers have asked how to make this crochet dog sweater with ruffles just slightly larger — perfect for pups who fall between 10–12 pounds.
A reader named Connie generously shared her adjustments after making this sweater for her dog, Ren. With just a few simple changes, she was able to create a roomier fit while keeping the original construction and ruffle placement intact.
If your dog is just a bit larger than the standard small size, you can try the following:
• Use a K (6.5 mm) hook instead of a J (6.0 mm)
• Begin with Chain 33 instead of Chain 31
• For a slightly shorter back, you may stop body repeats at Row 16 instead of Row 18
• Follow the same shaping and ruffle instructions as written


These minor adjustments will create a bit more width and flexibility without altering the overall look of the sweater.
If you need a more customized fit — or want to confidently scale this design for dogs outside the small-size range — I teach a complete dog sweater scaling system inside the Studio, where we break down measurements, stitch ratios, and construction logic step by step.
But for many 10–12 lb pups, these small adjustments are all you need.
Notes:
Base Sweater Pattern
Collar
The collar is worked first and forms the foundation of your sweater. It is created as a simple rectangle, then folded and seamed to form a soft, stretchy neckline.
Start at the neckline and work back and forth in rows.
Follow the row instructions as written to create your collar panel.
When complete:
- Do not bind off.
- Fold the collar in half lengthwise, aligning edges.
- Single crochet (sc) through both layers across the bottom edge to seal the collar.
- Continue directly into the body of the sweater as instructed.
This folded construction creates a thicker, more structured neckline while maintaining stretch and comfort.
Visual Learner?
The ad-free PDF includes detailed, step-by-step photos of the collar construction and fold-and-seam process, along with full assembly guidance.
You can find it in:
Back Panel
Note: Sweater is worked flat, beginning at the neckline and working toward the tail.
Chain 31
Row 1:
DC in 2nd ch from hook, working in the back post only (BPO), DC across. [30 sts]
Row 2:
Ch 2, turn. DC in first stitch and in each stitch across. [30 sts]
Row 3:
Repeat Row 2. [30 sts]
Collar Finish
Do not fasten off.
Fold the collar in half lengthwise. Working through both layers, single crochet evenly across the bottom edge to join and seal the collar.
Before continuing, you can also adjust the neckline fit if needed. This guide explains how to customize neck openings in crochet dog sweaters for a tighter, looser, or more comfortable fit.
Do not fasten off. Continue directly to Row 4.
Row 4:
Ch 2, turn. DC in each stitch across. [30 sts]
Rows 5–18:
Repeat Row 4. [30 sts]
Shaping the Back
Row 19:
Ch 2, turn. SC2tog over first 2 sts, DC across to last 2 sts, SC2tog over last 2 sts. [28 sts]
Each SC2tog decreases the stitch count by 1. You have decreased twice in this row.
Row 20:
Repeat Row 19. [26 sts]
Row 21:
Ch 2, turn. DC in next 12 sts, SC2tog, DC in last 12 sts. [24 sts]

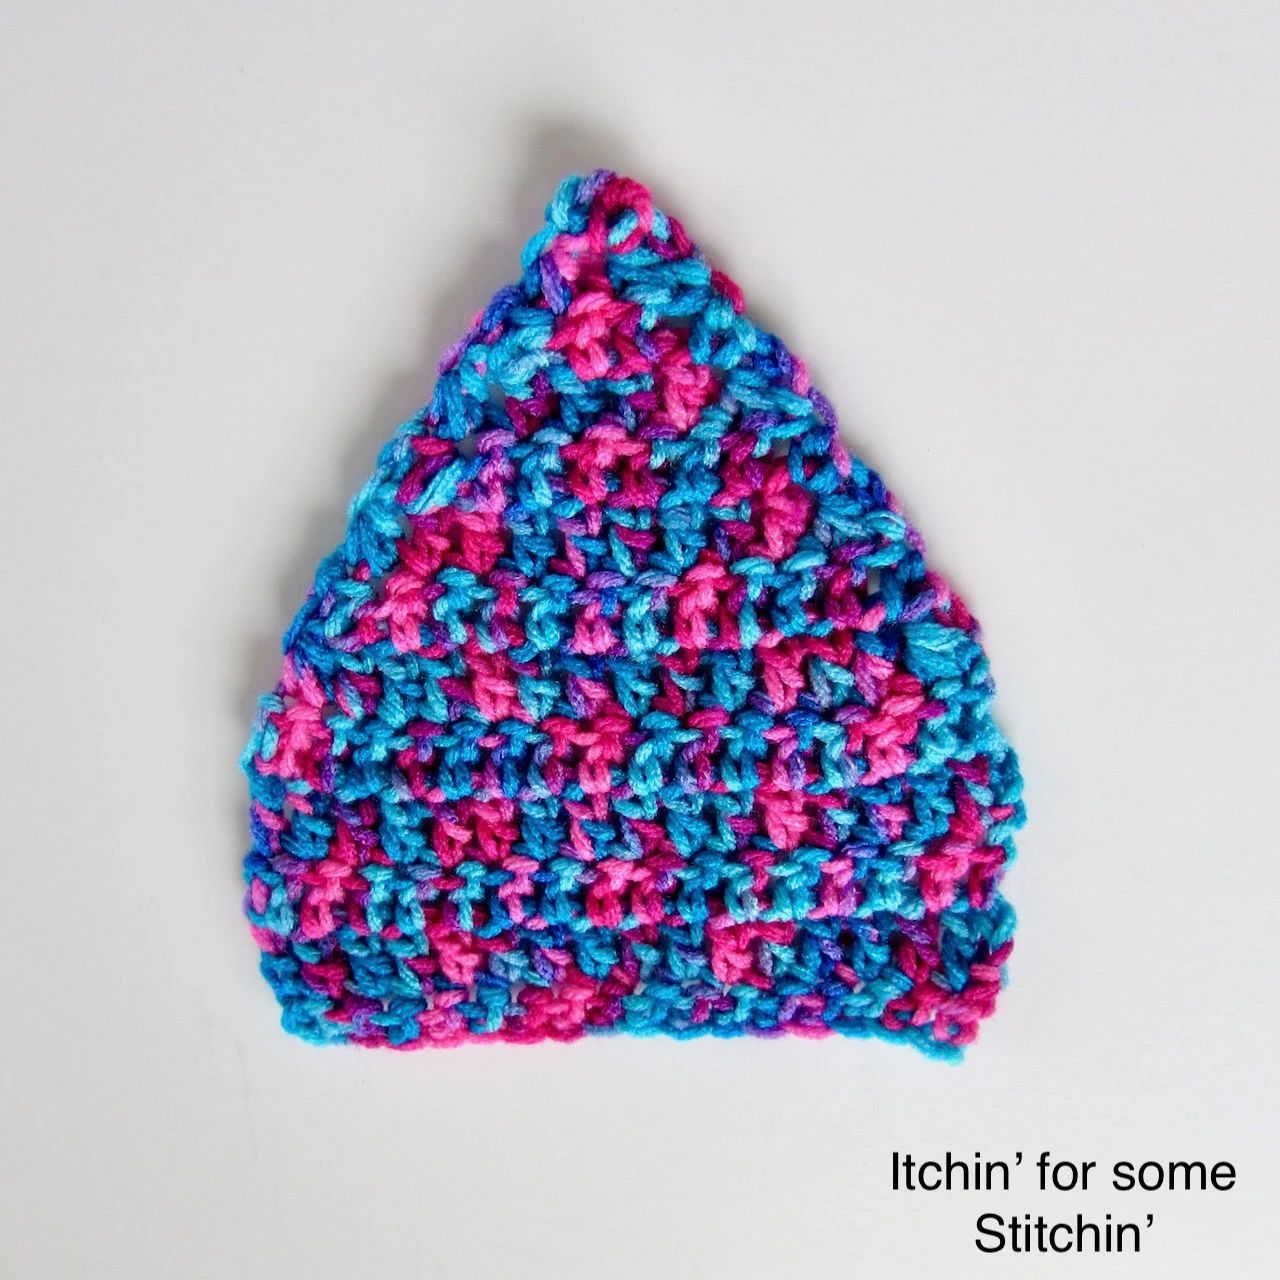
Chest Panel
Note: Chest is worked flat, beginning at the belly edge and shaping upward toward the neckline.
Chain 18
Row 1:
DC in 2nd ch from hook and in each ch across. [17 sts]
Rows 2–5:
Ch 2, turn. DC in each stitch across. [17 sts]
Shaping the Chest
Rows 6–13:
Ch 2, turn. SC2tog over first 2 sts, DC across to last 2 sts, SC2tog over last 2 sts.
You will decrease by 2 stitches in each of these rows (one at each end).
Row 14:
If 2 stitches remain, SC2tog to close.
Fasten off and weave in ends.
The finished chest piece forms a tapered triangle that fits comfortably along the belly and chest.

Adding the Ruffle Trim
Before attaching the chest piece, set it aside. The ruffles are added directly to the back panel first.
Although they look decorative and layered, the ruffles are worked using simple double crochet stitches in a serpentine pattern across the back of the sweater.
If you prefer visual guidance, you can follow my full step-by-step tutorial (including video):
This tutorial demonstrates:
• Where to attach the yarn
• How to work around double crochet posts
• How to create the alternating 3 dc / 5 dc pattern
• How to space and layer the ruffle rows
Now let’s add the ruffles.
How to Crochet the Ruffles
You will be working back and forth across the back panel in a gentle serpentine pattern.
First Row of Ruffles
Step One
With the back piece facing right side up, count 5 rows up from the bottom of the back piece.
On the right-hand side of the 5th row, attach new yarn to the first double crochet (dc) using a slip stitch (slp st).
Step Two
Work 3 double crochets (dc) around that first double crochet of the back piece.
Step Three
Chain 1.
Moving left, work 5 dc around the second double crochet of the back piece.
Step Four
Chain 1.
Skip the next double crochet of the back piece.
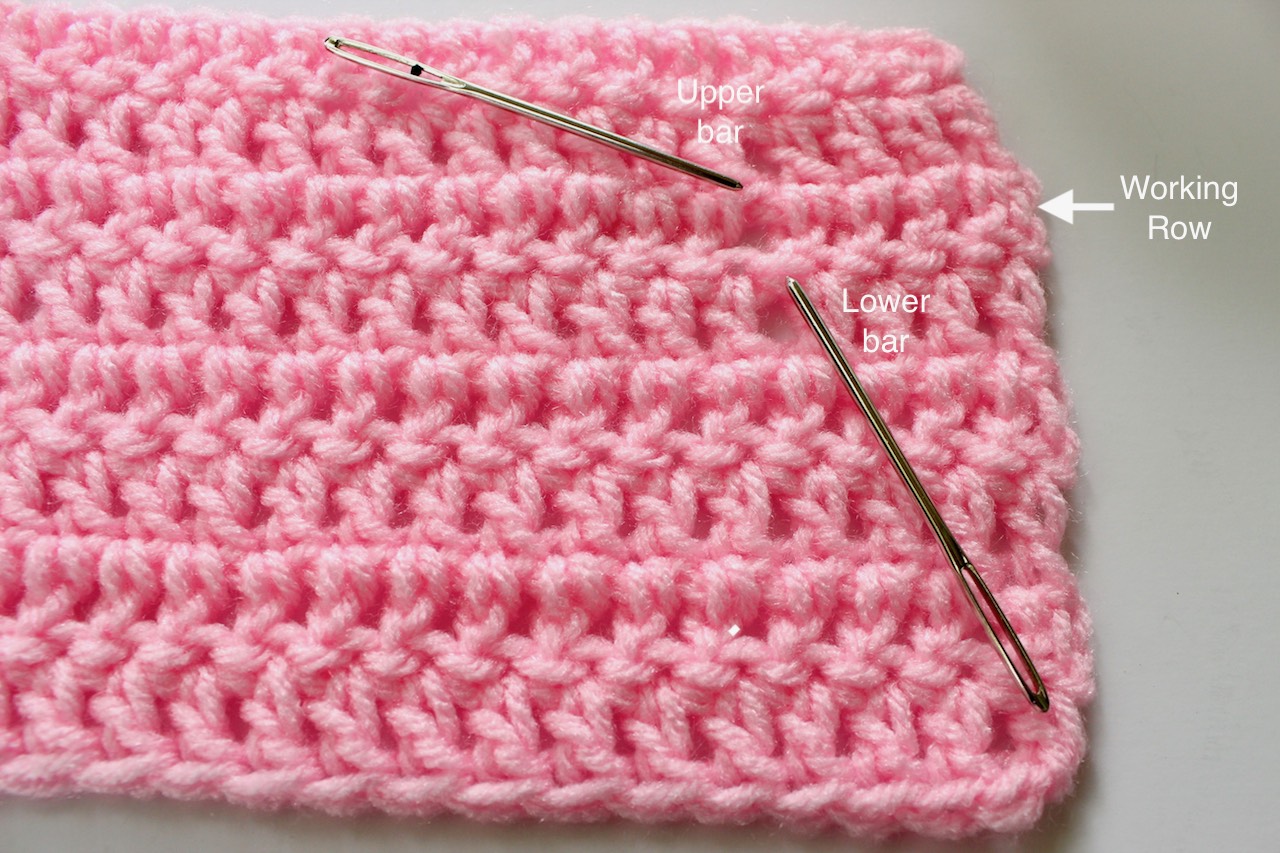
Locate the small horizontal bar between the two double crochet stitches in the row below.
Work 3 dc around that bar.
Step Five
Chain 1.
Skip the next double crochet.
Work 5 dc around the next double crochet of the back piece.
Step Six
Chain 1.
Locate the horizontal bar between the two double crochet stitches in the row above.
Work 3 dc around that bar.
Step Seven
Chain 1.
Skip the next double crochet.
Work 5 dc around the next double crochet.
Step Eight
Repeat Steps Four through Seven, moving left across the back panel until you reach the opposite side.
You should finish with 5 dc around the final double crochet on the left edge.
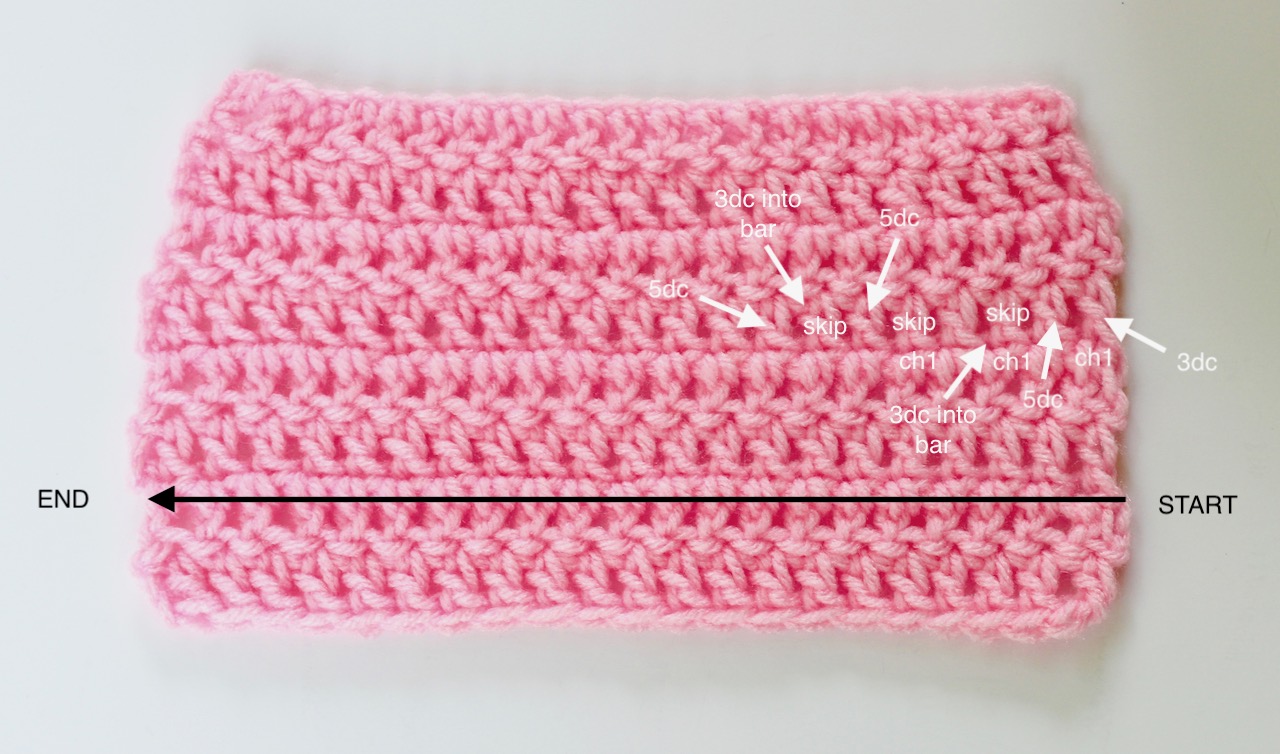
Bind off.
You have now completed one row of ruffles.
Second Row of Ruffles
Step Nine
With the back piece facing right side up, count 3 rows up from the bottom.
Attach new yarn to the first double crochet on the right-hand side using a slip stitch.
There should be one full row (Row 4 from the bottom) between your two ruffle rows.
Step Ten
Repeat Steps Two through Eight to complete the second row of ruffles.
Weave in ends.
Assembly
Once the ruffles are complete, you can assemble the sweater.
Need visual guidance? The ad-free PDF includes a detailed, step-by-step photo tutorial for assembly , and it’s available in my shop and inside The Crochet Conservatory.
Step One – Position the Chest Piece
Place the chest piece centered between the two back edges, right sides together.
The ruffles should be facing upward.
The pointed tip of the chest piece should sit at the base of the neckline, naturally creating a slight opening at the neck.
Step Two – Seam the Chest Piece
Fold one side of the back panel down to align with the edge of the chest piece.
Using slip stitch (slp st), seam the chest piece to the back panel.
Leave approximately 2 inches open on each side for the leg openings.
Need Help With Fit?
If you’d like extra help with sizing and fit adjustments, you can download my free Dog Sweater Fit Planner — it walks you through measurements, customization notes, and planning adjustments before you seam.
On my dogs, the leg openings began about 5–6 inches down from the neckline.
However, check placement against your own dog before fully seaming.
Fold the other side of the back panel inward and seam, again leaving space for the leg opening.
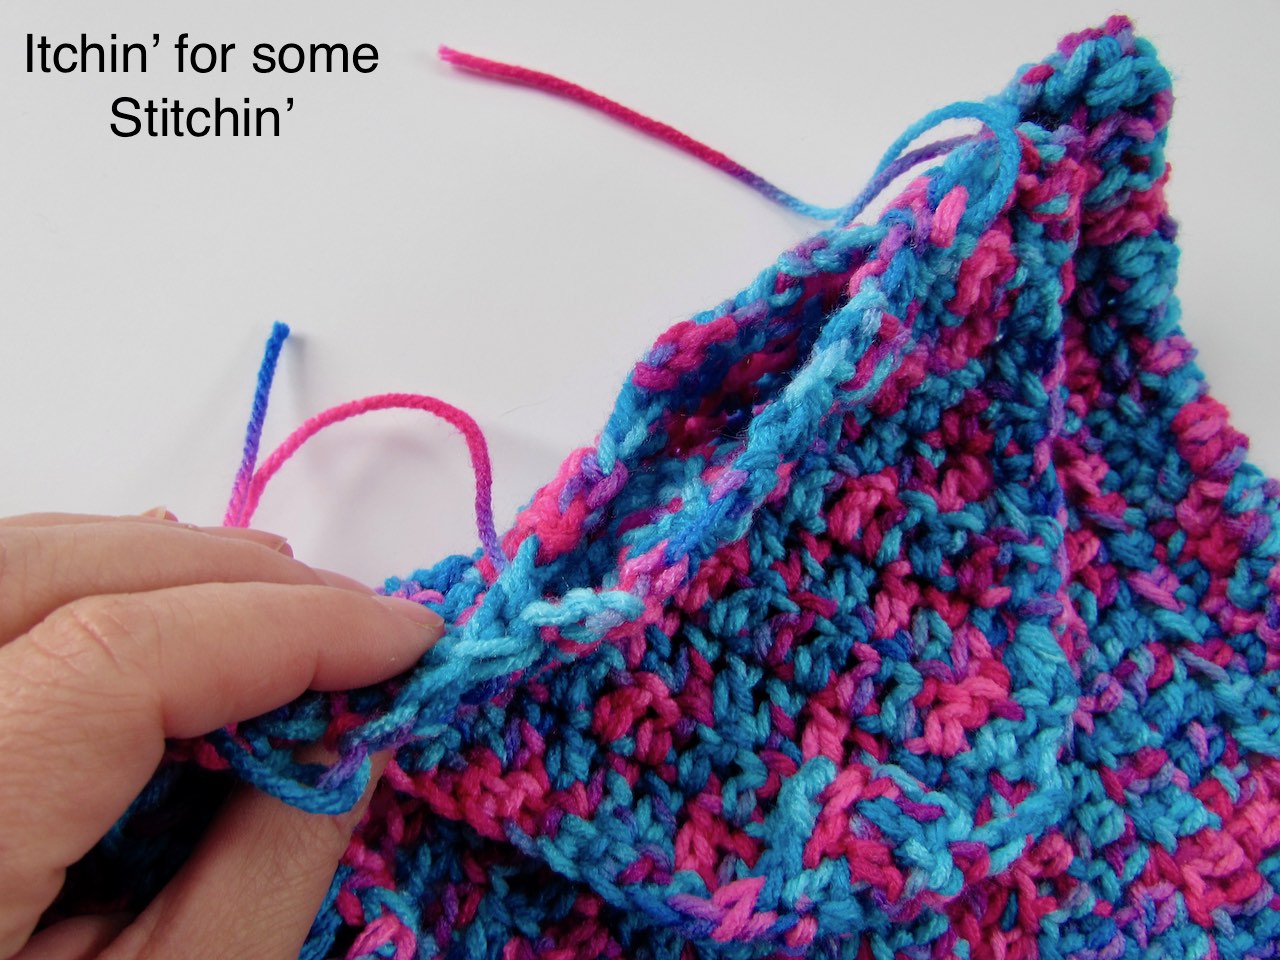
Step Three – Close the Neck Opening
Use slip stitch to seam the slight opening at the neckline.
Step Four – Finish
Bind off and weave in all ends.
Turn the sweater right-side out.
Your crochet small dog sweater with ruffles is now complete.
Love This Pattern? Keep It Forever.
Download the ad-free printable version and crochet with ease — no scrolling needed. PDF includes full step-by-step photo tutorial, including the ruffles.
You Did It!
See? The ruffles weren’t nearly as complicated as they looked.
Once you work that first row and see the fabric begin to ripple, something clicks. It’s simple shaping, simple stitches — just arranged with intention.
And that’s the beauty of this design.
The base sweater gives you structure.
The ruffles give you personality.
Now your little fur baby has something that feels both cozy and a little dramatic in the best possible way.
Make It Yours
Play with color.
Adjust the length.
Try subtle ruffles… or go full flourish.
If you’d like help adjusting fit before adding details like ruffles, be sure to grab the Dog Sweater Fit Planner. It walks you through measurements and customization notes so your sweater fits beautifully before you seam.
I’d Love to See Your Version
If you share your finished sweater on Instagram or Facebook, tag @itchinforsomestitchin and use:
#IFSS_RuffleButtDogSweater
#itchinforsomestitchin
It’s always a joy to see how each of you brings your own touch to these designs.
And, if you enjoy quiet encouragement and shared creativity, you’re always welcome in our crochet community.
More Small Dog Sweaters to Love


Thank you
I sincerely appreciate you visiting my blog! By sharing my content and/or making a purchase you are making it possible for me to continue producing and sharing free content for everyone to enjoy. Your support is amazing!
Sugandh
Saturday 13th of January 2024
Hi, I noticed in some of the comments that you have a large version of this pattern. I would love to try that out, been wanting to make one of these for my dog
Sugandh
Thursday 5th of December 2024
@Itchin4Stitchin,
Hi RaeLynn,
That would be amazing! I'm happy to try it out, it would be far better than be trying to size up a pattern 😅 I'd be happy to try it out if you end up finding it. What's the best way to send you my email?
Thanks, Sugandh
Itchin4Stitchin
Monday 12th of February 2024
Hi Sugandh,
I do have a large version that I have never had tested nor do I have a large dog to try it out on! Let me dig through my files and see if I can find it. If I can, I'd be happy to email it to you - with the stipulation that it may not be accurate - as I said, it is completely untested.
Sincerely,
RaeLynn
Ellie
Tuesday 11th of May 2021
Made this for my Shih Tzu, and she looks very fancy in it. Shame I can’t post a picture here.
Itchin4Stitchin
Friday 14th of May 2021
Hi Ellie,
I know I really wish you could attach photos here! If you want to email it to me or contact me with a photo on social media that would be great! My email is [email protected] and you can most readily reach me on Instagram @itchinforsomestitchin. I'd love to see it!
Best wishes,
RaeLynn
Kari
Wednesday 13th of January 2021
Hi RaeLynn!
I would love to test the large dog pattern! I have never tested a pattern before, so please just let me know what all I need to do!
Itchin4Stitchin
Friday 15th of January 2021
Hi Kari,
That's wonderful! Thank you so much! I'll send you and email. :)
Best wishes,
RaeLynn
Kari
Friday 1st of January 2021
Do your happen to have this pattern for a large dog? I saw the medium pattern, but I have a 65 lb Cur mix, and a 70 lb golden retriever mix.
Itchin4Stitchin
Monday 4th of January 2021
Hi Kari,
I have made a large dog version, but it has not been tested by pattern testers yet. As soon as it is I will get it out. If you are interested in testing it, please let me know.
Best wishes,
RaeLynn
Lois Harrison
Tuesday 22nd of December 2020
Do you have a video tutorial? I am a visual learner as I am sure many others are too. Having a video to be able to back up, several times if necessary, is always helpful.
Itchin4Stitchin
Tuesday 22nd of December 2020
Hi Lois,
I actually did film a tutorial for this pattern, but it ended up filming incorrectly and I have to redo. I will get it out and attach it to this post as soon as I can!
Best wishes,
RaeLynn