
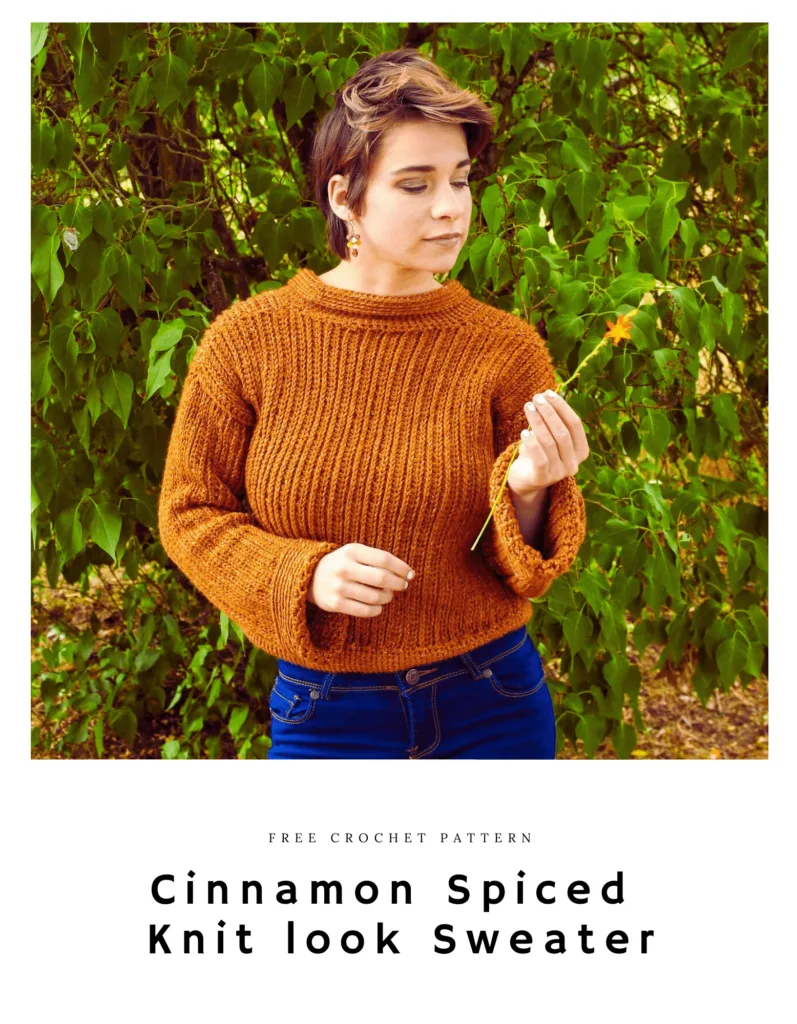
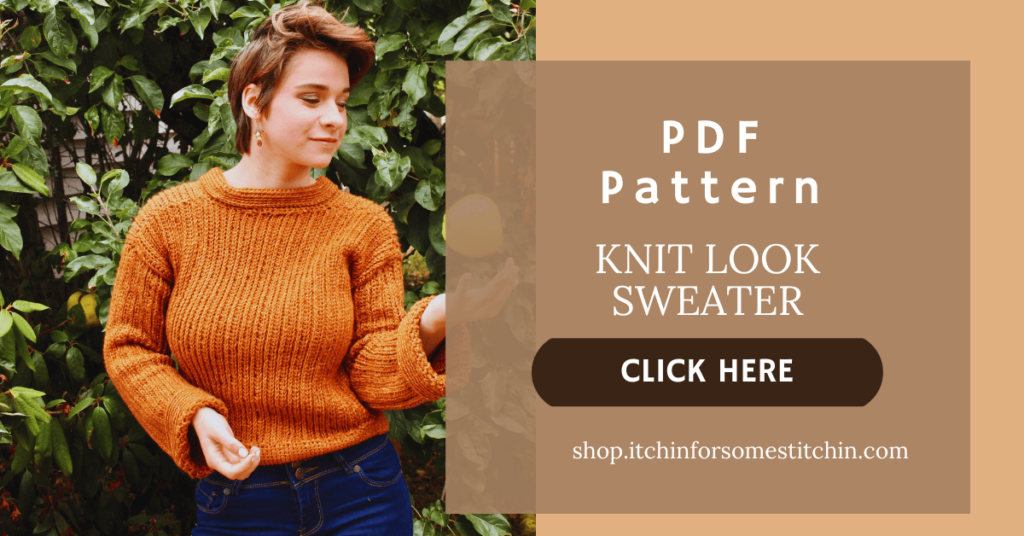
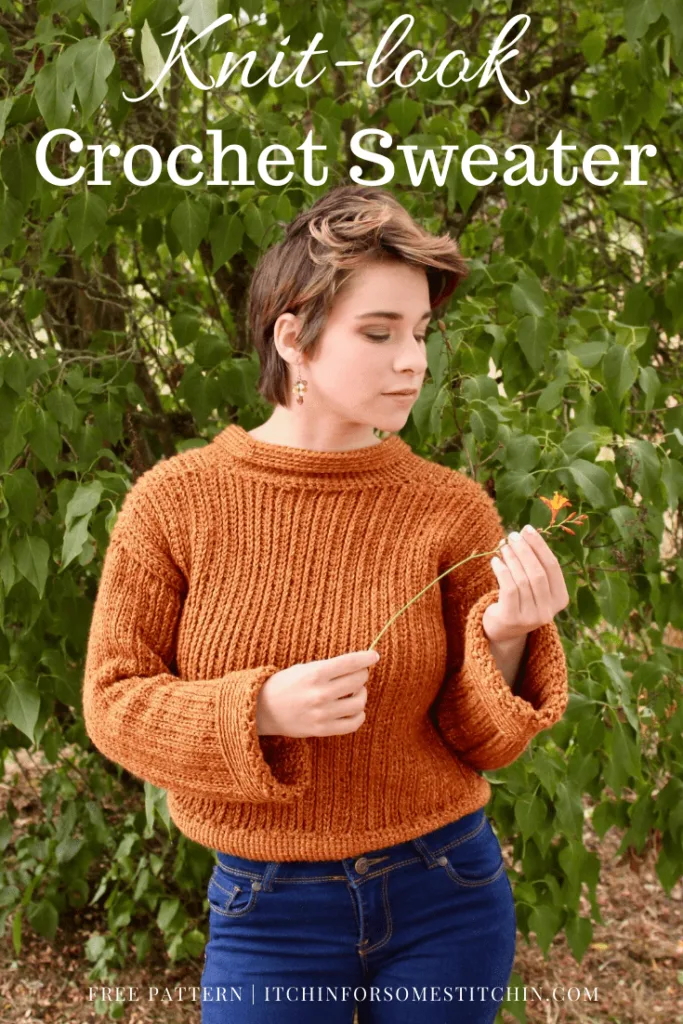
Get ready to cozy up this season with our knit-look crochet Cinnamon Spiced Ribbed Sweater pattern. This beginner-friendly project is a perfect blend of style and comfort, and we can’t wait to share it with you. Despite its simplicity, this design has been a labor of love, and we’re thrilled to finally unveil it. So, whether you’re an experienced crocheter or just starting, this pattern is a must-try!
Introducing the Cinnamon Spiced Sweater – Your Cozy Crochet Project!
Last fall, I was on a quest for the perfect knit sweater. I love the look of knitted fabric and wanted something stylish and cozy to wear throughout the coming winter.
The problem?
I hadn’t picked up my knitting needles in a while and I knew I would need a refresher project before tackling a knit sweater.
Yet, I didn’t want to wait. I wanted to get started on my sweater right away.
Fortunately, I happened to stumble upon a lesser-known crochet stitch that mimicked the look of knitting.
It was a game-changer!
Yarn Details: It’s All About the Yarn Baby!
I chose Lion Brand Jeans yarn for its softness and ease of shaping, ensuring maximum comfort for your winter wardrobe.
So, I grabbed a skein of yarn, a hook and this sophisticated crochet cropped sweater
Btw, I had never worked with Lion Brand Jeans yarn before, but I end up loving it!
It is literally the perfect yarn for this pattern!
Here are some key reasons Lion Brand Jeans is the perfect yarn for the Cinnamon Spiced Knit Look Sweater:
- Softness and Comfort: Lion Brand Jeans yarn is renowned for its exceptional softness. When creating a cozy sweater, comfort is key, and this yarn provides a gentle touch against your skin, making it perfect for long hours of wear.
- Easy Shaping: This yarn is known for its ease of shaping. Whether you’re crafting the body, sleeves, or collar of your sweater, Lion Brand Jeans yarn allows for smooth and precise shaping, ensuring your sweater fits beautifully.
- Drape and Flow: Lion Brand Jeans yarn offers a lovely drape and flow to your finished project. It enhances the natural movement of the sweater, giving it an elegant and flattering look when worn.
- Stitch Definition: The yarn’s quality allows for excellent stitch definition. Your intricate crochet stitches, including the ribbed effect, will be clearly visible, adding to the sweater’s overall appeal.
- Color Variety: Lion Brand Jeans yarn comes in a wide range of colors, giving you plenty of options to choose from. You can select the shade that complements your style or create multiple sweaters in various colors.
- Durability: Crafted from high-quality acrylic fiber, Lion Brand Jeans yarn offers durability that stands the test of time. Your Cinnamon Spiced Ribbed Sweater will remain a wardrobe favorite for seasons to come.
- Washability: Practicality is essential for everyday wear. Lion Brand Jeans yarn is machine washable and easy to care for, making it ideal for a sweater that sees regular use.
- Versatility: Beyond sweaters, Lion Brand Jeans yarn is versatile and suitable for various crochet and knitting projects. You can explore a wide range of crafting possibilities with this yarn.
- Affordability: Despite its exceptional quality, Lion Brand Jeans yarn is an affordable option for crocheters. You can create a luxurious-looking sweater without breaking the bank.
- Positive Feedback: The Cinnamon Spiced Sweater, crafted with Lion Brand Jeans yarn, has received positive feedback from crocheters, including winning awards at creative arts festivals. This success showcases the yarn’s suitability for this project.
For these reasons, combined with the ease of working with Lion Brand Jeans yarn, it becomes an ideal choice for your Cinnamon Spiced Ribbed Sweater, ensuring your finished project is not only stylish but also comfortable and durable.
Crafting the Perfect “Knit-Look” Sweater: Step-by-Step Instructions
**THIS IS AN ORIGINAL PATTERN. Please see my Copyright Statement for details.
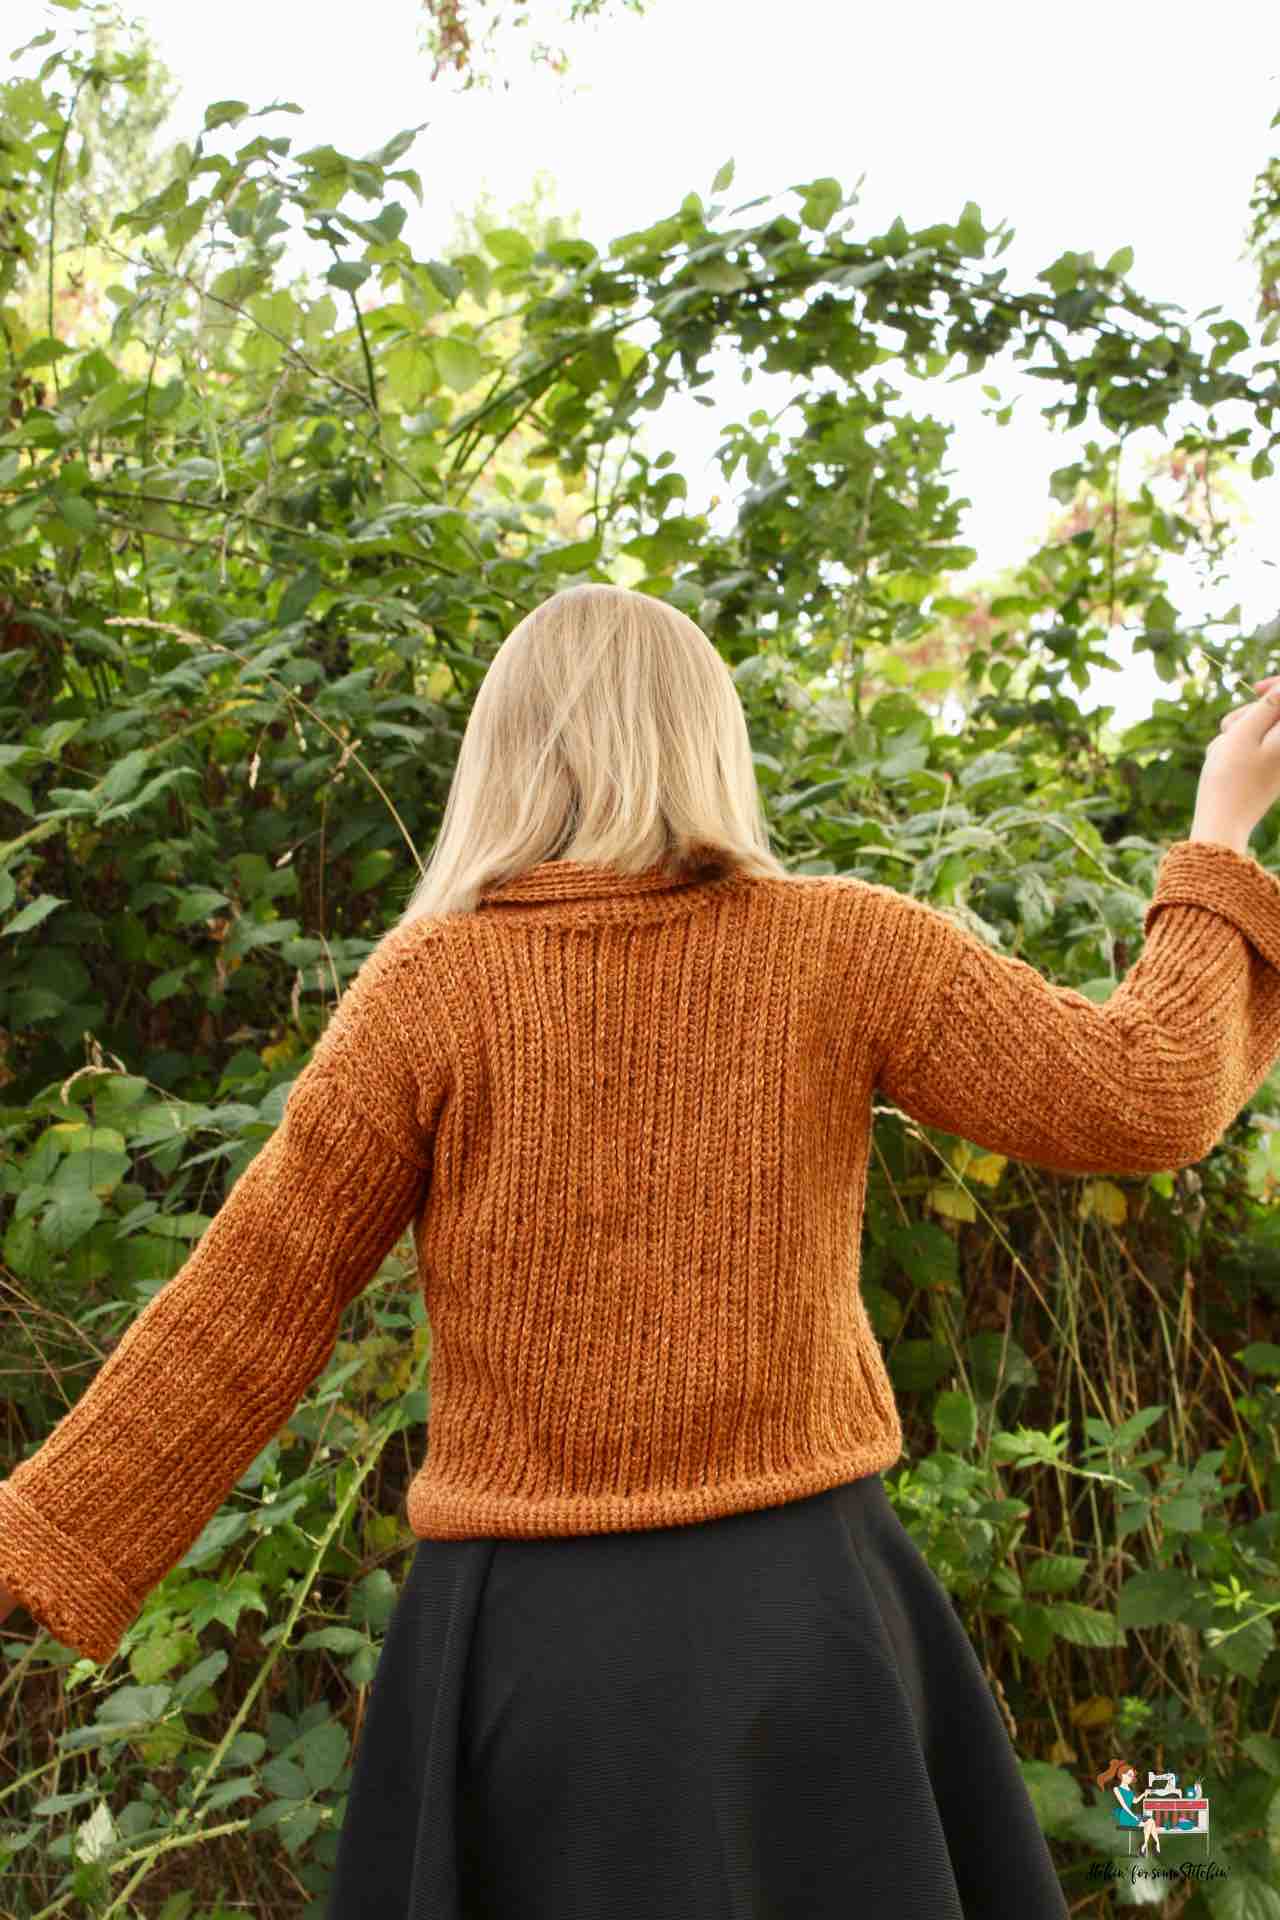
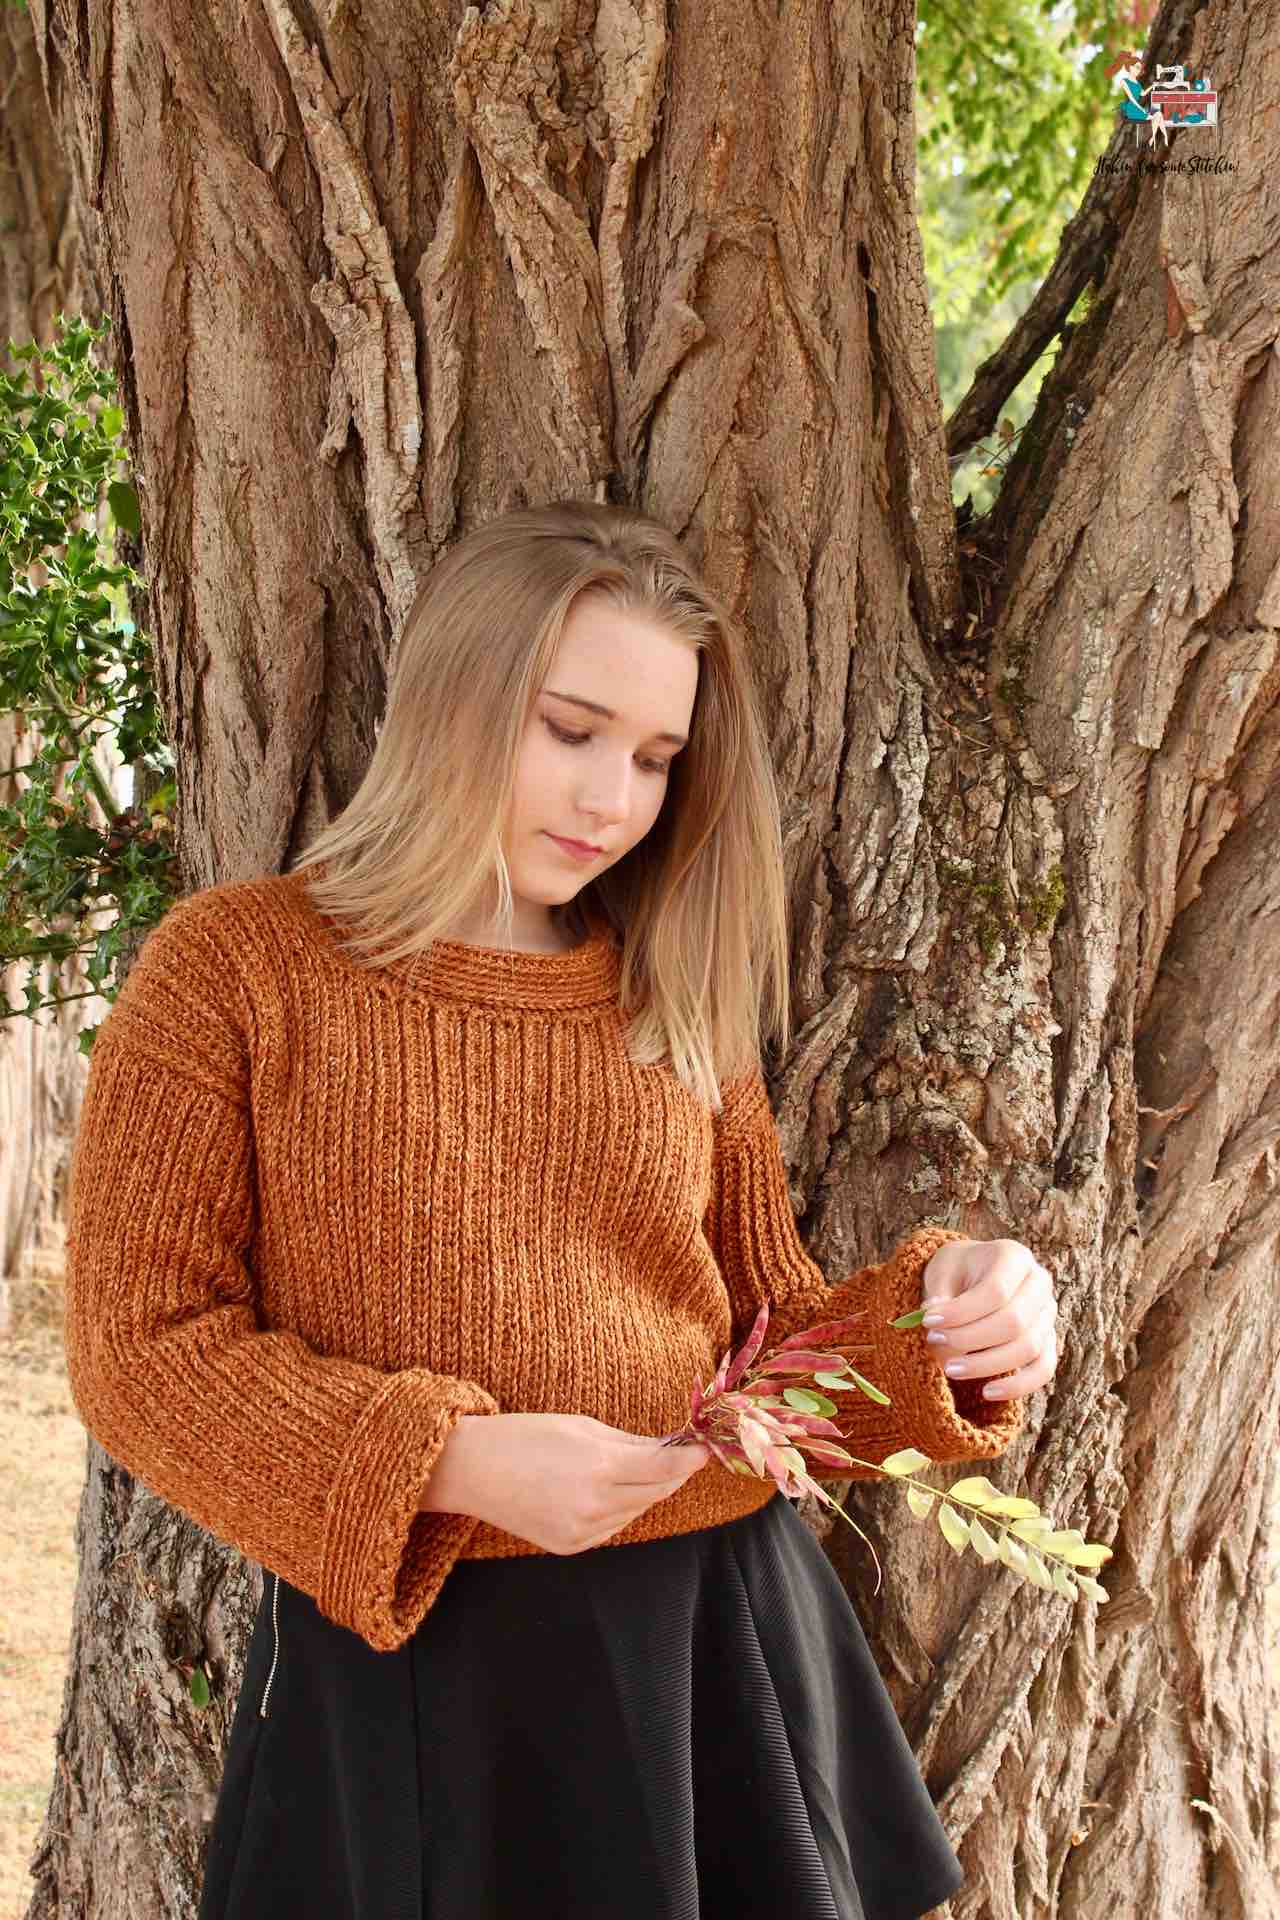
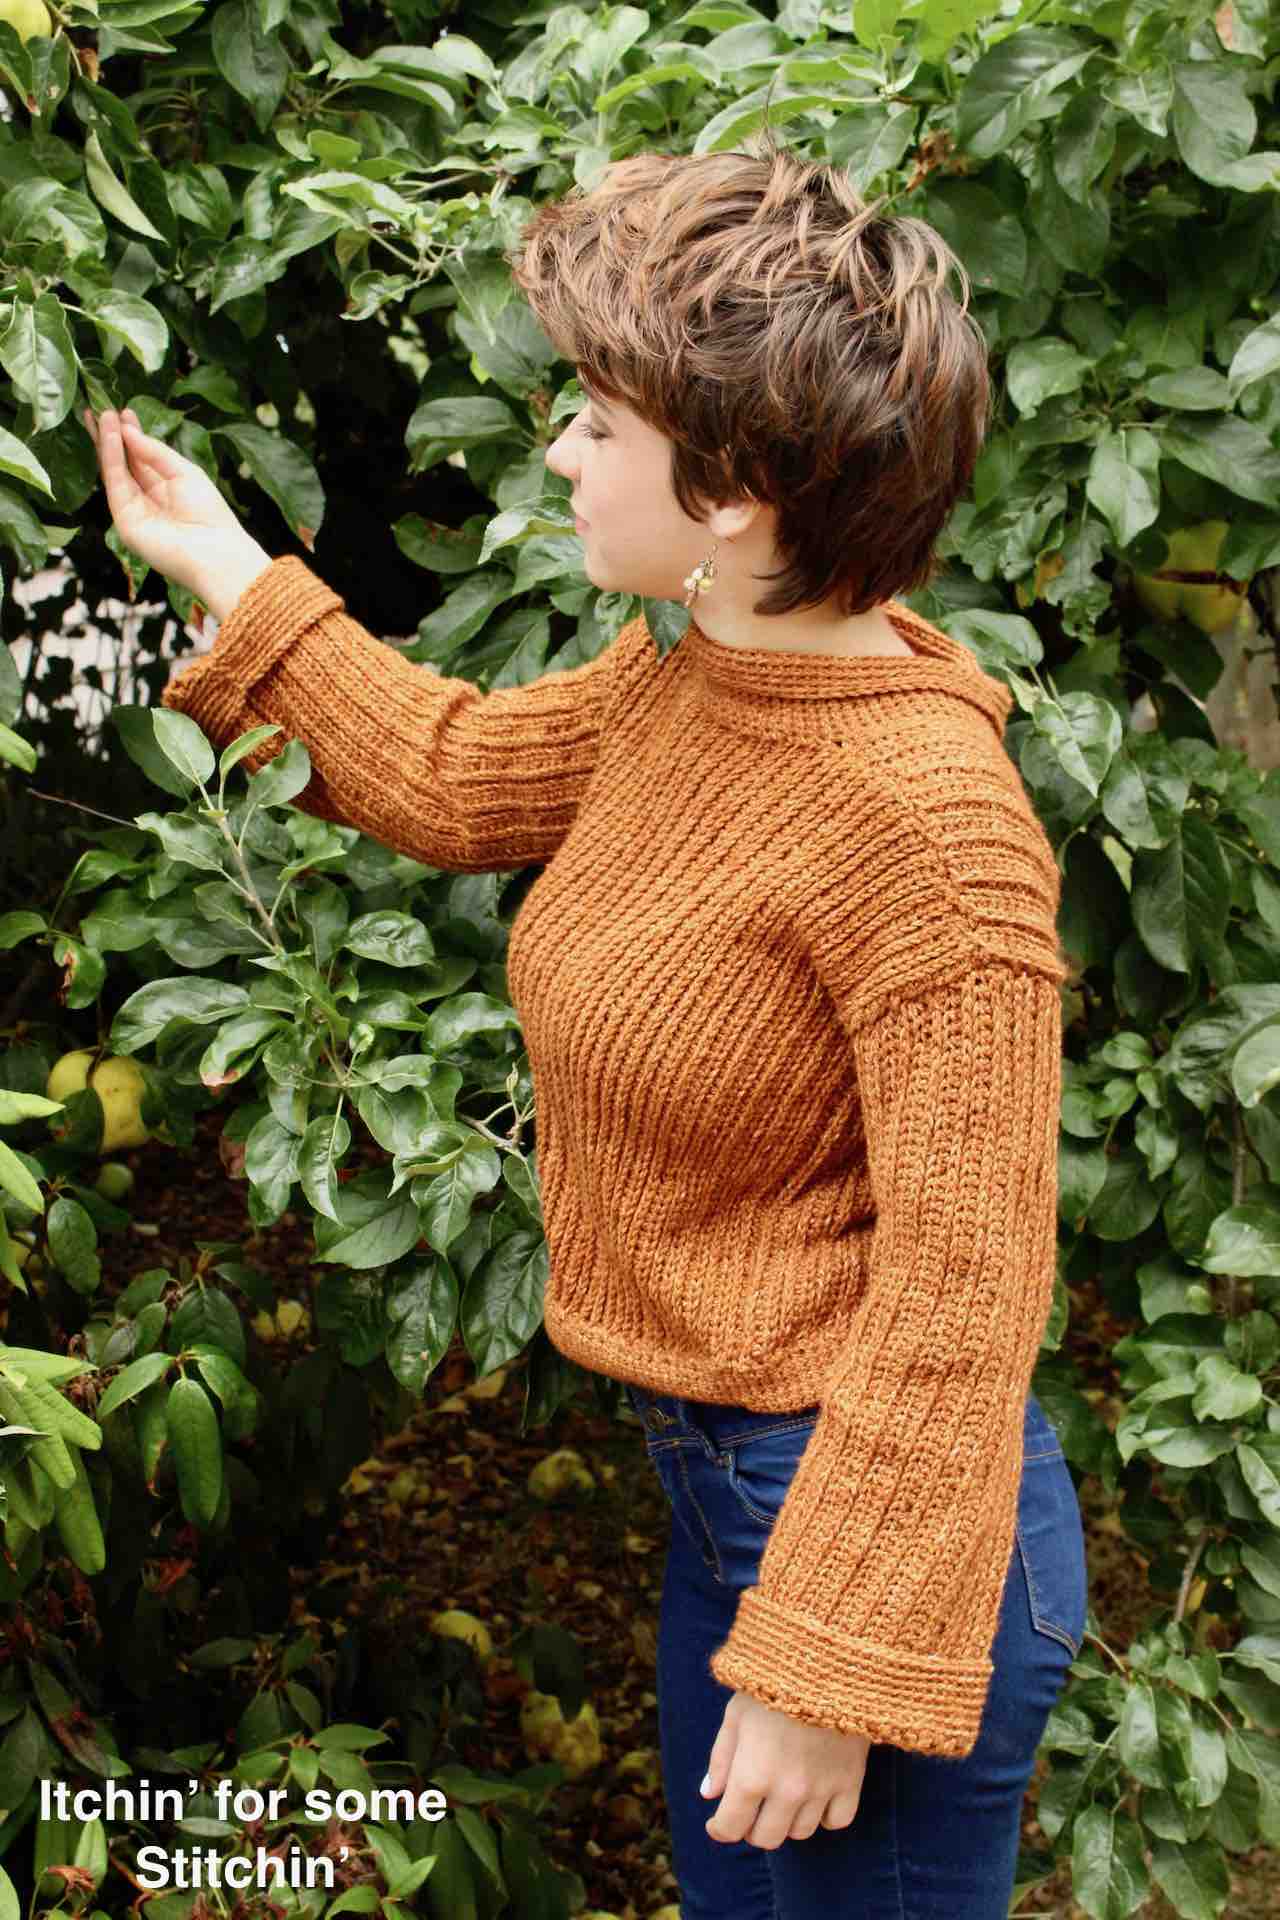
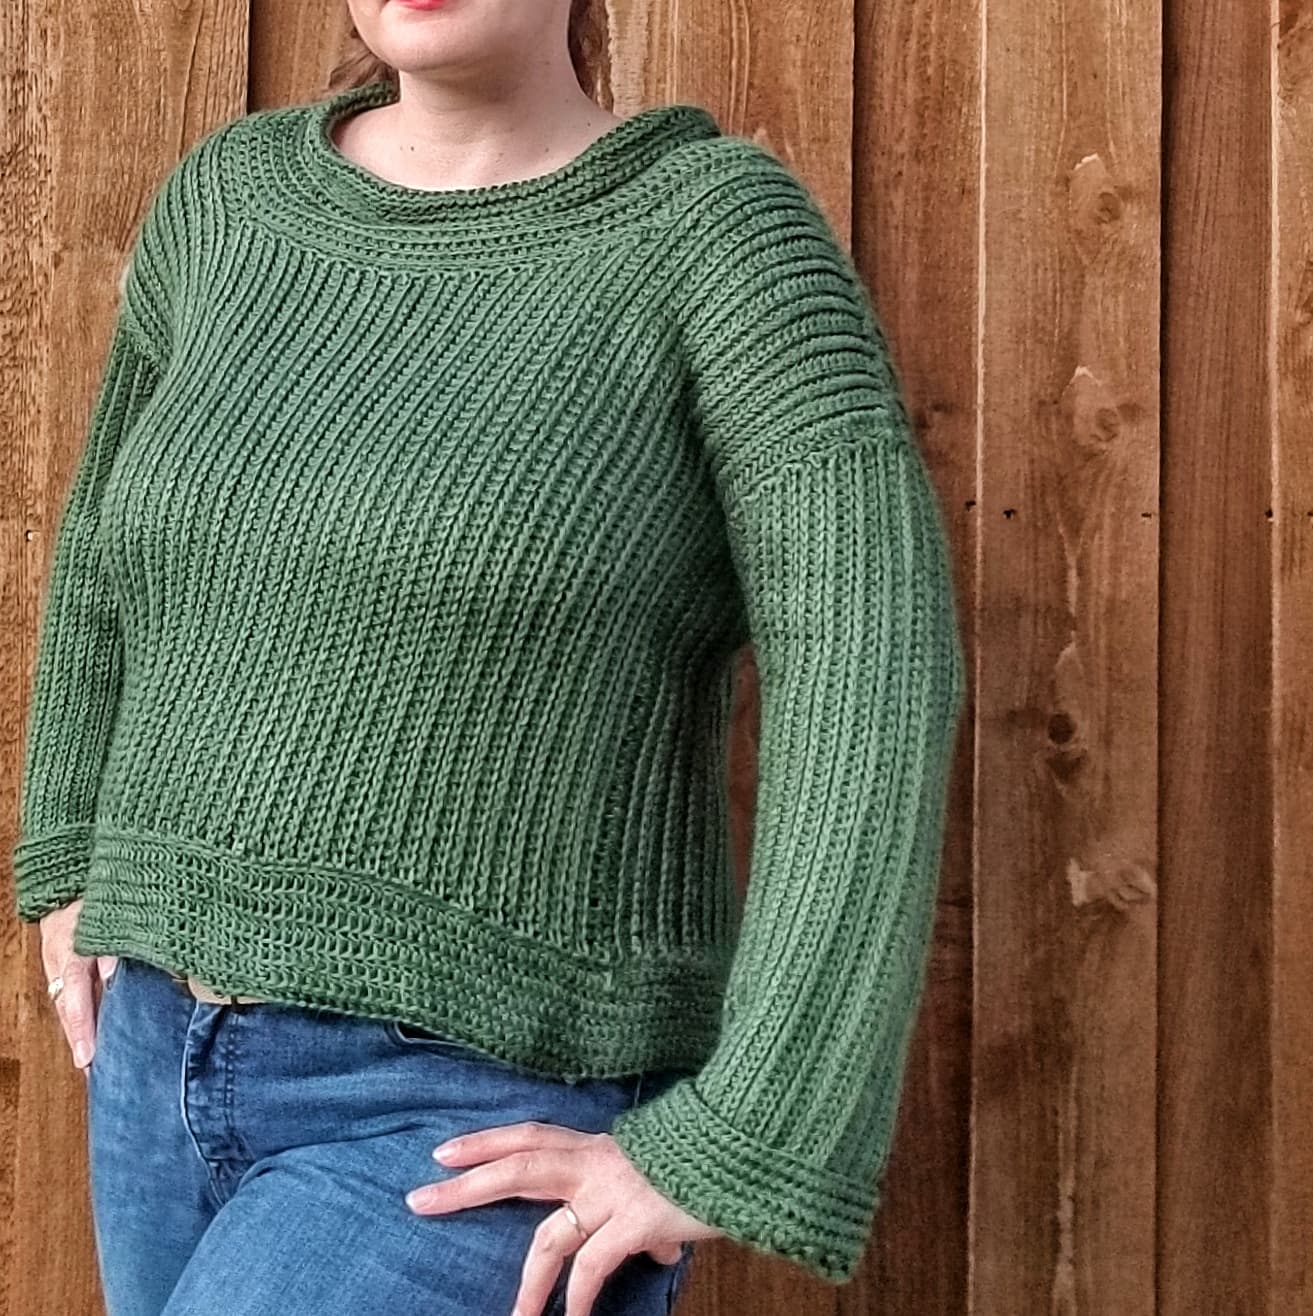
This easy “knit-look” cropped sweater is both classy and stylish. It uses a combination of stitches to create a unique ribbed effect that’s absolutely eye-catching! Add on the rolled collar, rolled cuffs, and hem and you’ve just created a fabulously unique sweater that you’ll love to wear all fall and winter long!
Prefer a PDF?
Get Your Pattern: Cinnamon Spiced Sweater is available as a large print, ad-free, printable PDF pattern.


Difficulty level: Level 1 or 2 – Beginner to Advanced Beginner
Finished Dimensions:
Pattern is made according to the Crafty Yarn Council’s women size standards each size listed below:
X-small (XS) – length (from top of shoulder to bottom edge of hem) 16.5-inches X width (from shoulder to shoulder) 14-14.5 inches.
Small (S) – length (from top of shoulder to bottom edge of hem) 17-inches X width (from shoulder to shoulder) 14.5-15 inches.
Medium (M) – length (from top of shoulder to bottom edge of hem) 17.25-inches X width (from shoulder to shoulder) 15.5-16 inches.
Large (L) – length (from top of shoulder to bottom edge of hem) 17.5-inches X width (from shoulder to shoulder) 16.5-17 inches.
X-large (XL) – length (from top of shoulder to bottom edge of hem) 17.75-inches X width (from shoulder to shoulder) 17-17.5 inches.
NOTE: Final dimensions for XL may vary from Crafty Yarn Council standards. Pattern testers had final dimensions of length (from top of shoulder to bottom edge of hem) 21-inches X width (from shoulder to shoulder) 20-inches.
2X – 3X – length (from top of shoulder to bottom edge of hem) 18-inches X width (from shoulder to shoulder) 18-inches.
Gauge:
18 stitches and 13 rows = 4-inches in knit-like stitch (See description below under INSTRUCTIONS)
Materials:
~Yarn alternatives: Caron Simply Soft (use G/4.0mm hook), Bernat Super Value, and I Love This Yarn.
- Crochet Hook size I/9 5.5mm or whatever hook is necessary to obtain correct gauge (I use a hook made by Nelsonwood)
~ Total yardage: 5 skeins each 246y/225m (3.5oz/100g) = approx. 1230 yards for XS. Sizes S-XL will require 6 to 7 skeins and about 1300-1600 yards. Sizes 2X-3X will require 8 skeins.
Abbreviations:
Pattern is written in US terms.
Stitch/es (st/sts)
3rd loop (aka. diagonal loop or front loop)
Additional Notes:
- Read all pattern notes, instructions, and other provided details carefully before starting the project to make sure you understand everything. It could save you hours & a lot of headaches!
- Make a swatch that measures at least 10 x 10 cm / 4 x 4 inches using the stitch provided under the Gauge Section. If your swatch matches the gauge, then you are all set to start the project. If the gauge is wrong, you might need to change your crochet hook – increase your hook size if your stitches are smaller & decrease your hook size if your stitches are larger.
- All measurements given are unblocked.
- Provided measurements are as exact as possible, but are given as approximates. This is because yarn variances, crochet tension, & individual technique might give variations in the result, which changes from person to person.
- This pattern works best with soft pliable yarn.
- Final counts are indicated in parentheses in the following order (XS), (S), (M), (L), (XL), (2X), (3X)
Instructions:
This pattern uses the “knit-like” stitch – a two row repeat in which one row you hdc in the 3rd loop and in the other row you hdc into the blo. This creates a ribbing effect.
Front of Sweater – left shoulder
Ch (70), (73), (74), (75), (76), (78), (78)
Row 1: Hdc in 4th ch from hook (counts as your first hdc st) and in each ch across (68 sts), (71), (72), (73), (74), 76), (76)
Row 2: Ch2 (does not count as a st), turn work, hdc in the 3rd loop across to last st, hdc under the top two loops of the last st (this should be the first hdc of row 1 that counted as a st) (68 sts), (71), (72), (73), (74), 76), (76)
Reference: How to Work in the 3rd Loop

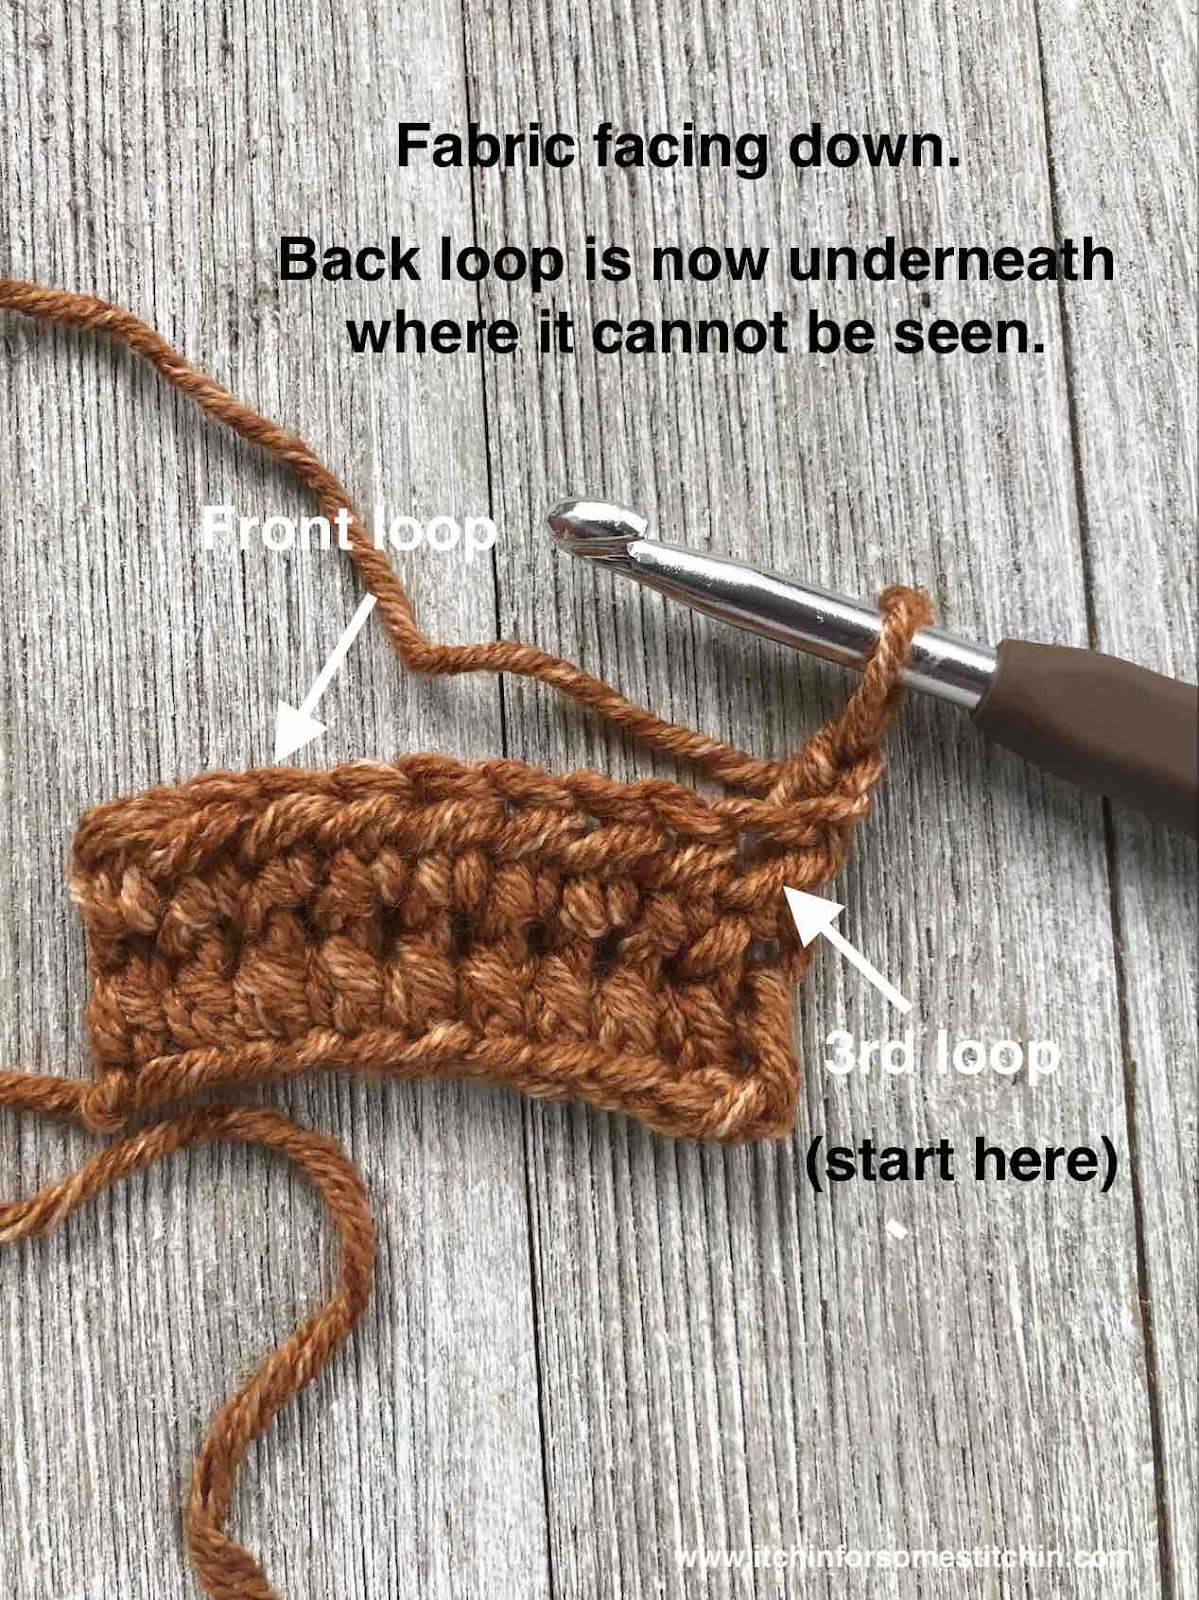
Row 3: Ch2 (does not count as a st), turn work, hdc in blo across to the last st, hdc (as normal, ie. under both front & back loops) (68 sts), (71), (72), (73), (74), 76), (76)
Row 4: Ch2 (does not count as a st), turn work, hdc in the 3rd loop across to last st, hdc (as normal, ie. under both front & back loops) (68 sts), (71), (72), (73), (74), 76), (76)
For sizes XS – XL
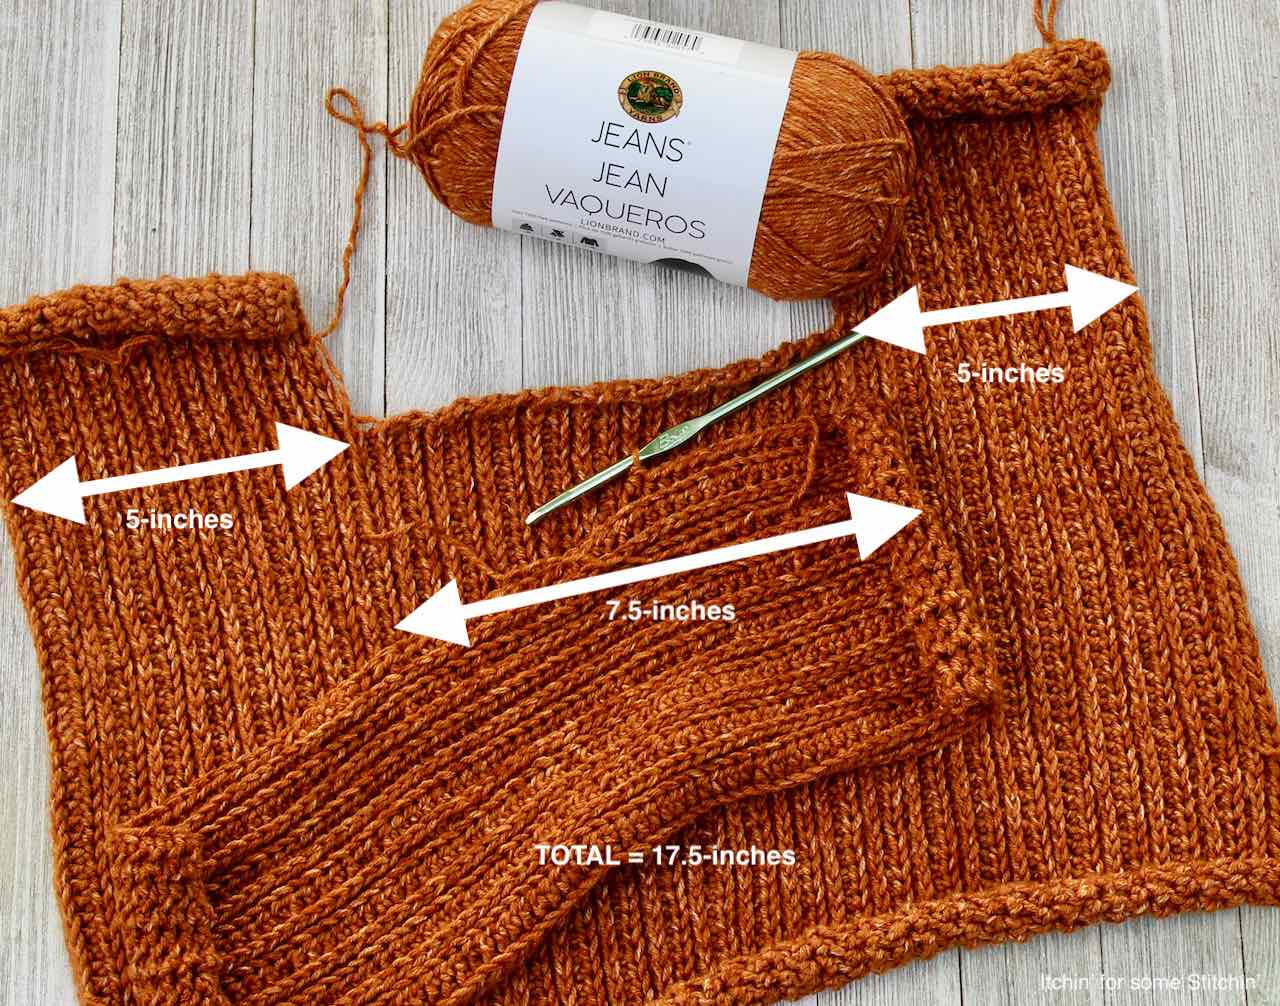
Rows 5-16: Repeat rows 3 and 4 until fabric measures 5-inches in width.
For 2X
Rows 5-16: Repeat rows 3 and 4 until fabric measures 7-inches in width.
For 3X
Rows 5-16: Repeat rows 3 and 4 until fabric measures 7.5-inches in width.
Front of Sweater – neck area
Row 17: Ch2 (does not count as a st), turn work, hdc in blo in the next 50 sts (50 sts), (53), (54), (55), (56), (58)
Row 18: Ch2 (does not count as a st), turn work, hdc in the 3rd loop of the next 50 sts (50 sts), (53), (54), (55), (56), (58)
For XS – XL
Rows 19-41: Repeat rows 17 and 18 until fabric measures 7.5 – inches in width, but do NOT cut your yarn, simply continue on to row 42.
For 2X
Rows 19-41: Repeat rows 17 and 18 until fabric measures 11 – inches in width, but do NOT cut your yarn, simply continue on to row 42.
For 3X
Rows 19-41: Repeat rows 17 and 18 until fabric measures 12 – inches in width, but do NOT cut your yarn, simply continue on to row 42.
Front of Sweater – right shoulder
Row 42: Ch 21 (this will hang off the main fabric – what you are doing here is extending your fabric to make the right shoulder the same length as the left shoulder), turn work, hdc in the 4th ch from hook and in each ch across (18 sts) until you meet back up with the main fabric, hdc in the the 3rd loop of the next (50 sts), (53), (54), (55), (56), (58), (58).
NOTE: (50 sts), (53), (54), (55), (56) on the main fabric plus 18 sts extending from the main fabric should create your original stitch counts of (68 sts), (71), (72), (73), (74), (76), (76).
Row 43: Ch2 (does not count as a st), turn work, hdc in blo across to the last st, hdc (as normal, ie. under both front & back loops) ((68 sts), (71), (72), (73), (74), (76), (76).
Row 44: Ch2 (does not count as a st), turn work, hdc in the 3rd loop across to last st, hdc (as normal, ie. under both front & back loops) (68 sts), (71), (72), (73), (74), (76), (76).
For sizes XS – XL
Rows 45-59: Repeat rows 43 and 44. Until the section measures 5-inches in width.
For 2X
Rows 45-59: Repeat rows 43 and 44. Until the section measures 7-inches in width.
For 3X
Rows 45-59: Repeat rows 43 and 44. Until the section measures 7.5-inches in width.
Note: Photo below is shown for XS – XL.
Back of Sweater
Ch (70), (73), (74), (75), (76), (76), (76)
Row 1: Hdc in 4th ch from hook (counts as your first hdc st) and in each ch across (68 sts), (71), (72), (73), (74), (76), (76)
Row 2: Ch2 (does not count as a st), turn work, hdc in the 3rd loop across to last st, hdc under the top two loops of the last st (this should be the first hdc of row 1 that counted as a st) (68 sts), (71), (72), (73), (74), (76), (76).
Row 3: Ch2 (does not count as a st), turn work, hdc in blo across to the last st, hdc (as normal, ie. under both front & back loops) (68 sts), (71), (72), (73), (74), (76), (76).
Row 4: Ch2 (does not count as a st), turn work, hdc in the 3rd loop across to last st, hdc (as normal, ie. under both front & back loops) (68 sts), (71), (72), (73), (74), (76), (76).
XS
Rows 5-59: Repeat rows 3 and 4 until fabric measures 17.5-inches in width. This should fit approximately 14-14.5 inches from shoulder to shoulder.
S
Rows 5-63: Repeat rows 3 and 4 until fabric measures 18.5-inches in width. This should fit approximately 14.5-15 inches from shoulder to shoulder.
M
Rows 5-66: Repeat rows 3 and 4 until fabric measures 19.5-inches in width. This should fit approximately 15.5-16 inches from shoulder to shoulder.
L
Rows 5-67: Repeat rows 3 and 4 until fabric measures 20-inches in width. This should fit approximately 16.5-17 inches from shoulder to shoulder.
XL
Rows 5-69: Repeat rows 3 and 4 until fabric measures 20.5-inches in width. This should fit approximately 17-17.5 inches from shoulder to shoulder.
2X
Rows 5-69: Repeat rows 3 and 4 until fabric measures 25-inches in width. This should fit approximately 18-18.5 inches from shoulder to shoulder. (?)
3X
Rows 5-69: Repeat rows 3 and 4 until fabric measures 27-inches in width. This should fit approximately 18.5 -19 inches from shoulder to shoulder.
Sleeves (Make 2)
Sizes XS – XL, (2X-3X):
Ch 71, 74
Row 1: Hdc in 4th ch from hook (counts as your first hdc st) and in each ch across (69), (72)
Row 2: Ch2 (does not count as a st), turn work, hdc in the 3rd loop across to last st, hdc under the top two loops of the last st (this should be the first hdc of row 1 that counted as a st) (69), (72)
Row 3: Ch2 (does not count as a st), turn work, hdc in blo across to the last st, hdc (as normal, ie. under both front & back loops) (69), (72)
Row 4: Ch2 (does not count as a st), turn work, hdc in the 3rd loop across to last st, hdc (as normal, ie. under both front & back loops) ((69), (72)
Sizes XS -L:
Rows 5-35: Repeat rows 3 and 4 until fabric measures 11-inches in width.
Size XL :
Rows 5-41: Repeat rows 3 and 4 until fabric measures 13.5-inches in width.
Size 2X – 3X :
Rows 5 – 43: Repeat rows 3 and 4 until fabric measures 15-inches in width.
Assembling Your Cinnamon Spiced Ribbed Sweater: A Seamless Finish
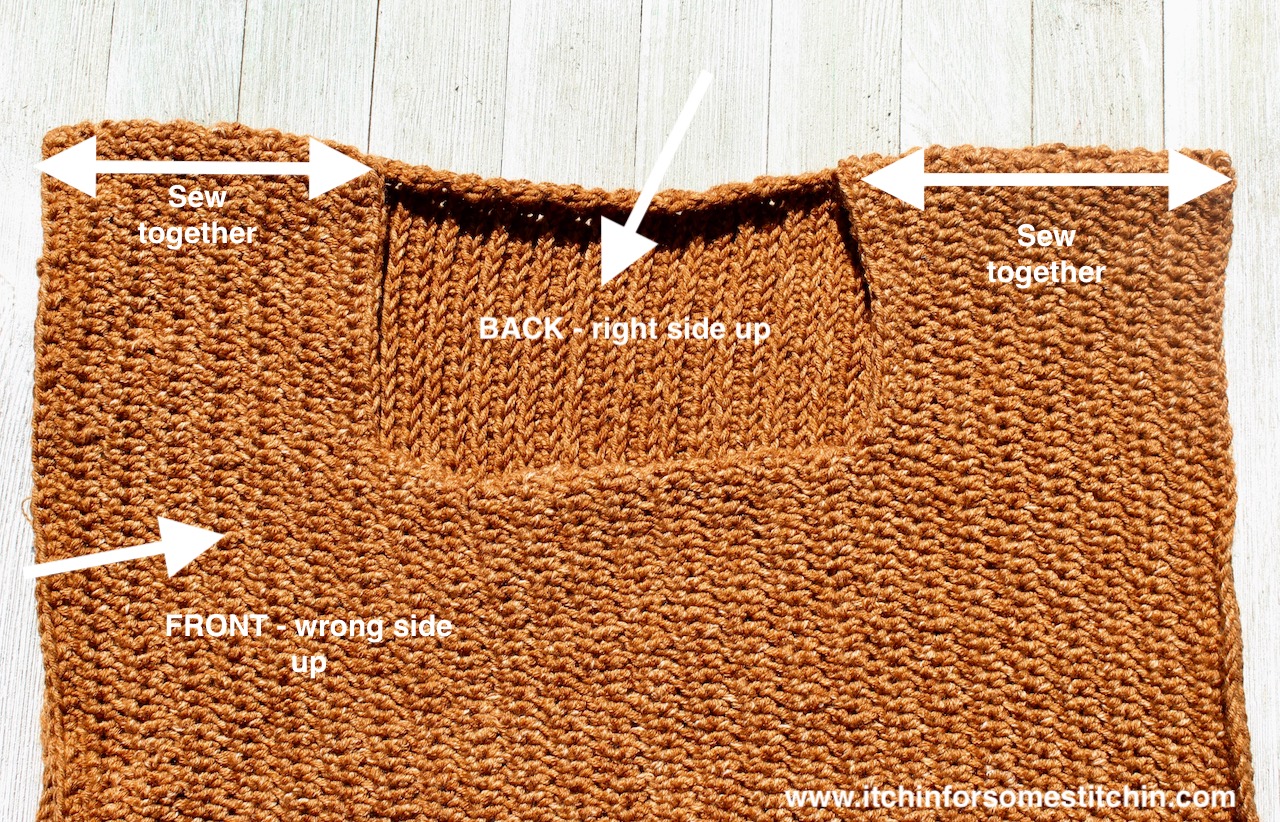
Step 1: Attach front & back pieces at the shoulder.
- Place the back piece on a table top with the RIGHT side UP
- Place the front on top of the back piece with the WRONG side facing UP and the shoulder edges lined up with the edge of the back piece
- Seam two shoulder edges of the front piece to the edge of the back piece
Step 2: Open the sweater and place it on the table-top with the RIGHT side facing UP. (Photos below demonstrate sizes XS-L, please see instructions below for XL)
- For sizes XS – L: Place the 5.5 – inch mark of a measuring tape right at the shoulder seam of the sweater. Inches 1 to 5.5 should extend to the left of the seam. Inches 5.5 to 11 should extend to the right of the seam. Place stitch markers at 1-inch and 11-inches. Do this on both sides of the sweater.
- For sizes XL: Place the 6.5 – inch mark of a measuring tape right at the shoulder seam of the sweater. Inches 1 to 6.5 should extend to the left of the seam. Inches 5.5 to 13.5 should extend to the right of the seam.
- For sizes 2X-3X: Place the 7.5 – inch mark of a measuring tape right at the shoulder seam of the sweater. Inches 1 to 7.5 should extend to the left of the seam. Inches 7.5 to 15 should extend to the right of the seam.
- Place stitch markers at 1-inch and 11-inches for XS-L. Do this on both sides of the sweater.
- Place stitch markers at 1-inch and 13.5-inches for XL. Do this on both sides of the sweater.


Step 3: Place the edge of the sleeves with WRONG sides facing UP along the edge of the sweater between your two markers.
- Seam the sleeves to the sweater along these edges.
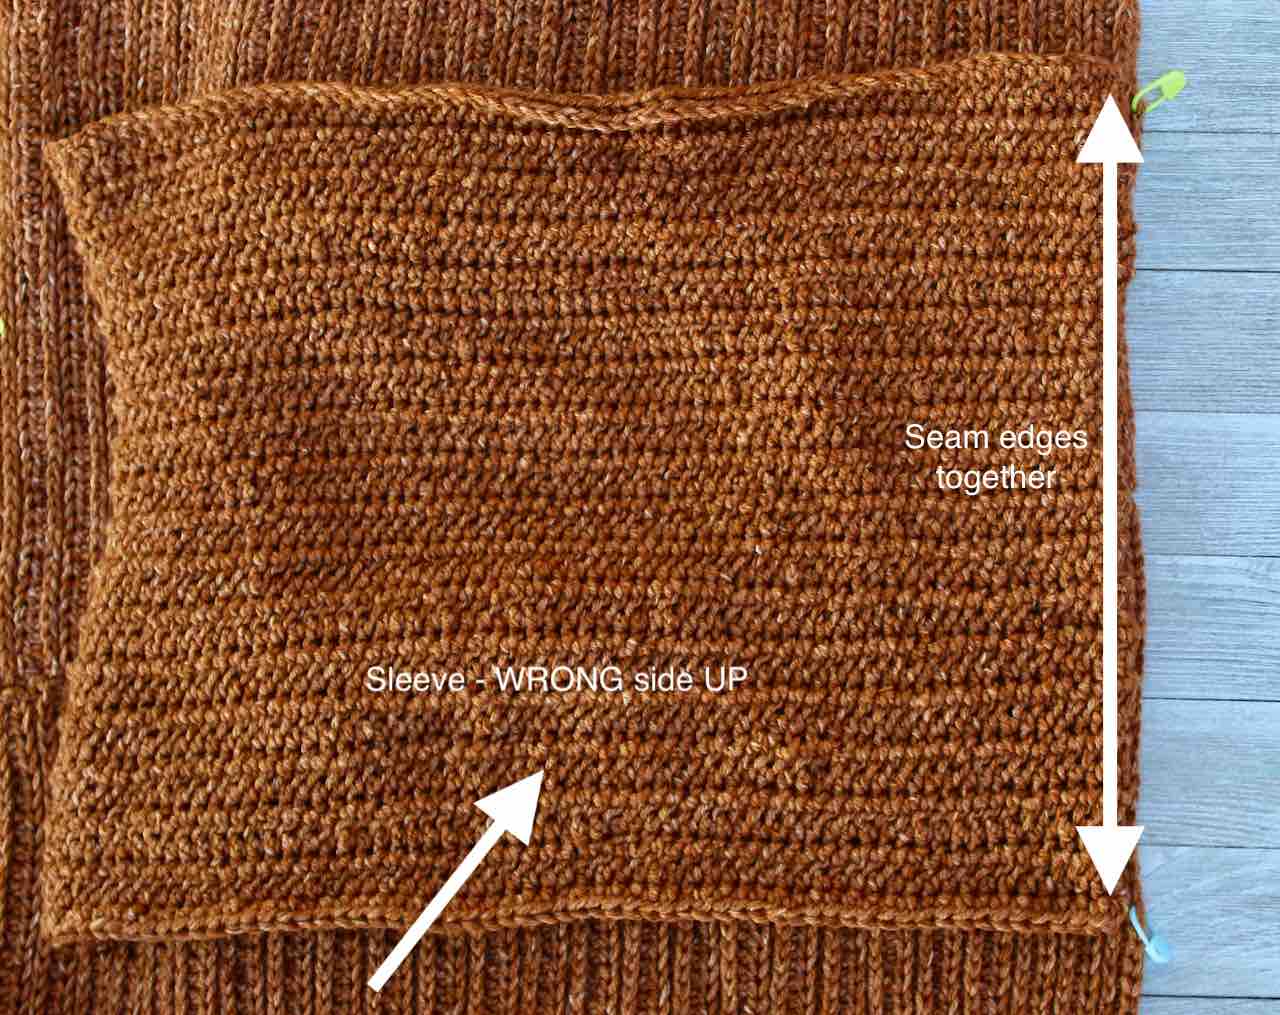
Step 4: Fold sweater so that RIGHT sides are together and sleeves are folded lengthwise in half.
- Seam together the sides of the body of the sweater and along the lengthwise edges of the sleeves.
Adding Elegance: Finishing Touches for Your Crochet Masterpiece
— Turn sweater so that the RIGHT sides are now on the outside.
Rolled collar (Sizes XS-L)
Attach yarn at the right shoulder seam using a slp-st.
Round 1: Sc around the back the sweater and the neckline, making a total of 85 sts. Slp-st into the slp-st where you attached the yarn.
Round 2: Ch2 (does not count as a st), hdc in the blo of the next st and in each stitch around, slp-st to close. (85 sts)
Rounds 3-14: Repeat round 2 until collar measures at least 3-inches in height, at the end of the final round slp-st to close. (85 sts)
Rolled collar (Sizes XL only)
Attach yarn at the right shoulder seam using a slp-st.
Round 1: Sc around the back the sweater and the neckline, making a total of 112 sts. Slp-st into the slp-st where you attached the yarn.
Round 2: Ch2 (does not count as a st), hdc in the blo of the next st and in each st around making 4 decreases (hdc2tog 4 times) wherever you choose, slp-st to close. (104 sts)
Round 3: Ch2 (does not count as a st), hdc in the blo of the next st and in each st around making 4 decreases (hdc2tog 4 times) wherever you choose, slp-st to close. (96 sts)
Round 4-14: Ch2 (does not count as a st), hdc in the blo of the next st and in each stitch around, slp-st to close. (96 sts)
Rolled collar (Sizes 2X-3X)
Attach yarn at the right shoulder seam using a slp-st.
Round 1: Sc around the back of the sweater and the neckline, making a total of 139 sts. Sc into the slp-st where you attached the yarn.
Round 2: Ch2 (does not count as a st), hdc in the blo of the next st and in each st around making 4 decreases (hdc2tog 4 times) wherever you choose, slp-st to close. (131 sts)
Round 3: Ch2 (does not count as a st), hdc in the blo of the next st and in each st around making 4 decreases (hdc2tog 4 times) wherever you choose, slp-st to close. (131 sts)
Round 4-14: Ch2 (does not count as a st), hdc in the blo of the next st and in each stitch around, slp-st to close. (131 sts)
Rolled sleeves (cuffs) for all sizes
Attach yarn at the bottom seam using a slp-st.
Round 1: Sc around the sleeve, making a total of 54 sts for sizes XS-L, 62 sts for XL, 74 for sizes 2X-3X. Slp-st into the slp-st where you attached the yarn.
Round 2: Ch2 (does not count as a st), hdc in the blo of the next st and in each stitch around, slp-st to close. (54 sts for XS-L), (62 sts for XL), (74 for sizes 2X-3X).
Rounds 3-7: Repeat round 2 until cuffs measure at least 1.5-inches in height, at the end of the final round slp-st to close. (54 sts for XS-L), (62 sts for XL), (74 for sizes 2X-3X).
Bottom (hem) of sweater
Attach yarn at the left sweater seam using a slp-st.
Round 1: Sc around the bottom edge of the sweater, making a total of 143 sts for XS-L and 190 for XL. Slp-st into the slp-st where you attached the yarn.
Round 2: Ch2 (does not count as a st), hdc in the blo of the next st and in each stitch around, slp-st to close. (143 sts for XS-L), (190 sts for XL), (237 sts for 2X-3X).
Rounds 3-7: Repeat round 2 until hem measure at least 1.5-inches in height, at the end of the final round slp-st to close. (143 sts for XS-L), (190 sts for XL), (237 sts for 2X-3X).
There now, I told you this was a super easy sweater pattern!
I have had multiple people who swore they could not crochet a sweater make this one with no problems – one who hadn’t successfully crocheted a sweater in her 25 years of crochet experience!
But… you know what?
She made this easy knit-look sweater with no issues and loved it so much she wore it all throughout the colder seasons. 🙂
So, if you’re nervous about crocheting a sweater. Don’t be!
You can do this one! Honest.
Just give it a try. 🙂
Please be sure to follow me on Instagram and share your makes with #itchinforsomestitchin and #easyknitlooksweater. Be sure to tag me!
Explore More Patterns: Crochet Favorites You’ll Love!
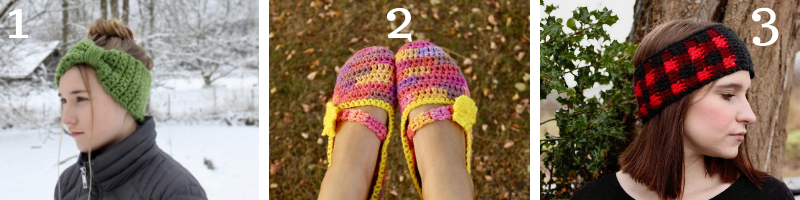
- Simple & Sweet Bowtie Head Warmer / 2. Easy Beginner Crochet Slippers / 3. Simply Chic Plaid Ear Warmer
Check out my latest posts!
- How to Adjust Neck Openings in a Crochet Dog Sweater
- Crochet Beginner’s Tools: What You Actually Need (and What You Don’t)
- How to Adjust Crochet Dog Sweater Chest Width (Easy Fit Guide)
- How to Adjust the Back Length of a Crochet Dog Sweater
- How to Measure Your Dog for a Crochet Sweater
Love Pinterest?
I do!
Pin It for Later: Cinnamon Spiced Sweater Inspiration
You can also follow all my boards!

Thank you for coming to my blog! By sharing my content and/or making a purchase you are making it possible for me to continue producing and sharing free content for everyone to enjoy. I sincerely appreciate your support!
Until next time… Happy Crocheting!


Please share!
Community Creations: Stunning Sweaters from my Crochet Community
Note: The easy crochet
Jojo
Monday 27th of January 2025
Hey there! I absolutly adore the stitches and the look of the finished sweater! I do have a question tho: As a european I do struggle a bit with the description on how to attach the sleeves, as I am not familiar with inches. Am I supposed to attach the sleeves, so the middle of them is alligned with the seam where I joined the front and back pieces together? I am very excited to see my piece finished, it already feels super cozy!
Itchin4Stitchin
Wednesday 5th of February 2025
Hi Jojo,
My apologies for the delay! Yes you are exactly correct. The midpoint of your sleeves goes on the seam where the front and back pieces came together. I'll update this post to add centimeters as well as inches if that helps.
Please reach out to me via the contact button - it goes directly to my email so I can further assist you if needed.
So glad you love the pattern!
Best wishes,
RaeLynn
Daisy
Wednesday 18th of January 2023
Hi I love this pattern is it possible to use 8 ply, if so how would i adjust the pattern
Daisy
Friday 20th of January 2023
@Itchin4Stitchin, hi thanks for letting me know do you have any recommendations for hook size or is it just the same as the pattern,
thanks daisy
Itchin4Stitchin
Wednesday 18th of January 2023
Hi Daisy,
Absolutely! The pattern itself is very easy. Just be aware that using a yarn with double the thickness will make the sweater much thicker, chunkier, and heavier.
So glad you like the pattern!
Best wishes,
RaeLynn
Susanne
Thursday 13th of October 2022
Thank you so much for this fabulous sweater pattern. I have been searching in vain for a pattern for my youngest daughter and this morning I opened Pinterest and your jumper was the first thing I saw. My daughter loves it 😁
Itchin4Stitchin
Tuesday 18th of October 2022
Hi Susanne,
Awe... thank you so much! You've totally made my week! I am so glad you like the pattern and that your daughter loves her sweater! :)
Best wishes,
RaeLynn
Eileen
Tuesday 31st of August 2021
I'm wondering why you list 2 different suggested hook sizes. Are they the suggested hooks for the different yarns.
Itchin4Stitchin
Tuesday 31st of August 2021
Hi Eileen,
Thank you for your question. The recommended hook size is 5.5mm, but you can use whatever hook gets you closest to the correct gauge. I did list 4.0mm in parentheses next to the yarn alternative Caron Simply Soft. Although Caron Simply Soft is listed as a medium 4 worsted weight, it actually feels thinner and tends to work up as a thinner yarn.
One of my pattern tester used Caron Simply Soft for this project and did indeed find that she had to use a smaller hook size with it. So, if you are going to use Caron Simply Soft, I would suggest testing your gauge with the hook size she used (the 4.0mm). All other yarn alternatives used during tested used the 5.5mm hook.
Does that answer your question? If not, let me know. Feel free to message me here or email me at [email protected]
Best wishes,
RaeLynn
Shannon
Saturday 1st of August 2020
I wear a 5X. Is there any way you think this can scale up easily?
Itchin4Stitchin
Saturday 1st of August 2020
Hi Shannon,
I do think it will scale up pretty easily - also, I have gotten several requests for larger sizes so I will definitely be working on that soon! I'll add the update once the new sizes are through pattern testing. In the meantime, feel free to contact me via email to help with adjustments.
Best wishes,
RaeLynn