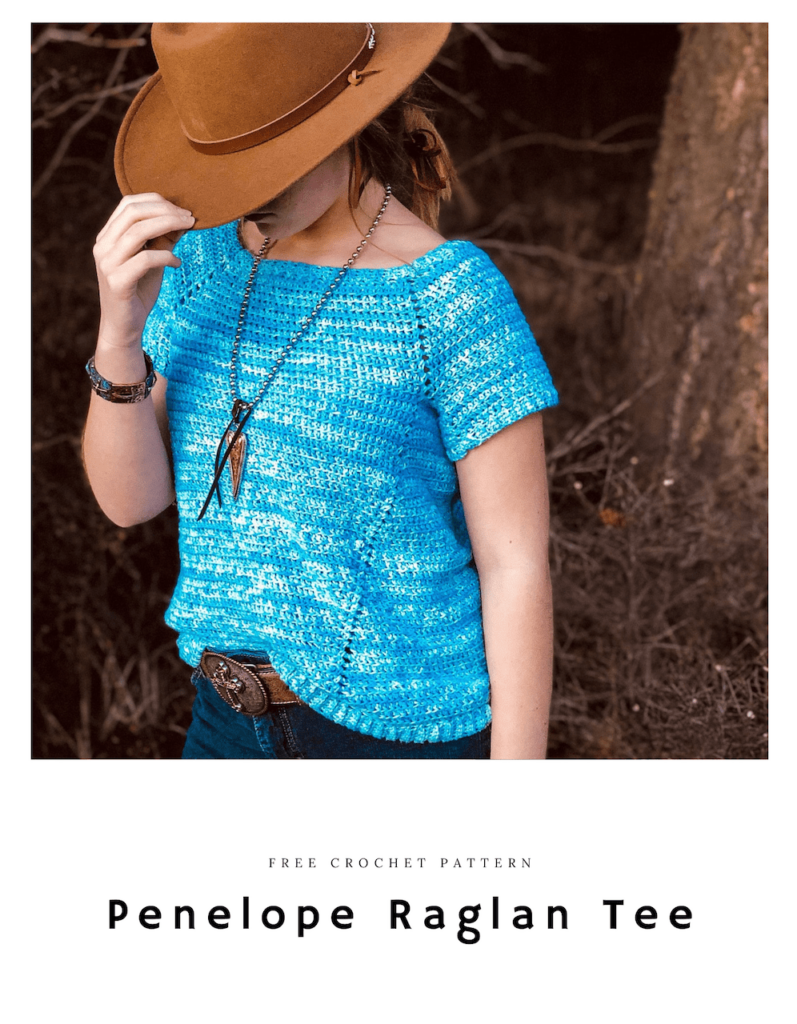
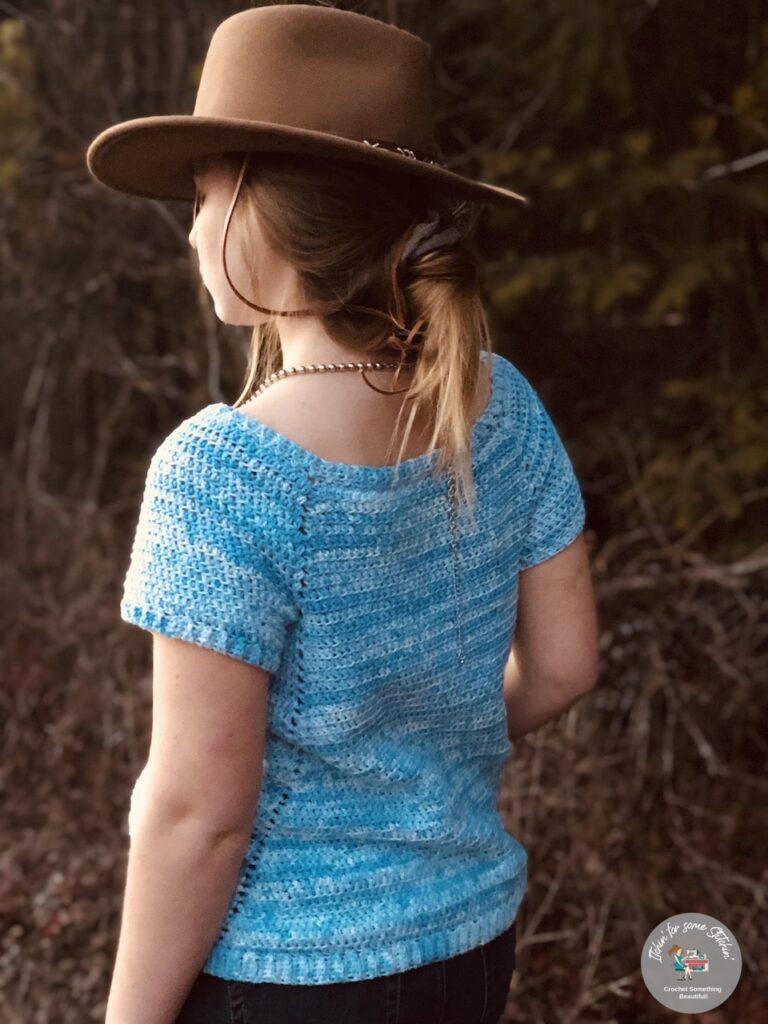
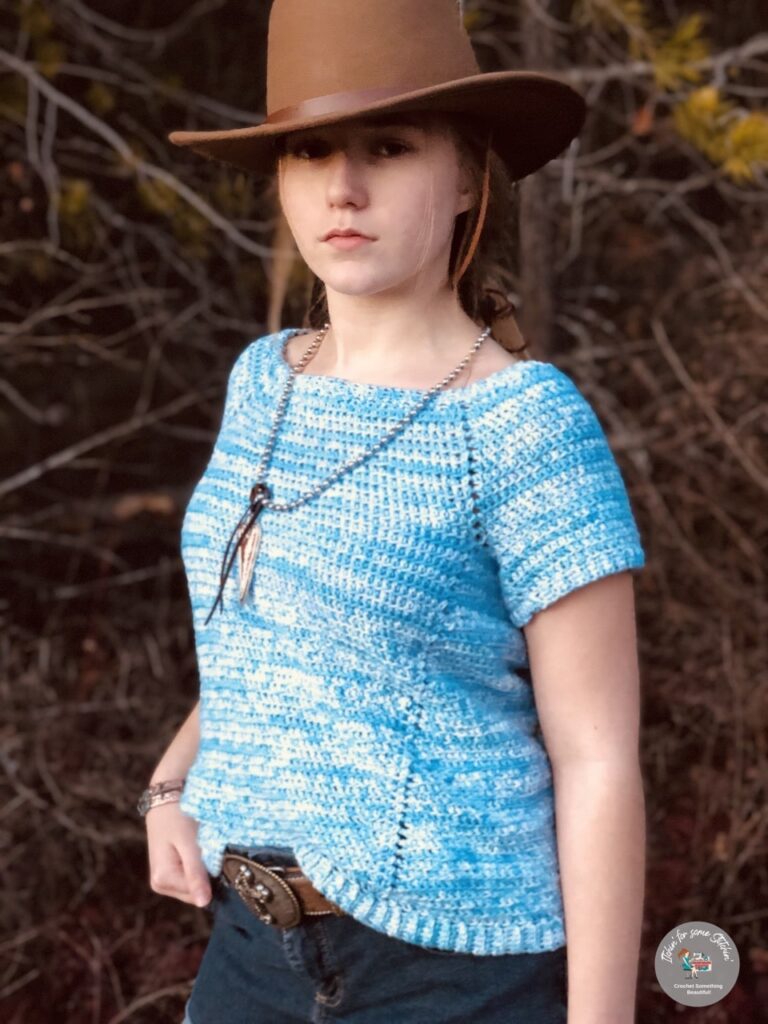
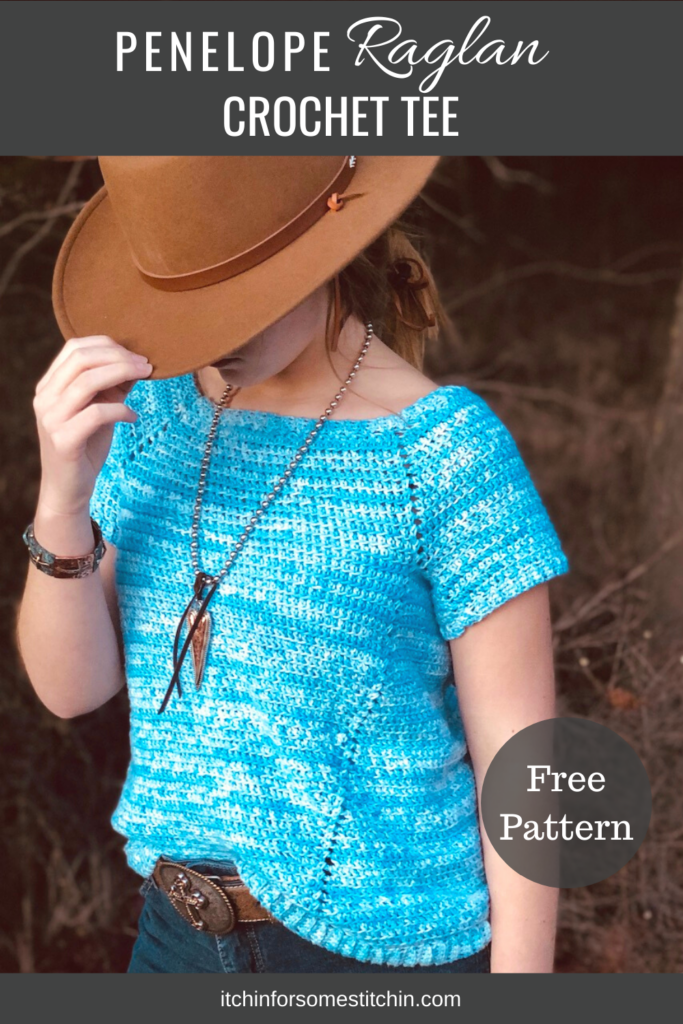
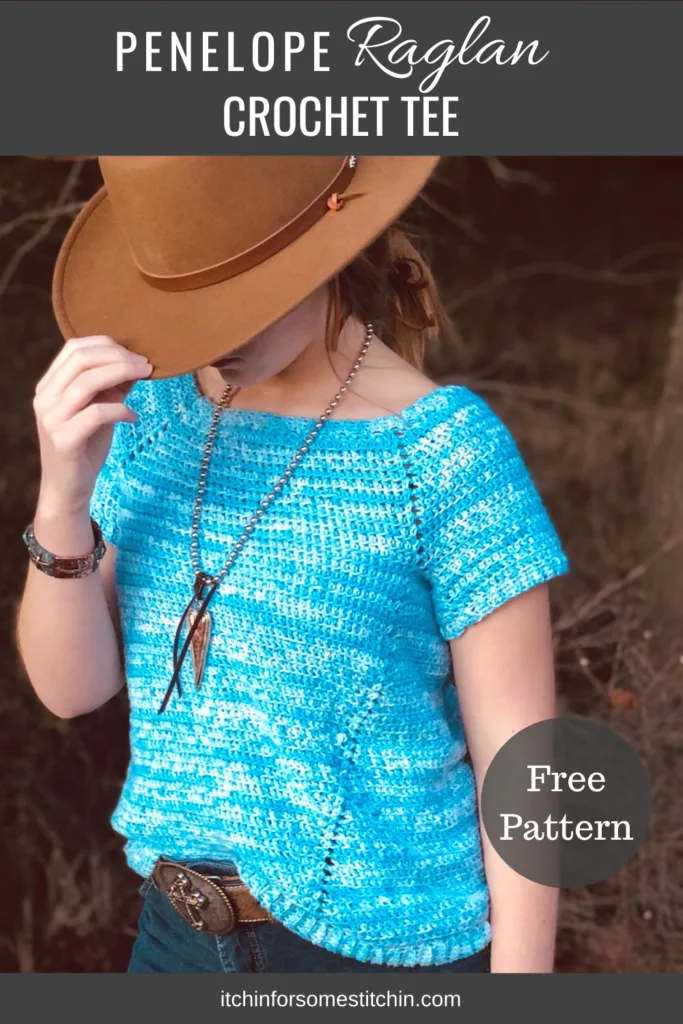
The Penelope Raglan Tee is a lightweight crochet top designed for comfort, ease, and everyday wear. Featuring classic raglan shaping and a simple stitch pattern, this tee offers a relaxed fit with just enough texture to keep things interesting.
This free crochet pattern includes clear, written instructions for working top-down raglan construction from the neckline to the hem, then finishing with sleeves, edging, and neckline details. It’s a versatile, wearable design that’s perfect for spring and transitional seasons.

Spring always puts me in the mood to try something new, and the Penelope Raglan Tee came from that exact place of curiosity and creativity.
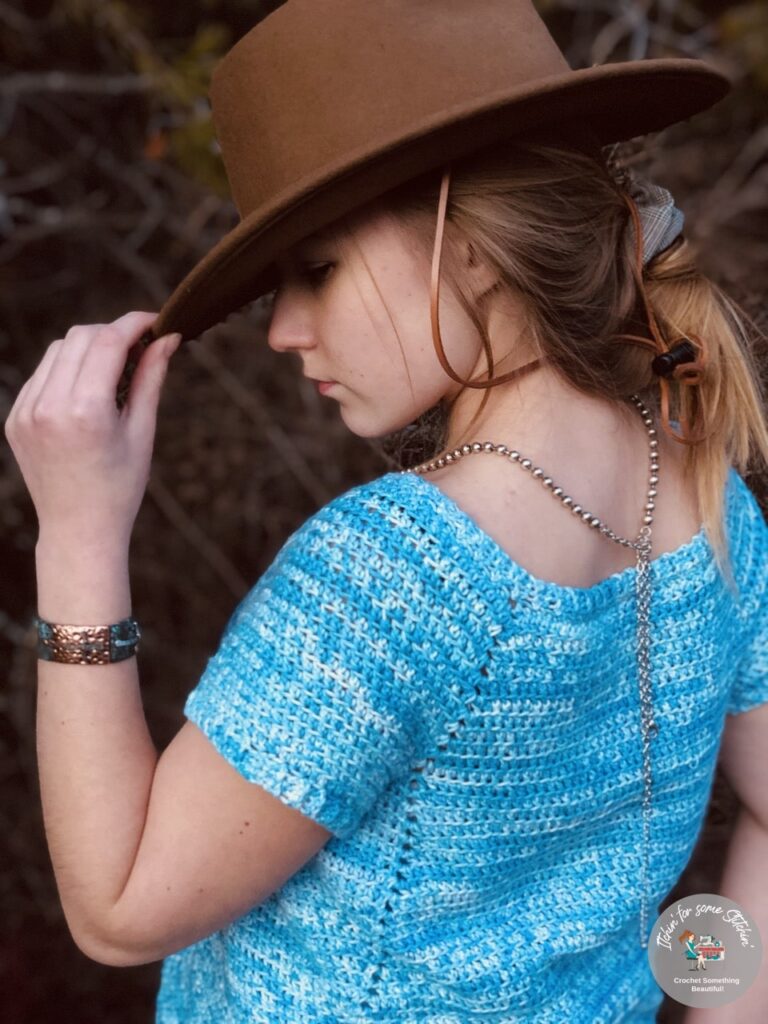
This was my very first raglan design and also my first top-down garment worked entirely in the round. Once I started, I quickly fell in love with the process. There’s something incredibly satisfying about watching a garment take shape from the neckline down and adding the sleeves, hem, and collar at the very end.
Despite the thoughtful construction, this tee keeps things simple. With the exception of the hem, the entire design uses one easy, beginner-friendly stitch throughout. The result is a comfortable, wearable top with subtle texture that adds interest without overpowering the design.
Whether you’re crocheting your first garment or adding a handmade staple to your wardrobe, this pattern is designed to be both approachable and enjoyable to make.
Where To Go Next With This Pattern
The Penelope Raglan Tee is a great starting point if you’re interested in crocheting wearable garments or learning top-down construction. If you’re here for the free pattern, everything you need to make the tee is included below. For those who prefer a printable pattern, Penelope is also available as an ad-free PDF for easy reference while you work.
If you enjoy creating lightweight garments for warmer weather and want to continue building a handmade wardrobe, the Lindie Summer Cardi is a natural next project. Its long sleeves and relaxed fit make it an easy layering piece that pairs beautifully with simple tops like this one while still offering the satisfaction of a full garment.
And if garment-making has sparked your interest, the Crochet Conservatory includes this pattern in the Library along with additional wearable designs and technique-focused projects created to help you build confidence with crochet clothing over time.

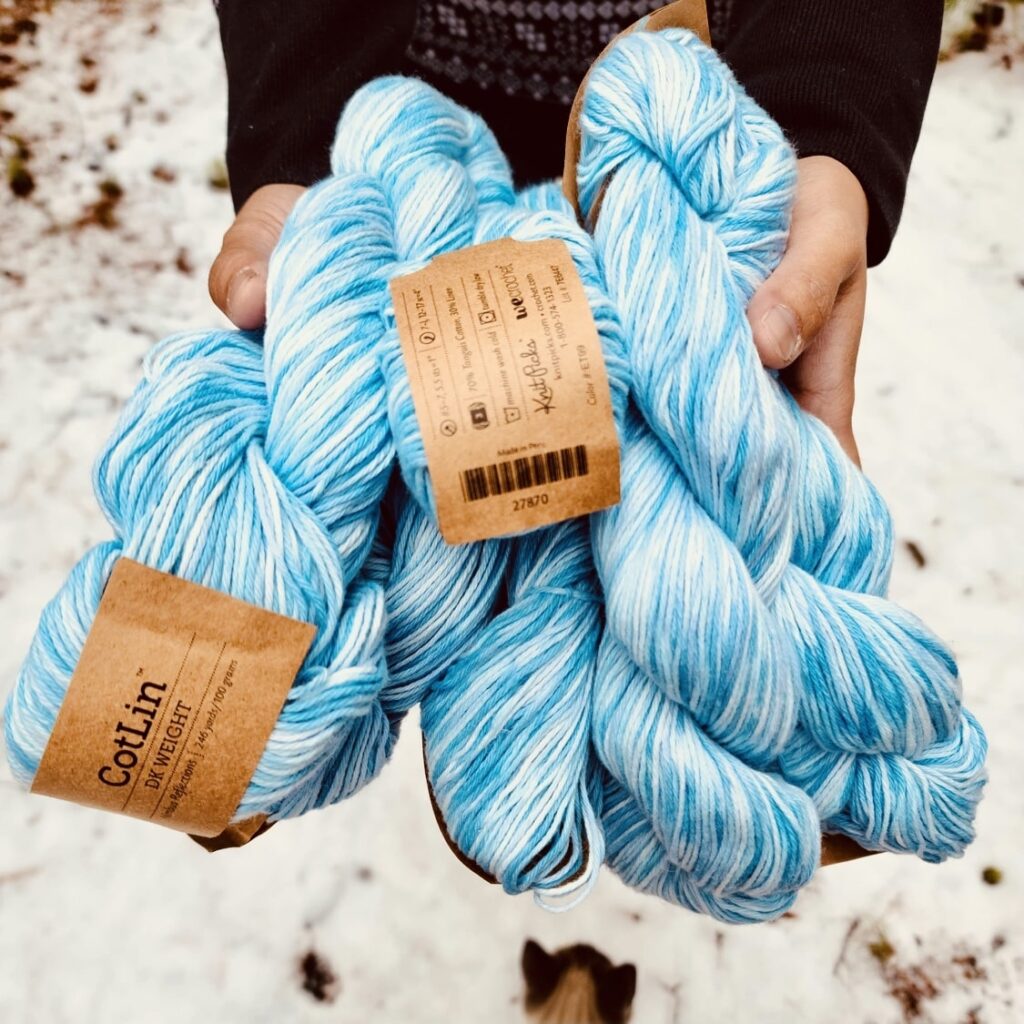
Yarn Details: It’s all about the yarn baby!
I chose Knit Picks CotLin DK from We Crochet for this project because it’s lightweight and made of a cotton/linen blend that keeps you cooler during those warm weather temperatures.
It was the PERFECT choice!

Initially I was concerned about designing a shirt that would be cool enough for spring.
I was worried it may become “heavy'” and uncomfortable to wear, even with a lightweight yarn.
So I was pleasantly surprised during the design process when I tested it on my daughter and she exclaimed “Oh I love how light this feels!”
I did not coach her folks. I promise.
It was literally the first thing she said and it assured me that I had made the right yarn choice for this tee!
You can purchase it via my affiliate link below.
Check Out These Other Patterns I LOVE!

1. Spring Gingham Placemats / 2. Granny Hexagon Pillow / 3. Nessa’s Ruffle Butt Dog Sweater
How to Crochet the Penelope Raglan Tee
**THIS IS AN ORIGINAL PATTERN. Please see my Copyright Statement for details.

Prefer a PDF?
This pattern is available as a large print, ad-free, printable PDF pattern. It includes sizes XS – 5X.

Summary:
Add a touch of style to your casual wear wardrobe this season with the Penelope Raglan Tee. A seamless crochet project worked in the round that can be whipped up in just a few days! Designed with a lightweight cotton-linen blend yarn, this tee is super comfortable and absolutely perfect for warmer weather.
Difficulty level: Level 3 – Intermediate
Finished Dimensions:
Pattern is made according to the Crafty Yarn Council’s women size standards each size listed below:
CHEST FIT / TOTAL LENGTH/ WIDTH (shoulder to shoulder) / NECK OPENING / SLEEVE LENGTH (underarm to cuff)
- All measurements are approximate, measured flat pre-wear, and are provided in inches.
X-small (XS): 28-30 / 19 / 14-14.5 / 7.5 / 3
Small (S): 32-34 / 19.5 / 14.5-15 / 8 / 3
Medium (M): 36-38 / 20 / 15.5-16 / 9 / 3
Large (L): 40-42 / 20.5 / 16.5-17 / 9 / 3.5
X-large (XL): 44-46 / 21 / 17.5 / 9.5 / 3.5
2X: 48-50 / 26.5 / 18 / 9.5 / 4
3X: 52-54 / 26.5 / 18 / 9.5 / 4
4X: 56-58 / 27 / 18.5 / 10 / 4.5
5X: 60-62 / 27 / 18.5 / 10 / 4.5
This shirt is designed to be loose fitting with slight positive ease.
Gauge:
19 stitches and 13 rows = 4-inches in hdc.
Materials:
- Knit Picks CotLin DK from We Crochet, #3 light-weight, Nimbus Reflections; 70% Tanguis Cotton, 30% Linen.
~Yarn alternatives: Yarnspirations Caron Cakes or Mary Maxim Fresh.
- Crochet Hook size I/9 5.5mm (for main) and F/5 3.75mm (for trim) or whatever hook is necessary to obtain the correct gauge.
~ Total yardage: 246yards / 100 grams per skein. XS-S = 3 skeins, approx. 738 yards. M-L = 4-5 skeins, approx. 984-1230 yards. XL-5X = 5-6 skeins, approx. 1230-1476 yards.
- Measuring tape
- Stitch markers (optional)
- Scissors
- Tapestry needle for weaving in ends
Abbreviations:
Pattern is written in US terms. *Click on abbreviation names for tutorials
Stitch/es (st/sts)
Back Post Only (bpo) – this is the bump on the backside of a chain stitch
*____* Repeat indicated instructions
Additional Notes:
- Read all pattern notes, instructions, and other provided details carefully before starting the project to make sure you understand everything. It could save you hours & a lot of headaches!
- Make a swatch that measures at least 10 x 10 cm / 4 x 4 inches using the stitch provided under the Gauge Section. If your swatch matches the gauge, then you are all set to start the project. If the gauge is wrong, you might need to change your crochet hook – increase your hook size if your stitches are smaller & decrease your hook size if your stitches are larger.
- All measurements given are unblocked and measured flat pre-wear and pre-seaming as fabric pieces may stretch during after blocking, wearing, and seaming.
- Provided measurements are as exact as possible, but are given as approximates. This is because yarn variances, crochet tension, & individual technique might give variations in the result, which changes from person to person.
- Please be sure to take your own body measurements and let those measurements serve as your guide. The Craft Yarn Council has a Standard Body Measurement guide you can use as reference for taking your own body measurements.
- This pattern is crocheted in the round, seamless, from the top-down. Sleeves, collar, and hem are added after the main body is worked.
- Care Instructions: Machine wash cold & Tumble dry low.
- Final counts are indicated in parentheses in the following order (XS), (S), (M), (L), (XL), (2X), (3X), (4x), (5x).
Instructions
Main Yoke
~ Worked continuously in the round. Use I/9 5.5mm hook.
Ch (101), (107), (121), (121), (129), (129), (135), (135), (135)
Slp-st the first and last chs together to form a large ring. Be sure not to twist the chain.
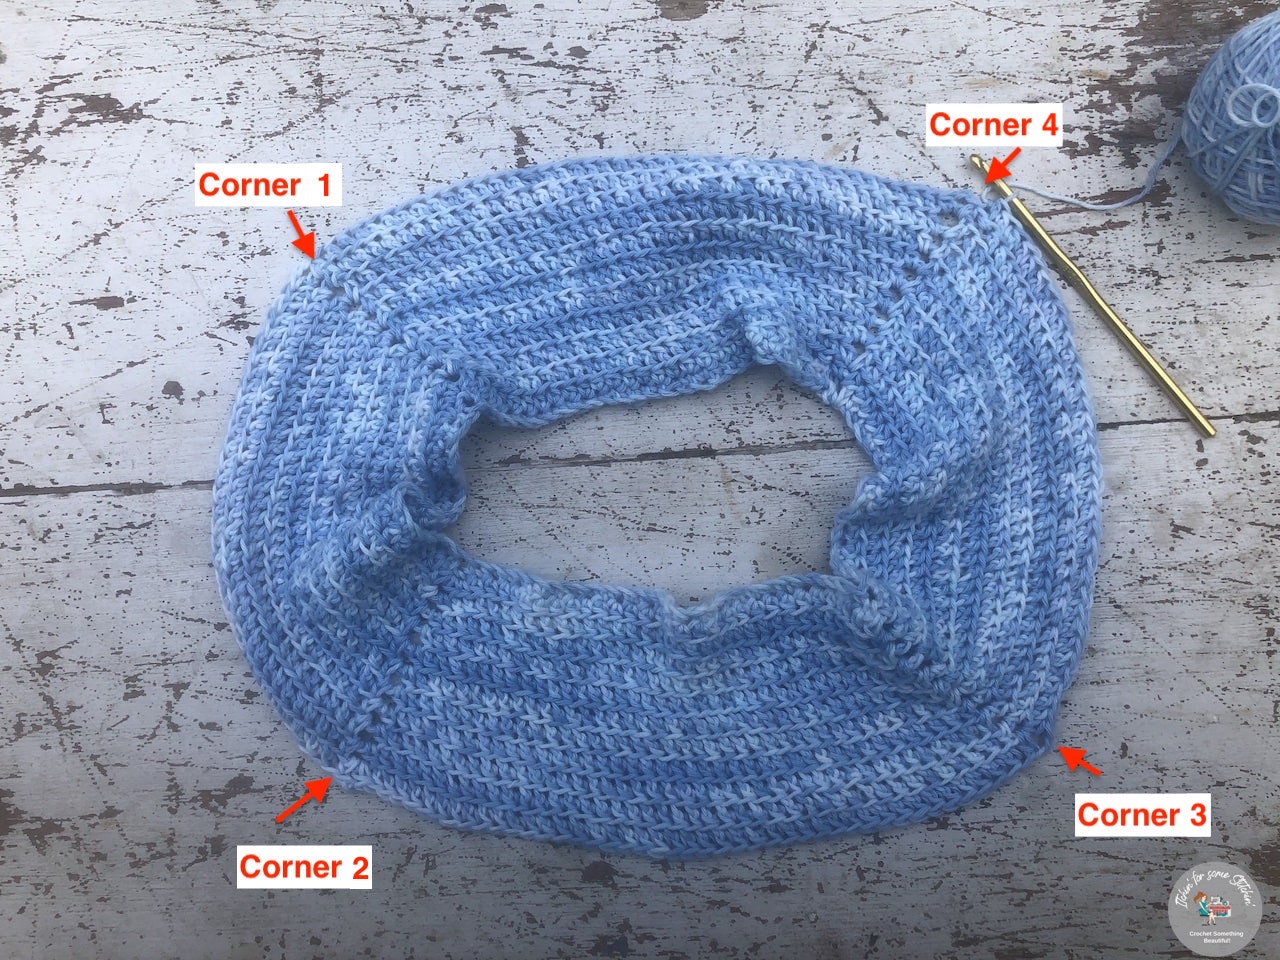
Round 1: Sc in the next (28), (30), (34), (34), (36), (36), (38), (38), (38) chs, (sc, ch 2, sc) in the next ch [creates corner 1], sc in the next (20), (21), (24), (24), (26), (26), (27), (27), (27) chs, (sc, ch 2, sc) in the next ch [creates corner 2], sc in the next (28), (30), (34), (34), (36), (36), (38), (38), (38) chs, (sc, ch 2, sc) in the next ch [creates corner 3], sc in the next (20), (21) (24), (24), (26), (26), (27), (27), (27) chs, (sc, ch 2, sc) in the next ch [creates corner 4]. (104 sts), (110), (124), (124), (132), (132), (138), (138), (138)
NOTES:
~ At this point you should have created two long sides which will become the front and back of your tee, as well as two short sides which will become the left and right sides of your garment. Each section is separated by one corner.
~ After round 1, your total stitch count increases by 3, but each side increases by 2 sts. So you should have: (30), (32), (36), (36), (38), (38), (40), (40), (40) [long side 1] + (22), (23), (26), (26), (28), (28), (29), (29), (29) [short side 1] + (30), (32), (36), (36), (38), (38), (40), (40), (40) [long side 2] + (22), (23), (26), (26), (28), (28), (29), (29), (29) [short side 2] = final st counts
~ To help keep track of proper stitch count, I advise marking at least corners 1 and 4 with a stitch marker after every round, but it may be helpful to mark all 4 corners and keep a key so you are sure not to mix up your corners.
~ If you want to keep track of your first stitch of each round, place your stitch marker in the second HDC of the (HDC, ch 2, HDC) corner of corner 4.
See image below.
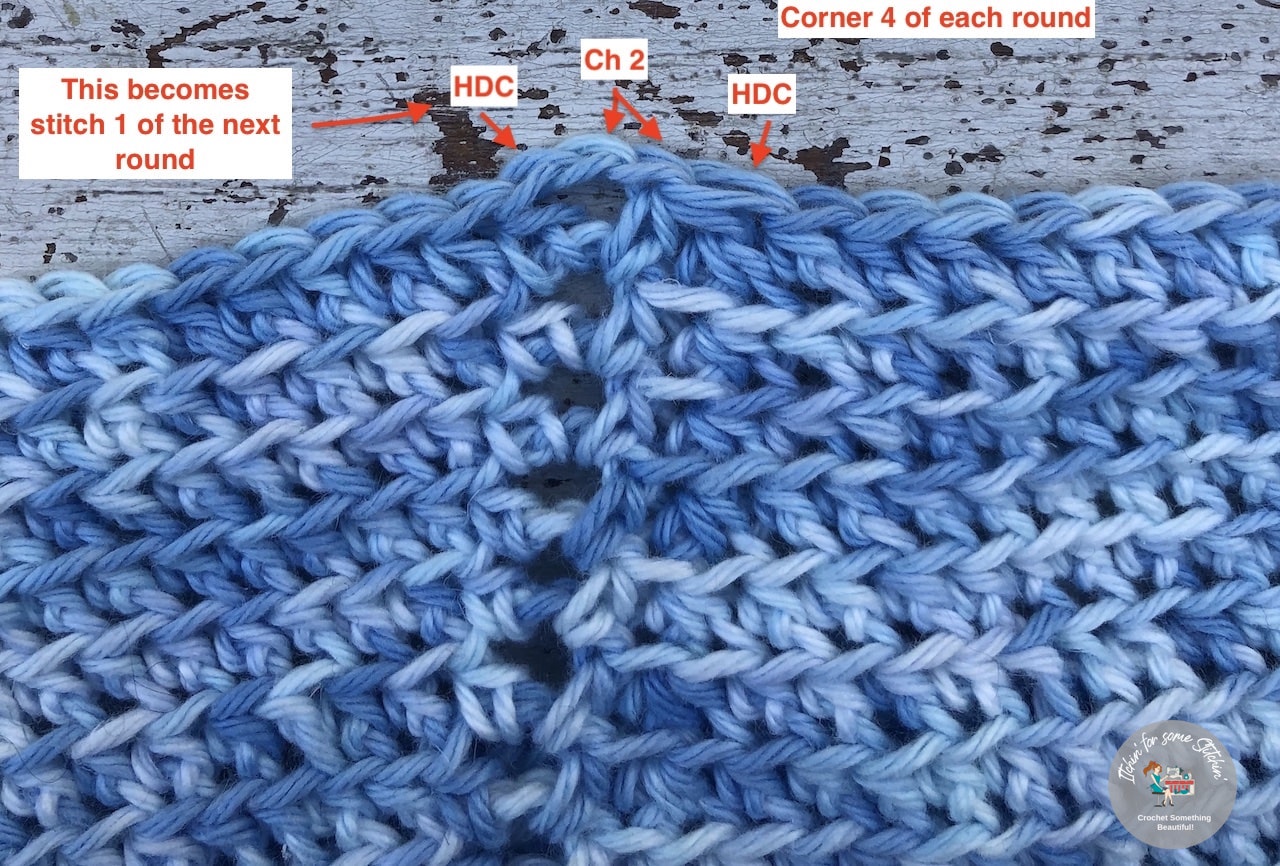
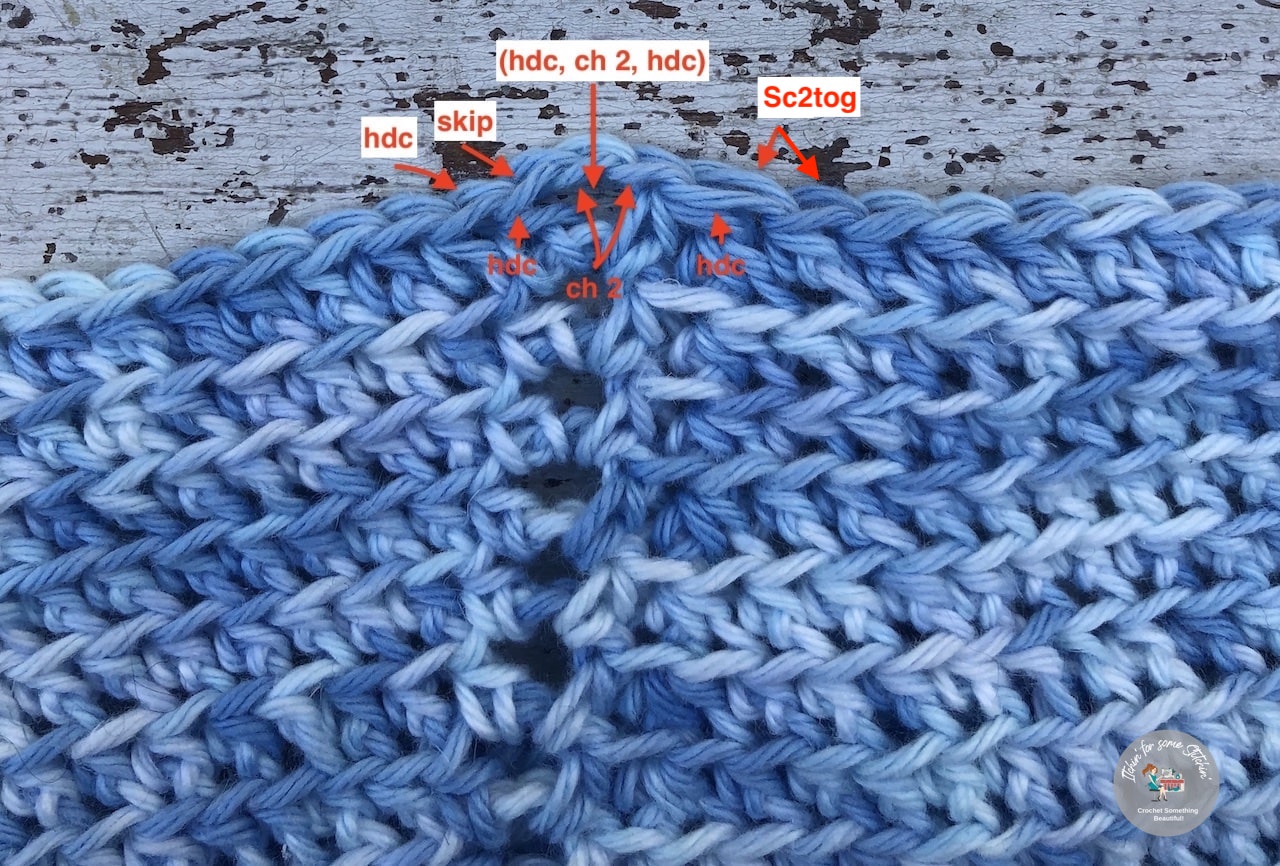
Round 2: Hdc in the blo of the next st and each st to corner 1, (hdc, ch 2, hdc) in corner 1, skip the next st, hdc in the blo of the next st and each st to corner 2, (hdc, ch 2, hdc) in corner 2, skip the next st, hdc in the blo of the next st and each st to corner 3, (hdc, ch 2, hdc) in corner 3, skip the next st, hdc in the blo of the next st and each st to corner 4, (hdc, ch 2, hdc) in corner 4. (108 sts), (114), (128), (128), (136), (136), (142), (142), (142).
***Please see image below for clarifications on how to work the corners.

Sizes XS – XL
Rounds 3-10: Hdc in the blo of each st to corner 1, (hdc, ch 2, hdc) in corner 1, skip the next st, hdc in blo in each st to corner 2, (hdc, ch 2, hdc) in corner 2, skip the next st, hdc in blo in each st to corner 3, (hdc, ch 2, hdc) in corner 3, skip the next st, hdc in blo in each st to corner 4, (hdc, ch 2, hdc) in corner 4.
NOTES:
~ For rounds 2-10 the stitch count for each side – front, back, left side, and right side – each increase by 1 st each round. This means the final st count should increase by 4 each round.
~ At the end of round 10 you should have: (39), (41), (45), (45), (47) [long side 1] + (31), (32), (35 (35), (37) [short side 1] + (39), (41), (45), (45), (47) [long side 2] + (31), (32), (35 (35), (37) [short side 2] = final st counts of (140 sts), (146), (160), (160), (168).
Round 11: Hdc in the blo of each st to corner 1, (hdc, ch 2, hdc) in corner 1, skip the next st, hdc in the blo in the next st and in each st to corner 2, (hdc, ch 2, hdc) in corner 2, skip the next st, hdc in the blo in the next st and in each st to corner 3, (hdc, ch 2, hdc) in corner 3, skip the next st, hdc in the blo in the next st and in each st to corner 4, (hdc, slp-st) into corner 4. Do NOT bind off. Proceed to underarm 1.
NOTES:
~ At the end of round 11 stitch count for each side – front, back, left side, and right side – each increase by 1 st each round. This means the final st count should increase by 4.
~ At the end of round 11 you should have: (40), (42), (46), (46), (48) [long side 1] + (32), (33), (36), (36), (38), (38), (38), (39), (39) [short side 1] + (40), (42), (46), (46), (48) [long side 2] + (32), (33), (36), (36), (38) [short side 2] = final st counts of (144 sts), (150), (164), (164), (172).
Sizes 2X – 5X
Rounds 3-16: Hdc in the blo of each st to corner 1, (hdc, ch 2, hdc) in corner 1, skip the next st, hdc in blo in each st to corner 2, (hdc, ch 2, hdc) in corner 2, skip the next st, hdc in blo in each st to corner 3, (hdc, ch 2, hdc) in corner 3, skip the next st, hdc in blo in each st to corner 4, (hdc, ch 2, hdc) in corner 4.
At the end of round 16 you should have: (53), (55), (55), (55) [long side 1] + (43), (44), (44), (44) [short side 1] + (53), (55), (55), (55) [long side 2] + (43), (44), (44), (44) [short side 2] = final st counts of (sts), (192), (198), (198), (198).
~ For rounds 2-16 the stitch count for each side – front, back, left side, and right side – each increase by 1 st each round. This means the final st count should increase by 4 each round.
Rounds 17-20: Hdc in the blo of each st to corner 1, (hdc, ch 2, hdc) in corner 1, hdc the blo of the next st, hdc in blo in each st to corner 2, (hdc, ch 2, hdc) in corner 2, hdc the blo of the next st, hdc in blo in each st to corner 3, (hdc, ch 2, hdc) in corner 3, hdc the blo of the next st, hdc in blo in each st to corner 4, (hdc, ch 2, hdc) in corner 4.
~ For rounds 17-20 the stitch count for each side – front, back, left side, and right side – each increase by 2 st each round. This means the final st count should increase by 8 each round.
At the end of round 20 you should have: (61), (64), (64), (64) [long side 1] + (51), (52), (52), (52) [short side 1] + (61), (64), (64), (64) [long side 2] + (51), (52), (52), (52) [short side 2] = final st counts of (224 sts), (232), (232), (232).
Round 21: Hdc in the blo of each st to corner 1, (hdc, ch 2, hdc) in corner 1, hdc in the blo of the next st, hdc in the blo in the next st and in each st to corner 2, (hdc, ch 2, hdc) in corner 2, hdc in the blo of the next st, hdc in the blo in the next st and in each st to corner 3, (hdc, ch 2, hdc) in corner 3, hdc in the blo of the next st, hdc in the blo in the next st and in each st to corner 4, (hdc, slp-st) into corner 4. Do NOT bind off. Proceed to underarm 1.
Love Pinterest?
Save this post for later!
Form the underarms (ALL sizes)
Underarm 1: Ch (19), (20), (23), (23), (23), (25), (26), (26), (26), slp-st to corner 3, bind off.
Underarm 2: Attach yarn via a slp-st into corner 1, ch (19), (20), (23), (23), (23), (25), (26), (26), (26) slp-st to corner 2, do NOT bind off, start round 12 for XS-XL or round 22 for 2X-5X.
NOTES:
~ At this point you will start forming the body of the tee which is worked around the two long sides and the chains created for each underarm.
~ This means you will have a new stitch count: (40), (42), (46), (46), (48), (63), (66), (66), (66) [long side 1] + (19), (20), (23), (23), (23), (25), (26), (26), (26) [underarm 1] + (40), (42), (46), (46), (48), (63), (66), (66), (66) [long side 2] + (19), (20), (23), (23), (23), (25), (26), (26), (26) [underarm 2] = final st counts of (118), (124), (138), (138), (142), (176), (184), (184), (184).
***Please see the images below for clarifications on creating the underarms (end of round 11 for XS-XL or round 21 for 2X-5X.

Main Body (ALL sizes)
~ Worked continuously in the round. Use I/9 5.5mm hook.
Round 12 (XS-XL) / 22 (2X-5X): (Hdc, ch 2, hdc) into corner 2 (right next to the slp-st) skip the next st, hdc in blo of each st to corner 3, (hdc, ch 2, hdc) into corner 3, hdc in the bpo of each chain stitch to corner 4, (hdc, ch 2, hdc) in corner 4, skip the next st, hdc in the blo of each st to corner 1, (hdc, ch 2, hdc) into corner 1, hdc in the bpo of each chain stitch to corner 2. (124), (128), (142), (142), (146), (184), (192), (192), (192).
Mark corner 2 with a stitch marker.
Round 13-22 (XS-XL) / 23-35 (2X-5X): (Hdc, ch 2, hdc) into corner 2, skip the next st, hdc in the blo of each st to corner 3, (hdc, ch 2, hdc) into corner 3, skip the next st, hdc in the blo of each st to corner 4, (hdc, ch 2, hdc) in corner 4, skip the next st, hdc in the blo of each st to corner 1, (hdc, ch 2, hdc) into corner 1, skip the next st, hdc in the blo of each st to corner 2.
NOTES:
~ For rounds 13-22 (XS-XL) / 23-35 (2X-5X) stitch count for each side – front, back, left side, and right side – each increase by 1 st each round. This means the final st count should increase by 4 each round.
~ So at the end of round 22 (XS-XL) / 35 (2X-5X) you should have: (51), (53), (57), (57), (59), (78), (81), (81), (81) [long side 1] + (30), (31), (34), (34), (36), (40), (41), (41), (41) [underarm 1] + (51), (53), (57), (57), (59), (78), (81), (81), (81) [long side 2] + (30), (31), (34), (34), (36), (40), (41), (41), (41) [underarm 2] = final st counts of (164), (168), (182), (182), (190), (236), (244), (244), (244).
Round 23 (XS-XL) / 36 (2X-5X): (Hdc, ch 2, hdc) into corner 2, skip the next st, hdc in the blo of each st to the last 2 sts before corner 3, sc2tog in the blo the last 2 sts before corner 3, (hdc, ch 2, hdc) into corner 3, skip the next st, hdc in the blo of each st to the last 2 sts before corner 4, sc2tog in the blo the last 2 sts before corner 4, (hdc, ch 2, hdc) in corner 4, skip the next st, hdc in the blo of each st to the last 2 sts before corner 1, sc2tog in the blo the last 2 sts before corner 1, (hdc, ch 2, hdc) into corner 1, skip the next st, hdc in the blo of each st to the last 2 sts before corner 2, sc2tog in the blo the last 2 sts before corner 2. (164), (168), (182), (182), (190), (236), (244), (244), (244).
***Please see the image below for how to work the corners.
Repeat round 23 (XS-XL) / 36 (2X-5X) until desired length for your size has been reached. See chart below.
At the end of your final round you should be back to corner 2, (hdc, ch 2, hdc) into corner 2, skip the next st, slp-st into the next st, ch 6. Do NOT bind off. Start the hem.


***The number of rows may vary based on choice of yarn, tension, and hook size. If you are using the yarn and hook indicated in this pattern AND you have met gauge properly, the approximate number of rows is provided in ( ).
FABRIC LENGTH / (APPROX. # OF TOTAL ROWS)
XS: 18 / (50)
S: 18.5 / (52)
M: 19 / (54)
L: 19.5 / (56)
XL: 19.5 / (56)
2X-3X: 24.5 / (71)
4X-5X: 25 / (73)
Hem
~ Worked in rows around the bottom edge of the shirt. Use an F/5 3.75mm hook.
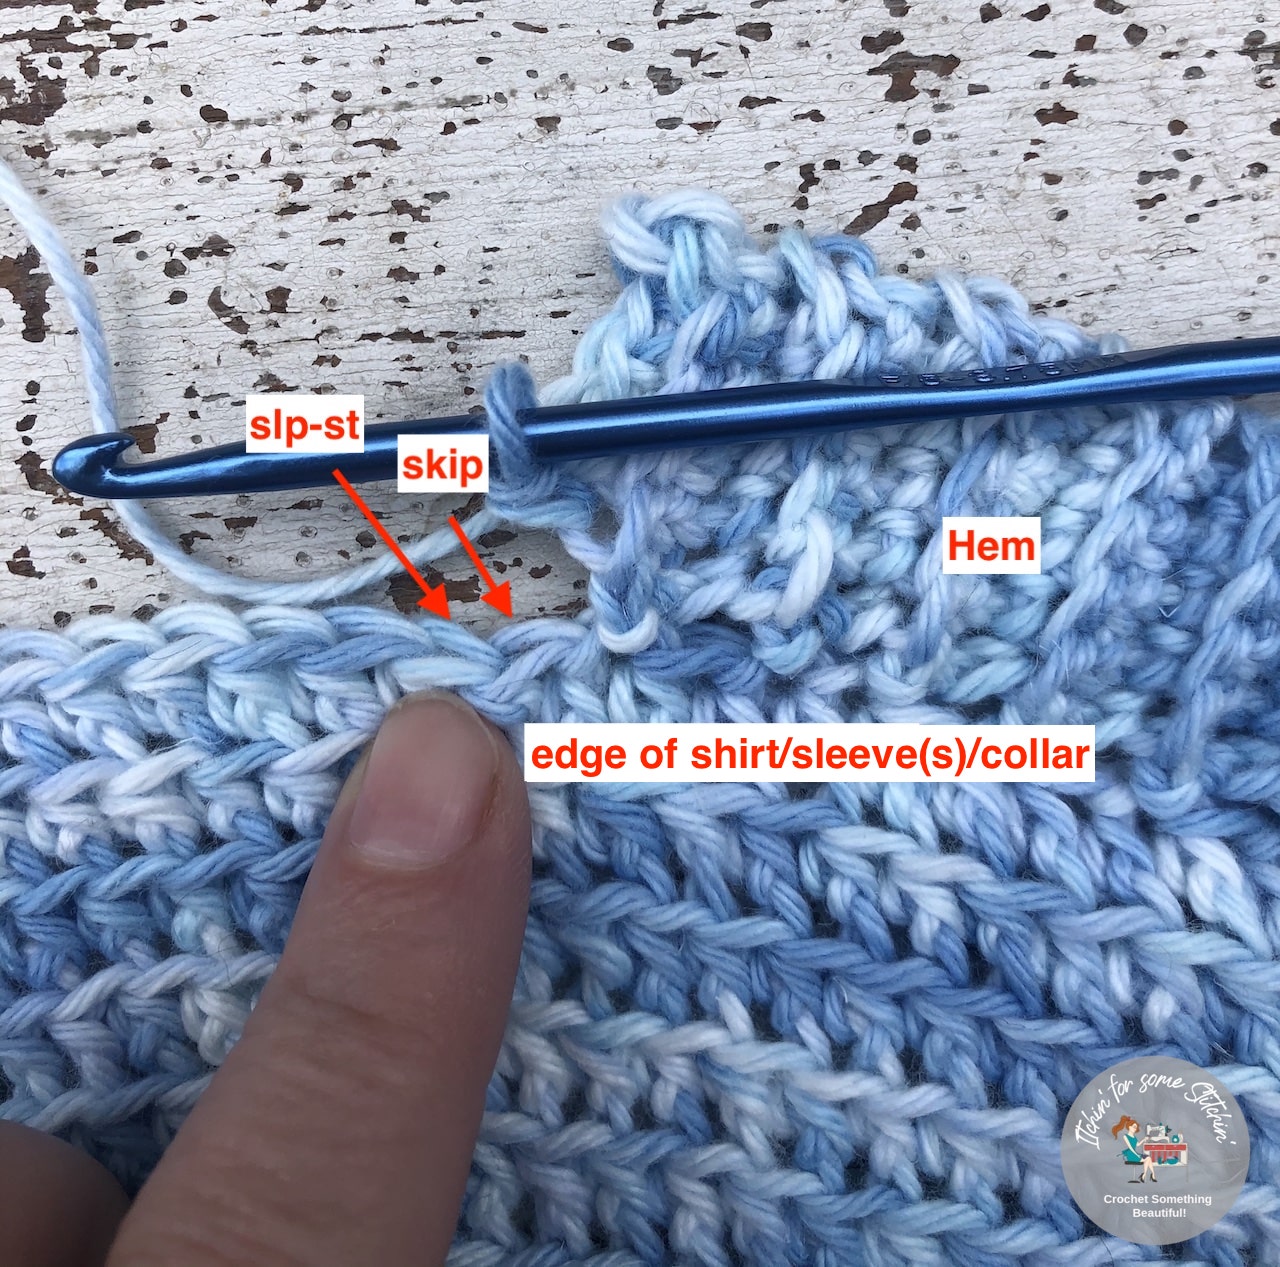
Row 1: Turn work, sc in the blo of the 2nd st from the hook and in each st across, skip the next st on the edge of the shirt, slp-st into the next st on the edge of the shirt. (5 sc)
Row 2: Ch 1, turn work, sc in the blo of each st across. (5 sc)
Row 3: Ch 1, turn work, sc in the blo of each st across, skip the next st on the edge of the shirt, slp-st into the next st on the edge of the shirt. (5 sc)
Repeat rows 2-3 around the bottom edge of the shirt. Turn the shirt inside out. Slp-st the final two edges of the hem together. Bind Off & Weave in the ends. Turn the shirt right side out.
***See image below.
Sleeves (Make 2)
~ Worked continuously in the round. Use I/9 5.5mm hook.
Round 1: Attach yarn at any corner on the backside of the shirt, ch 2 (counts as an hdc), hdc in the blo of each st around including the chs of each ch 2-space, slp-st to the top of the ch 2 to close. (55 sts), (56), (58), (58), (60), (60), (78), (78), (78).
Round 2: Insert stitch marker — Ch 2 (does not count as a st), hdc in the blo of the next st and in each st around, slp-st to the top of the ch 2 to close. Repeat round 2 to desired sleeve length per chart below. At the end of the final round, ch 4. Do NOT bind off. Start the cuff. (55 sts), (56), (58), (58), (60), (60), (78), (78), (78).
***The number of rows may vary based on choice of yarn, tension, and hook size. If you are using the yarn and hook indicated in this pattern AND you have met gauge properly, the approximate number of rows is provided in ( ).
FABRIC LENGTH / (APPROX. # OF ROWS)
XS-M: 2.5 / (7)
L-XL: 3 / (9)
2X-3X: 3.5 / (11)
4X-5X: 4 / (13)
Cuffs
~ Worked in rows around the bottom edge of the sleeves. Use an F/5 3.75mm hook.
See picture at the bottom of the hem section for reference.
Row 1: Turn work, sc in the blo of the 2nd st from the hook and in each st across, skip the next st on the edge of the sleeve, slp-st into the next st on the edge of the sleeve. (3 sc)
Row 2: Ch 1, turn work, sc in the blo of each st across. (3 sc)
Row 3: Ch 1, turn work, sc in the blo of each st across, skip the next st on the edge of the shirt, slp-st into the next st on the edge of the sleeve. (3 sc)
- Repeat rows 2-3 around the bottom edge of the sleeve.
- Turn the shirt inside out.
- Slp-st the final two edges of the hem together.
- Bind Off & Weave in the ends.
- Turn the shirt right side out.
Collar
~ Worked in rows around the top edge of the collar. Use an F/5 3.75mm hook.
See picture at the bottom of the hem section for reference.
Row 1: Attach yarn at any corner, ch 4, turn work, sc in the 2nd ch from the hook and in each ch across, skip the next stitch on the collar edge, slp-st into the next st on the collar edge. (3 sc)
Row 2: Ch 1, turn work, sc in the blo of each st across. (3 sc)
Row 3: Ch 1, turn work, sc in the blo of each st across, skip the next st on the edge of the shirt, slp-st into the next st on the edge of the shirt. (3 sc)
- Repeat rows 2-3 around the bottom edge of the shirt.
- Turn the shirt inside out.
- Slp-st the final two edges of the hem together.
- Bind Off & Weave in the ends.
- Turn the shirt right side out.
There you have it!
I have to tell you that my pattern testers totally loved this pattern and I hope you do too. 😃
Honestly, I think the hardest part about this pattern is keeping your stitch count accurate, if you can do that then you can do this pattern!
Please be sure to share your makes with me on social media with #itchinforsomestitchin and #penelopetee.
Thank you for coming to my blog! By sharing my content and/or making a purchase you are making it possible for me to continue producing and sharing free content for everyone to enjoy. I sincerely appreciate your support!
Until next time… Happy Crocheting!


Please Share!
Virginia
Saturday 7th of October 2023
The button that says… SIZE-INCLUSIVE PENELOPE RAGLAN TEE PDF
Is not ca clickable PDF. Can you make it Clickable PDF since it is supposed to be a clickable PDF.
When I touch it… it does nothing.
I don’t want the Ad website version. I rather have the Ad-free paid PDF.
So please make that button work!
Comment here with a Link to the PDF so I can pay for the pattern.
Itchin4Stitchin
Tuesday 10th of October 2023
Hi Virgina,
Thank you so much for letting me know! I added the link, but apparently didn't hit the "apply" button because you are right, it was missing. My apologies! It should be working now. If you like, here is also the direct link: https://shop.itchinforsomestitchin.com/product/penelope-raglan-tee-crochet-pattern/
Sincere thanks,
RaeLynn
Mary
Sunday 13th of March 2022
Hi I am trying to start the medium but when I get to the end I have one stitch left over. 35+25+35+25 = 120 and I have 121 stitches as per the pattern. What am I doing wrong.
Itchin4Stitchin
Sunday 13th of March 2022
Hi Mary,
I know it can be a little confusing. If you have chained 121 sts as per the pattern then you have done nothing wrong. There is an extra stitch in the foundation chain that "disappears" when you slp-st the first and last sts together (which is why you are working 1 less st than what is in the foundation chain in round 1) - because the final st is st #35 (in the section after corner 3) and it technically covers that extra st (which is the first st). However, since you are adding another st into this #35 (because this is the st where corner 4 is built) st you are actually gaining that extra st back -- which is why round 2 only increases by 3 instead of 4.
Does that make sense?
If not, please email me at [email protected] and I'll see if I can walk you through it. It is on my to do list to do a video for this -- I apologize for not having got to it yet.
Sincerely,
RaeLynn
Cynthia Campinell
Tuesday 4th of January 2022
Love this top...but from R23 on, following the sc2tog,and skipping l st after the corner, my top is getting skinnier. I am running out of side stitches! What do you think I'm doing wrong?? I may have to continue on w/o corners & just crochet straight to the bottom....
Cynthia Campinell
Sunday 16th of January 2022
@Itchin4Stitchin, sorry...computer died for a few weeks! Anyway, I am still at a standstill. So what could be the problem if I am doing the sc2tog & then corner st& skipnext....I don't what what else to do differently. ??
Itchin4Stitchin
Tuesday 4th of January 2022
Hi Cynthia,
oh no! It actually sounds like to me that you may be losing stitches somehow if the project is getting skinner. Please email me at itchinforsomestitchin.com and let's see if we can figure this out for you!
Best, RaeLynn
Noreen
Tuesday 1st of June 2021
Cute top. I too would have made it. I read your explanation for not making all sizes free, as advertised. I think it should give the info re pricing in the original promo, not after going to the pattern. Most designers I follow don’t do this. Your decision, but please be totally transparent in the future from the get-go to show respect for everyone’s time. My best to you.
Itchin4Stitchin
Tuesday 1st of June 2021
Hi Noreen,
I greatly appreciate your constructive criticism. And since I received Elizabeth's comment I had a serious rethink and had decided that if I put it out for free in one of my events, I should leave it as so on the blog. I just didn't have an opportunity to up date the post until late last night.
I'm actually a little surprised because the update should have taken place around 10pm last night and your comment is posted at 4am this morning. I have double checked and the post is updated - it has ALL sizes XS - 5X free on the website.
Are you not seeing all sizes on your end for some reason?
Sincere thanks,
RaeLynn
patricia Adams
Sunday 4th of April 2021
Beautiful pattern but it said free I was disappointed it's only xs size I'm a 2 x size . Should be free in all sizes? Sorry to complain but larger women crochet too.
i
Itchin4Stitchin
Wednesday 7th of April 2021
Hi Patricia,
Firstly, thank you so much for your comment and just fyi, I've sent you a personal email as well. I do want to say that I completely understand your concern and it was worry of mine when I made the decision to limit the size(s) I put out for free when it comes to garments.
It was a difficult decision, but a necessary one for my business and my family as garment design can often take tremendous effort and time. Because of my family's needs and the extensive work that goes into my garment designs, I've actually considered not making any part of them free at all.
However, as a crochet designer and blogger, I try very hard to balance between free and paid content. I have learned that you cannot please everyone, but I do try to please as many as I can. Making at least one size out for free is my attempt to help strike that balance.
Additionally, the free size is NOT meant to be size exclusive in any way. I actually change the free size with each garment pattern, so next time it may be the M, L, XL, 2X, etc. that is free rather than the small and sometimes I provide multiple sizes for free as well, rather than just one.
I do ask for your understanding and want you to know that I do appreciate everyone's support of my small business.
Wishing you all the best!
Sincerely,
RaeLynn