

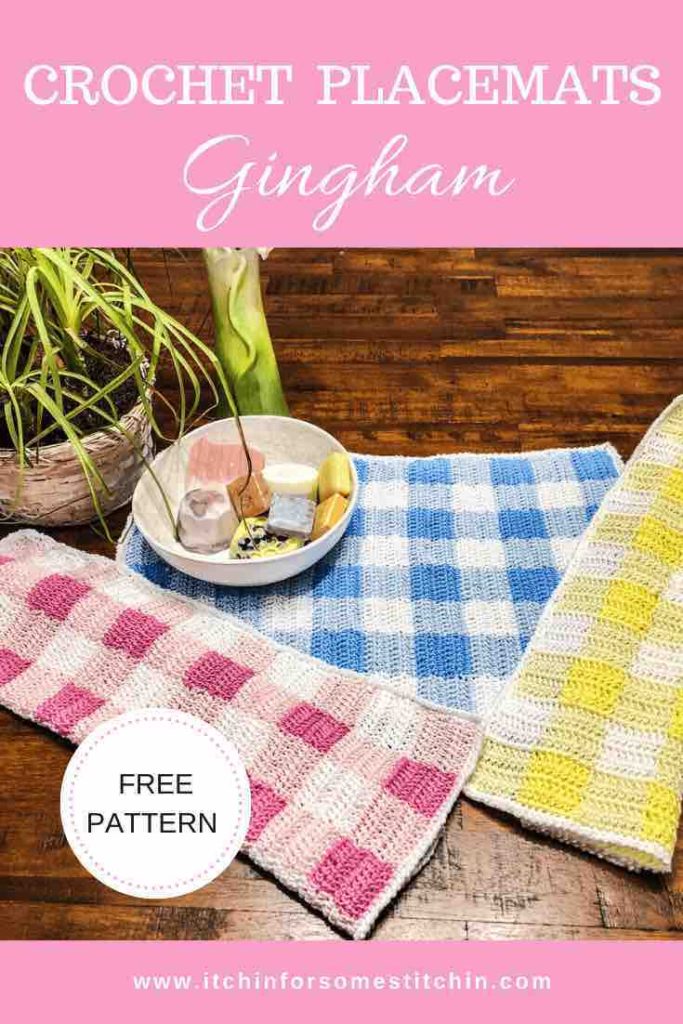
Hello Spring!

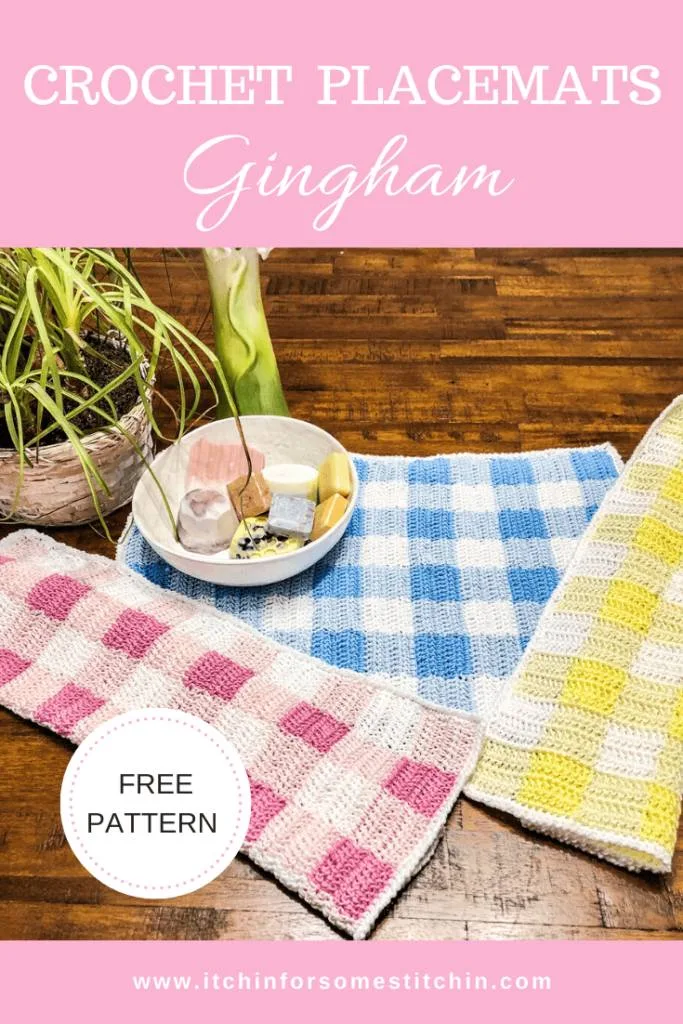
The flowers are just starting to peek out of the ground and spring is in the air. It’s the perfect time to share my gingham crochet placemats pattern!
Gingham always reminds me of spring – well, spring and The Wizard of Oz.
Dorothy’s blue gingham apron is actually the first time I remember seeing this fun pattern and I just loved it!
I never really thought this is something you could actually crochet, but you can!
And… it’s actually easier than you might think – especially if you are familiar with the plaid stitch.
If you are not familiar with how to crochet plaid or gingham, never fear!
It’s really not that complicated.
The main thing is coordinating three yarn colors, but it’s super easy once you get the hang of it!
Yarn Details: “It’s all about the yarn baby!”
I chose Rico Essentials Cotton DK from LoveCrafts for this pattern because they are 100% cotton and came in the spring colors I wanted for these placemats.
I have never used this yarn brand before, and I have to say I am quite please with it. It is super easy to work with and it has a gorgeous sheen that just makes the colors in these gingham placemats pop!
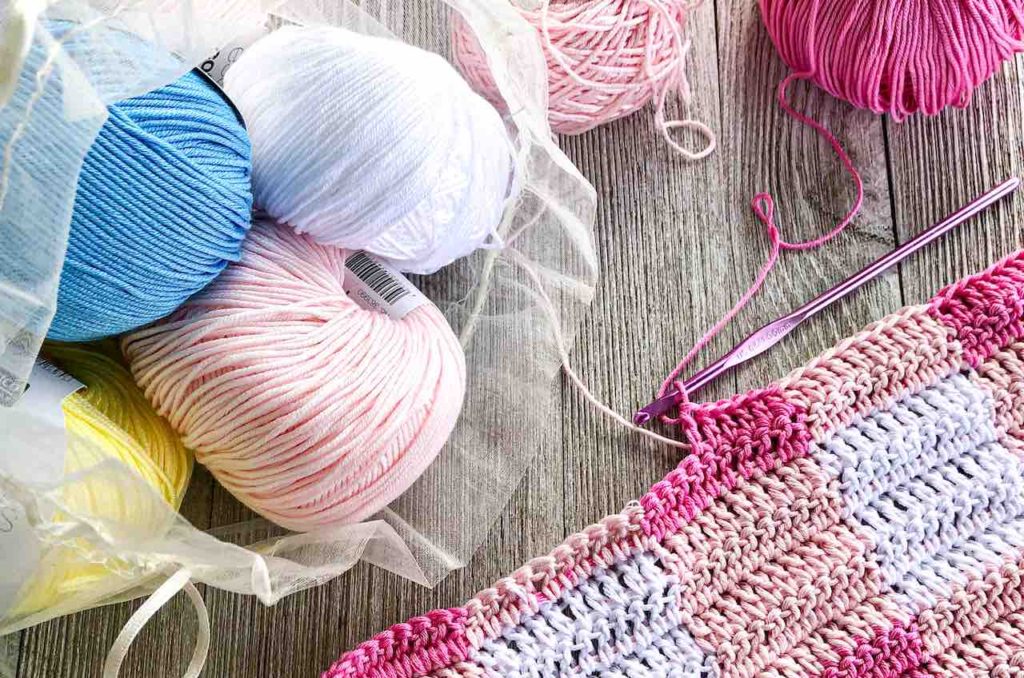

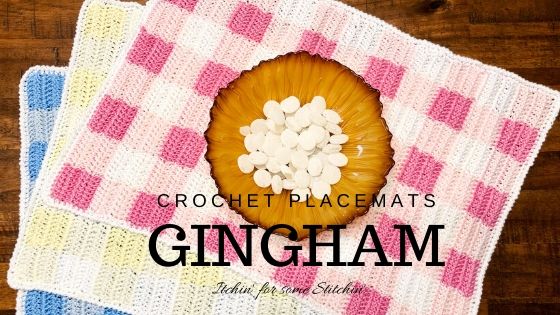
In addition to white, I chose two colors per placemat – one light shade and one medium shade. These colors include: light blue (light), sky blue (medium), pastel yellow (light), lemon (medium), pale pink (light) and pastel pink (medium).
You can purchase Rico Essentials Cotton DK through my LoveCrafts affiliate link HERE.
Gingham Crochet Placemats Pattern
**THIS IS AN ORIGINAL PATTERN. Please see my Copyright Statement for details.

Prefer a PDF?
The Spring Gingham Crochet Placemats Pattern is available as a high quality, ad-free PDF.
Find it in the following places:
Free Gingham Crochet Placemats Pattern Instructions


Summary:
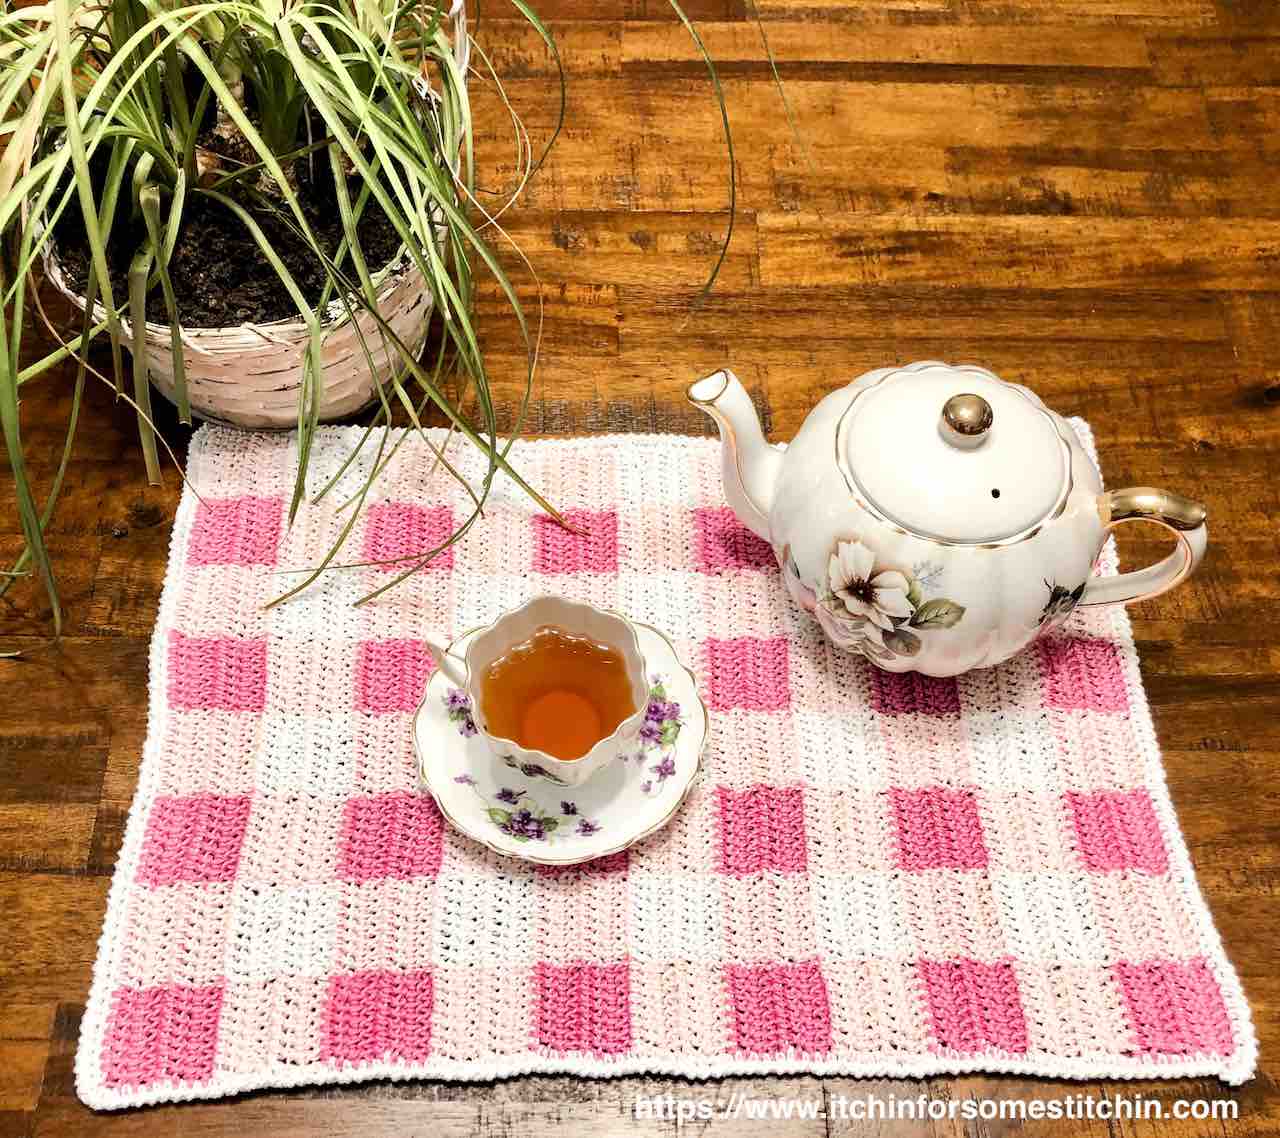
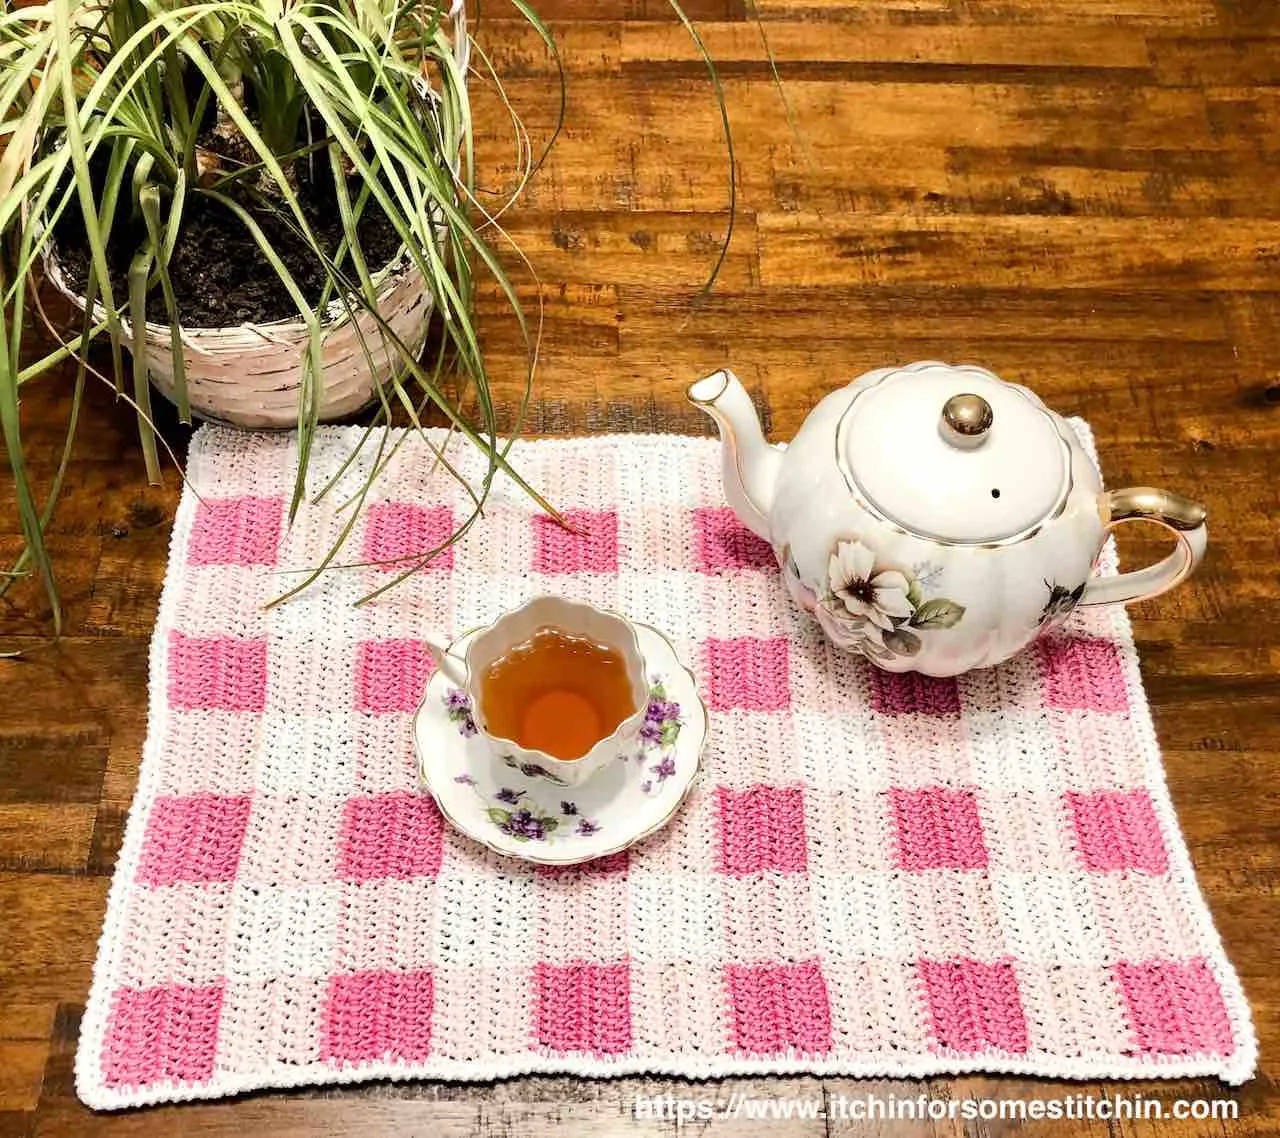
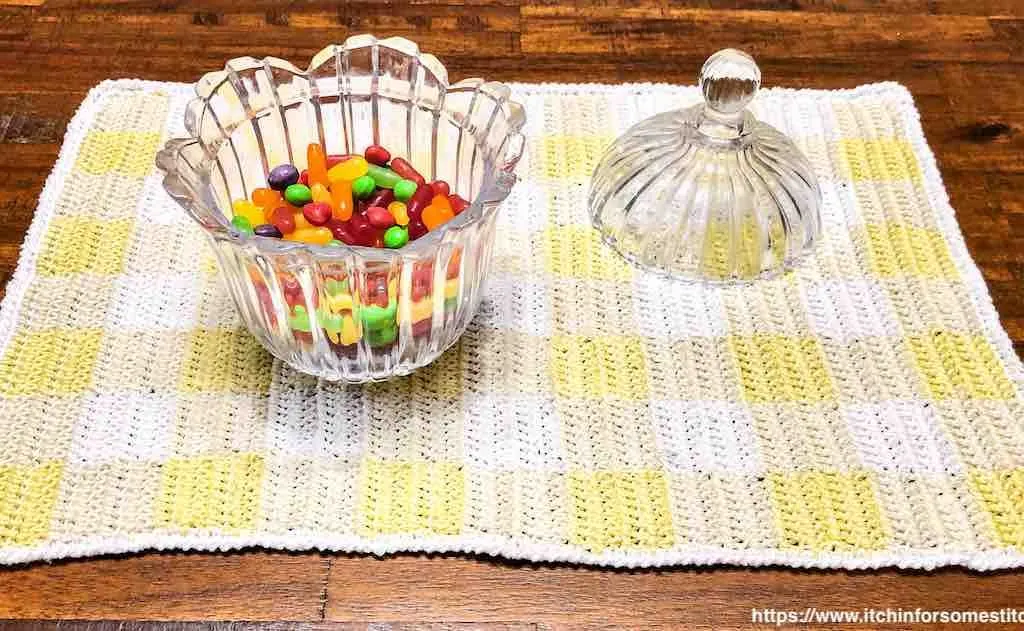
These gingham crochet placemats are a lovely way to brighten up your household this spring. Perfect for dressing up your springtime brunch or Easter table top! Place it beneath a plant, vase, picture frame, or other decorative piece to add a touch of pastel fun to your home decor!
Difficulty level: Level 3 – Intermediate
Finished Dimensions: 19.25 inches in length and 13.5 – inches in width.
Gauge: 21 stitches and 8 rows = 4-inches in double crochet (dc).
Materials:
- 3 colors of DK 100% cotton yarn – white, a light shade, and a medium shade.
NOTE: The light color of yarn should be a blending of the white & medium color.
~In this pattern I used Rico Essentials Cotton DK – 1 skein is 50 g ~130 m/ 142 yds. See details above.
Each placemat will require 1 skein white, 1 skein medium shade, and 1.25 skeins light shade.
~ Total yardage: 461.5 yd / 422m per placemat
- Crochet Hook size G / 6 – 4.00mm
- Yarn needle for weaving in ends
- Scissors
(Click HERE to find my favorite crochet tools & resources)
Abbreviations:
Pattern is written in US terms. *Click on abbreviation names for tutorials
Stitch/es (st/sts)
Crab stitch (Reverse Single Crochet) – worked exactly like the single crochet, but in reverse. Instead of working from right to left, you work from left to right. It creates a somewhat twisted, rounded edge that’s good for making a simple finished edge for your work.
Additional Notes:
- Read all pattern notes, instructions, and other provided details carefully before starting the project to make sure you understand everything. It could save you hours & a lot of headaches!
- Make a swatch that measures at least 10 x 10 cm / 4 x 4 inches using the stitch provide under the Gauge Section. If your swatch matches the gauge, then you are all set to start the project. If the gauge is wrong, you might need to change your crochet hook – increase your hook size if your stitches are smaller & decrease your hook size if your stitches are larger.
- All measurements given are unblocked.
- Provided measurements are as exact as possible, but are given as approximates. This is because yarn variances, crochet tension, & individual technique might give variations in the result, which changes from person to person.
- At the start of each row when the pattern states “Ch3, turn work” – in this case the ch 3 does not count as a stitch. You can alternatively use the chainless standing dc here, but in this case it will count as your first dc.
Resources
Chainless Standing Double Crochet
Starting and Standing Stitches (scroll to the section on standing stitches)
- You can cut your yarn every time you change colors and then later weave in the loose ends. However, you can significantly reduce the number of ends to weave in if you carry your yarn horizontally through your work – crocheting over it as you go – and/or vertically up the sides of your work.
Resources
Carry the yarn horizontally through project
Carry the yarn vertically up the sides of the project
When you change colors, especially in the middle of the project, I highly recommend this technique: How to Change Colors in the Middle of the Row using DC.
Instructions:
This pattern creates a gingham pattern, which I will call the “gingham stitch” throughout for simplification purposes.
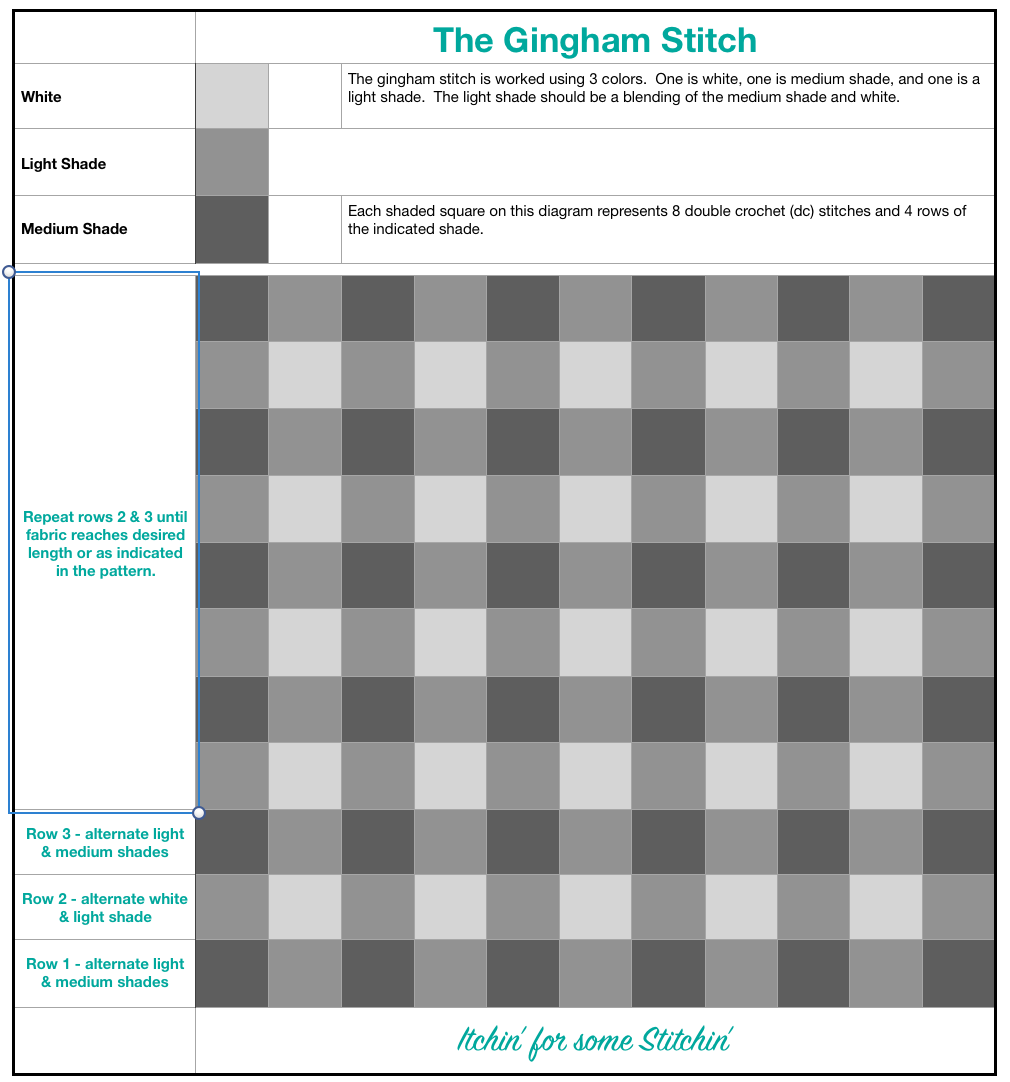
This diagram illustrates the gingham pattern in general and is not specific to this placemat pattern.
Video Tutorial: How to Work Gingham.
With White, Ch 64, switch to LIGHT shade and chain 3 more (67 chs).
Row 1: Turn work, dc in the 4th ch from the hook and in the next 7 stitches. (8 dc)
Change to MEDIUM shade – Dc in the next 8 chains. (8 dc)
*Change to LIGHT shade – Dc in the next 8 chains. (8 dc)
Change to MEDIUM shade – Dc in the next 8 chains. (8 dc)*
Repeat from * to * to end. There should be 8 alternating sets of gingham stitches – 4 LIGHT shade & 4 MEDIUM shade.
NOTE: You should be alternating LIGHT shade and MEDIUM shade every 8 double crochet stitches. You should have ended the row on MEDIUM shade.
Row 2: Turn work, ch 3, dc in the first stitch and in the next 7 stitches. (8 dc)
Change to LIGHT shade – Dc in the next 8 stitches. (8 dc)
*Change to MEDIUM shade – Dc in the next 8 stitches. (8 dc)
Change to LIGHT shade – Dc in the next 8 stitches. (8 dc)*
Repeat from * to * to end. There should be 8 alternating sets of gingham stitches – 4 LIGHT shade & 4 MEDIUM shade.
NOTE: You should be alternating LIGHT shade and MEDIUM shade every 8 double crochet stitches. You should have ended the row on LIGHT shade.
Row 3: Turn work, ch 3, dc in the first stitch and in the next 7 stitches. (8 dc)
Change to MEDIUM shade – Dc in the next 8 chains. (8 dc)
*Change to LIGHT shade – Dc in the next 8 chains. (8 dc)
Change to MEDIUM shade – Dc in the next 8 chains. (8 dc)*
Repeat from * to * to end. There should be 8 alternating sets of gingham stitches – 4 LIGHT shade & 4 MEDIUM shade.
NOTE: You should be alternating LIGHT shade and MEDIUM shade every 8 double crochet stitches. You should have ended the row on MEDIUM shade.
Row 4: REPEAT ROW 2 (ends on LIGHT shade).
NOTE: You should have 8 squares each composed of 8 stitches and 4 rows per color (4 squares of LIGHT & 4 squares of MEDIUM).
Row 5: Change to WHITE, Turn work, ch 3, dc in the first stitch (or work a standing DC) and in the next 7 stitches. (8 dc)
Change to LIGHT shade – Dc in the next 8 stitches. (8 dc)
*Change to WHITE – Dc in the next 8 stitches. (8 dc)
Change to LIGHT shade – Dc in the next 8 stitches. (8 dc)*
Repeat from * to * to end. There should be 8 alternating sets of gingham stitches – 4 LIGHT shade & 4 WHITE.
NOTE: You should be alternating LIGHT shade and WHITE every 8 double crochet stitches. You should have ended the row on LIGHT shade.
Row 6: Turn work, ch 3, dc in the first stitch (or work a standing DC) and in the next 7 stitches. (8 dc)
Change to WHITE – Dc in the next 8 stitches. (8 dc)
*Change to LIGHT shade – Dc in the next 8 stitches. (8 dc)
Change to WHITE – Dc in the next 8 stitches. (8 dc)*
Repeat from * to * to end. There should be 8 alternating sets of gingham stitches – 4 WHITE & 4 LIGHT shade.
NOTE: You should be alternating LIGHT shade and MEDIUM shade every 8 double crochet stitches. You should have ended the row on WHITE.
Row 7: Turn work, ch 3, dc in the first stitch (or work a standing DC) and in the next 7 stitches. (8 dc)
Change to LIGHT shade – Dc in the next 8 stitches. (8 dc)
*Change to WHITE – Dc in the next 8 stitches. (8 dc)
Change to LIGHT shade – Dc in the next 8 stitches. (8 dc)*
Repeat from * to * to end. There should be 8 alternating sets of gingham stitches – 4 LIGHT shade & 4 WHITE.
NOTE: You should be alternating LIGHT shade and WHITE every 8 double crochet stitches. You should have ended the row on LIGHT shade.
Row 8: REPEAT ROW 6 (should have ended on WHITE).
NOTE: You should have 8 squares each composed of 8 stitches and 4 rows per color (4 squares of WHITE & 4 squares of LIGHT).
The WHITE should be on top of the previous LIGHT squares and the LIGHT squares should be on top of the previous MEDIUM squares.
Rows 9: Change to LIGHT shade and repeat row 3.
Rows 10-44: REPEAT ROWS 2-9 until project reaches desired length.
Finishing:
- Using white, sc around the entire placemat, slp st the 1st & last single crochets together to close. Do NOT bind off.
- Ch 1, crab stitch (reverse sc) back around the entire placemat, slp st to close.
- Bind off & weave in ends.
I love crochet home decor so much! There is seriously nothing more beautiful than a handmade home.
If you love decorating your home with fiber art then you may find Decorate Your Home with Crochet, Knitting, and Quilting: The Experts Tell Us How to Do It would be a great article to check out!
Crochet Community on Facebook
Looking for lots of crafty inspiration, tips, tutorials, and a great crochet community? Join my Facebook group!
Other posts that may interest you
I’d love to see your spring gingham crochet placemats!
Please be sure to follow me on Instagram and share your makes with #itchinforsomestitchin and #ginghamplacemats. Be sure to tag me!


Thank you!
I sincerely appreciate you visiting my blog! By sharing my content and/or making a purchase you are making it possible for me to continue producing and sharing free content for everyone to enjoy. I sincerely appreciate your support!


Love Pinterest?
Save this post for later!

Mary Austin-Keller
Tuesday 19th of May 2020
Hi! Pretty placemats, they look like fun!
Question about the yarn. Is it easier to work with than, say, lily sugar n cream? I find lily snc really hard on my hands. But I want something absorbent for things like towels, placemats, etc.
Thanks for the pattern! Mary
Itchin4Stitchin
Wednesday 20th of May 2020
Hi Mary,
In truth, if Lily Sugar N Cream is difficult on your hands - you might want to avoid this Rico Essentials. Don't get me wrong - I love it! But it is DK weight and it's silky. Thin yarns can be harder to work with and the slippery-ness might make it more difficult for you - especially if you have arthritis or issues with your hands.
So, for you, I would honestly say stick with the Lily Sugar N Cream - it is a non-slick cotton and it's medium 4 so it's a bit thicker, which will make it easier to work with than the Rico Essentials.
Your placemats will just turn out a bit thicker and bigger than the ones here - but they will be lovely and useful all the same!
I hope that helps!
Best wishes,
RaeLynn