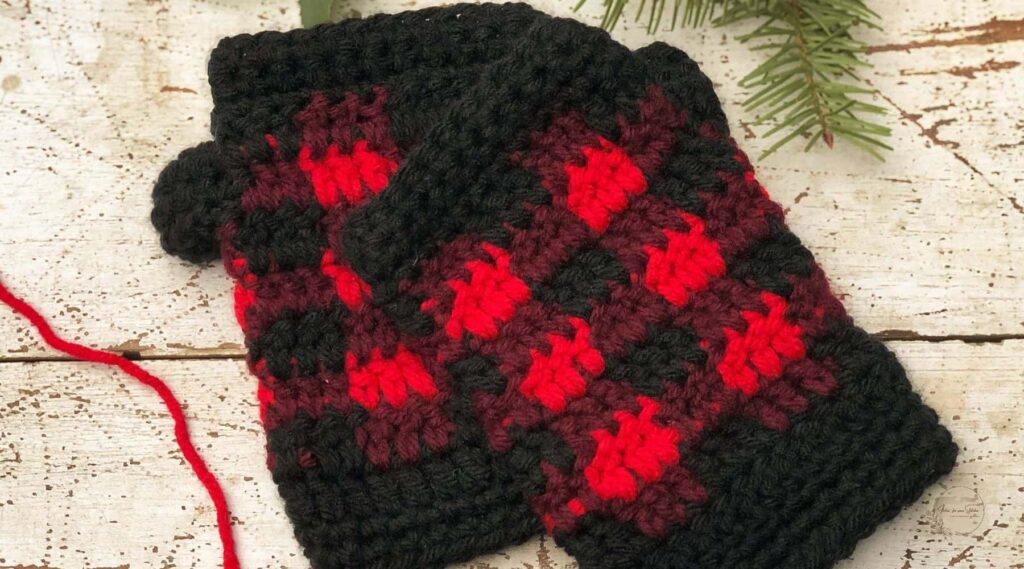
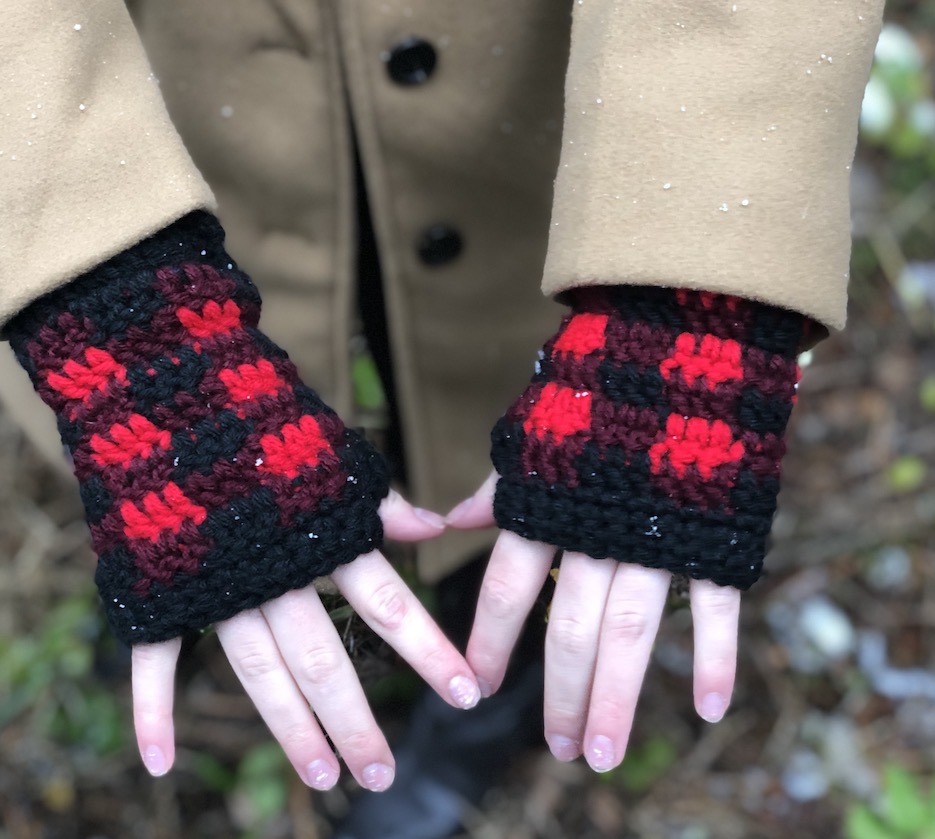
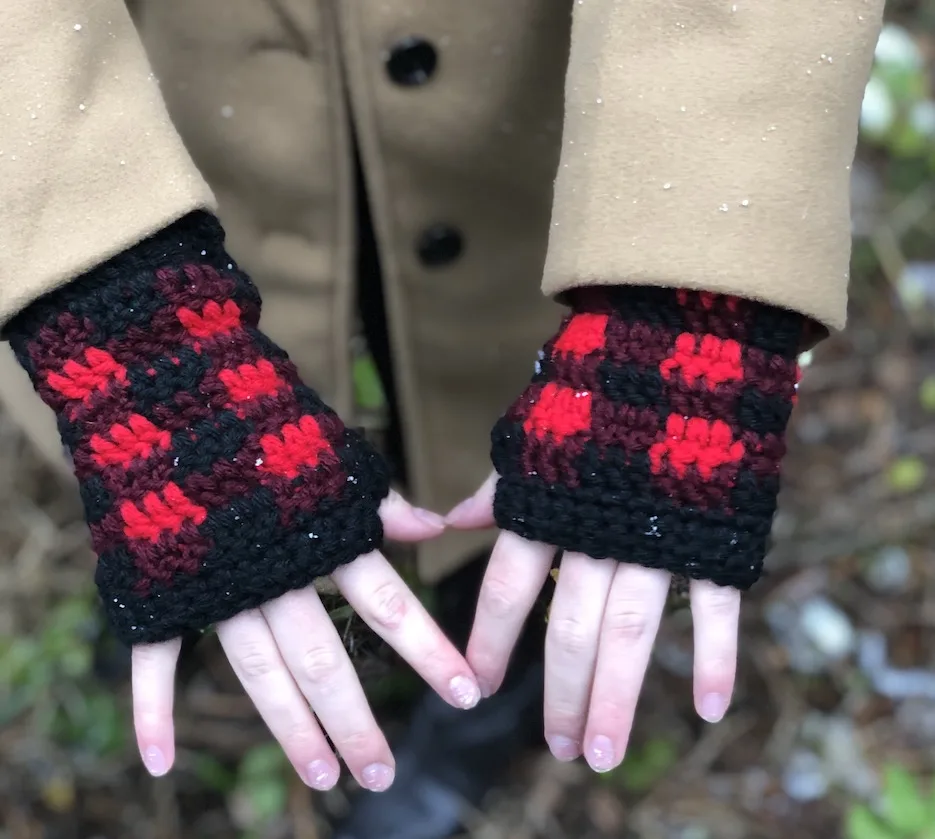
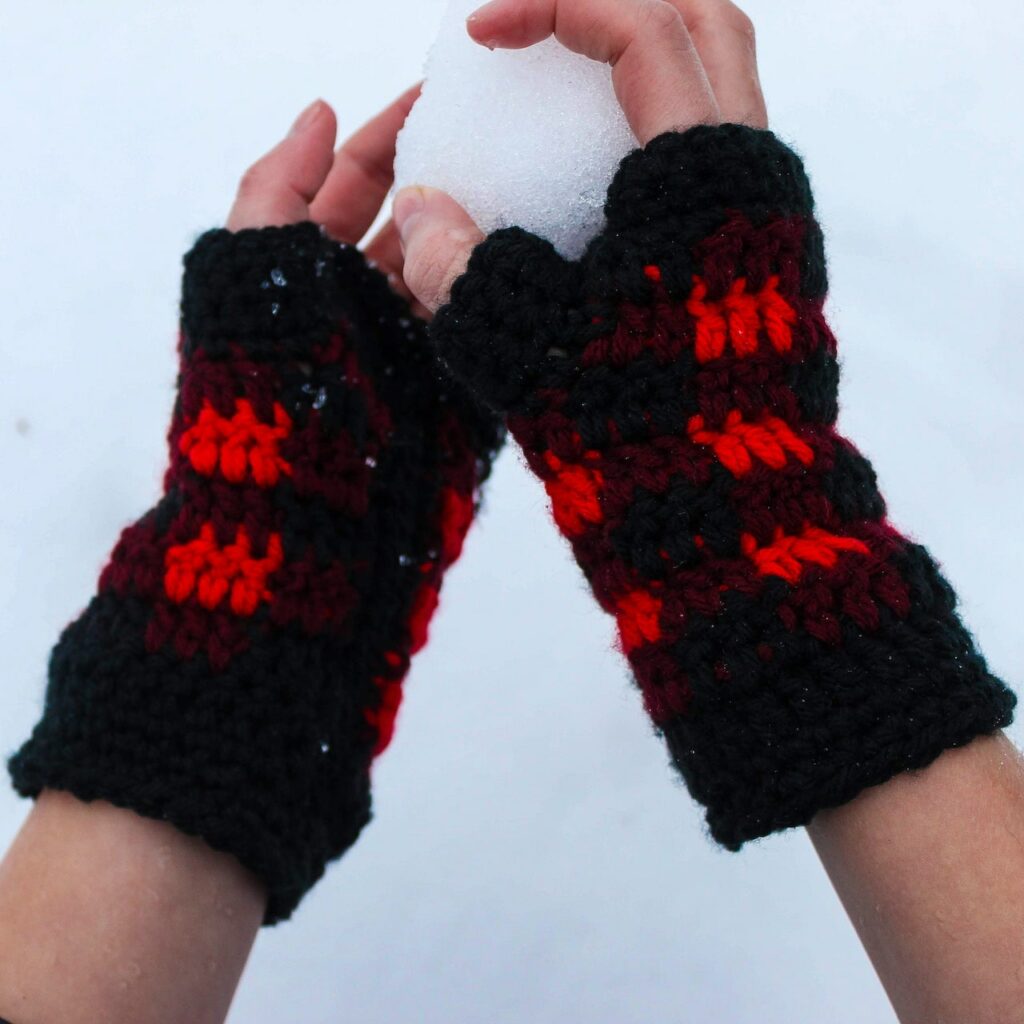
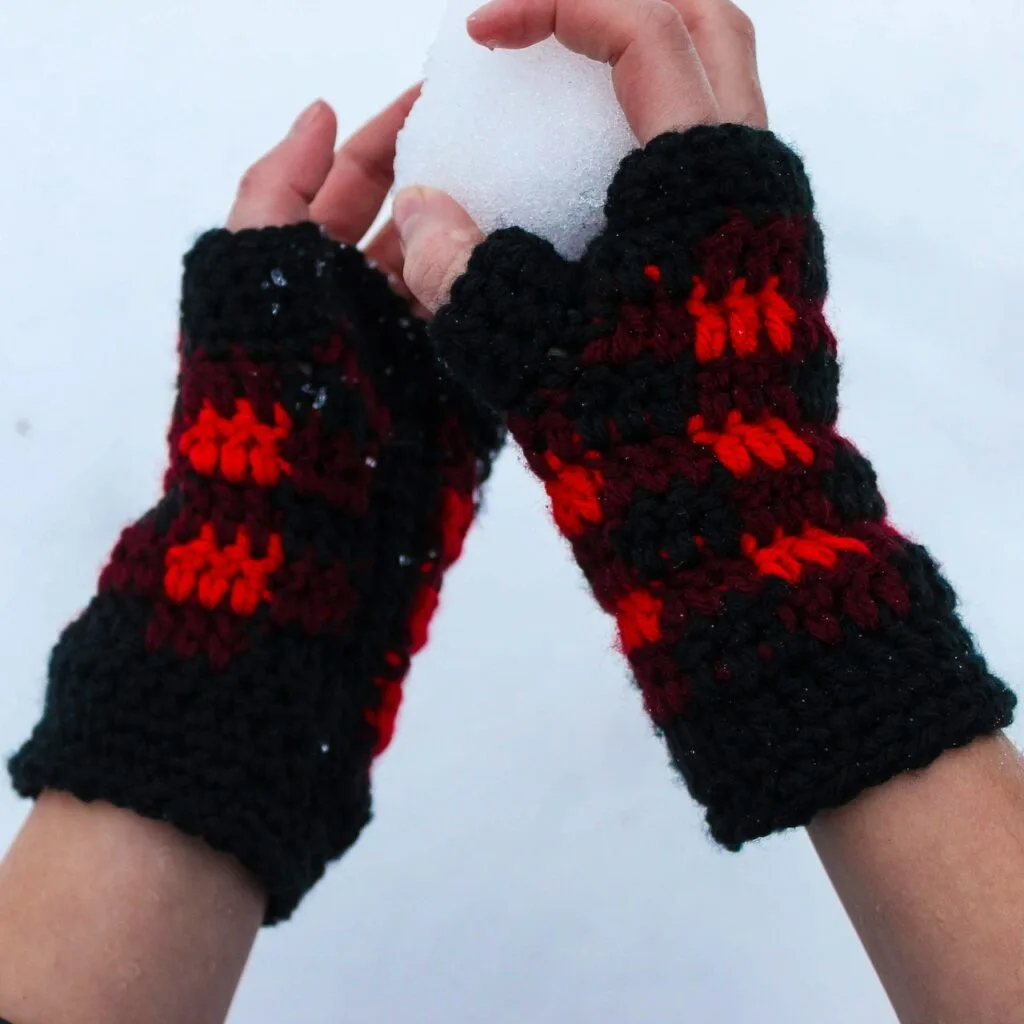
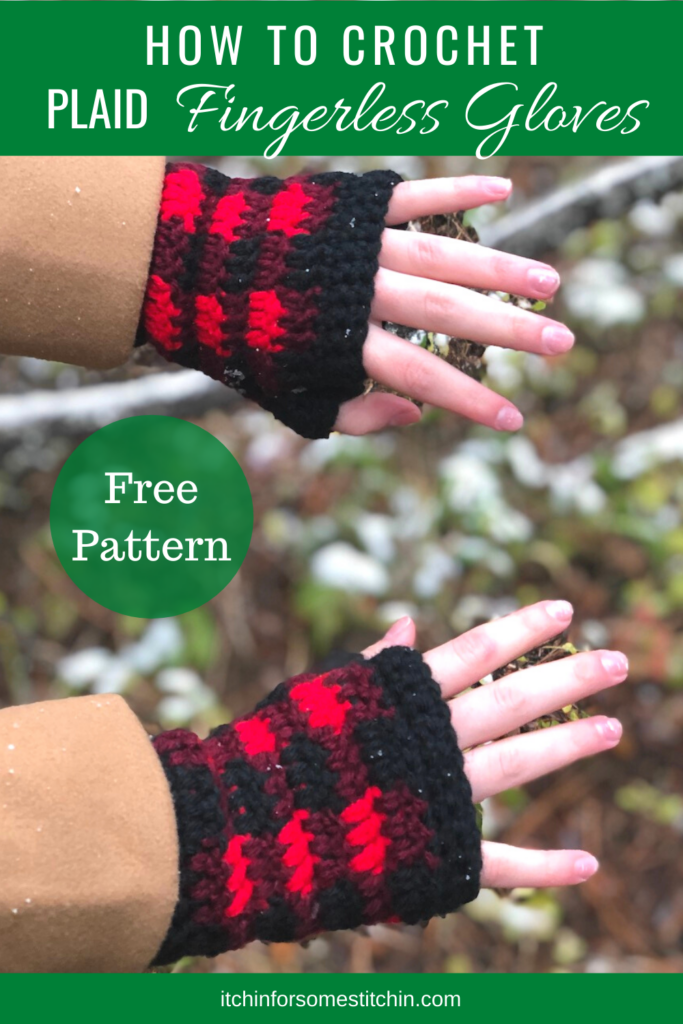
The Buffalo Plaid Fingerless Gloves Crochet Pattern is a cozy and practical accessory that’s perfect for fall and winter. Designed using the plaid stitch and three coordinating colors, this pattern creates the classic buffalo plaid look while keeping your hands warm and your fingers free.
Whether you’re running errands, attending outdoor events, or enjoying a cup of coffee on a chilly morning, these fingerless gloves provide warmth without sacrificing functionality.
What You’ll Find Inside this Pattern:
At a Glance
Behind the Design
Inspired by Classic Buffalo Plaid
Few patterns feel as timeless as buffalo plaid. From cozy flannel shirts and warm winter blankets to rustic cabin décor, this classic design has been a favorite for generations.
When designing these Buffalo Plaid Fingerless Gloves, I wanted to capture that same cozy winter feeling in a practical accessory you could wear every day. The plaid stitch creates the look of traditional woven plaid while using only basic crochet stitches and three coordinating yarn colors.
The result is a pair of warm, stylish fingerless gloves that pair perfectly with jeans, boots, oversized sweaters, and all your favorite fall and winter outfits.
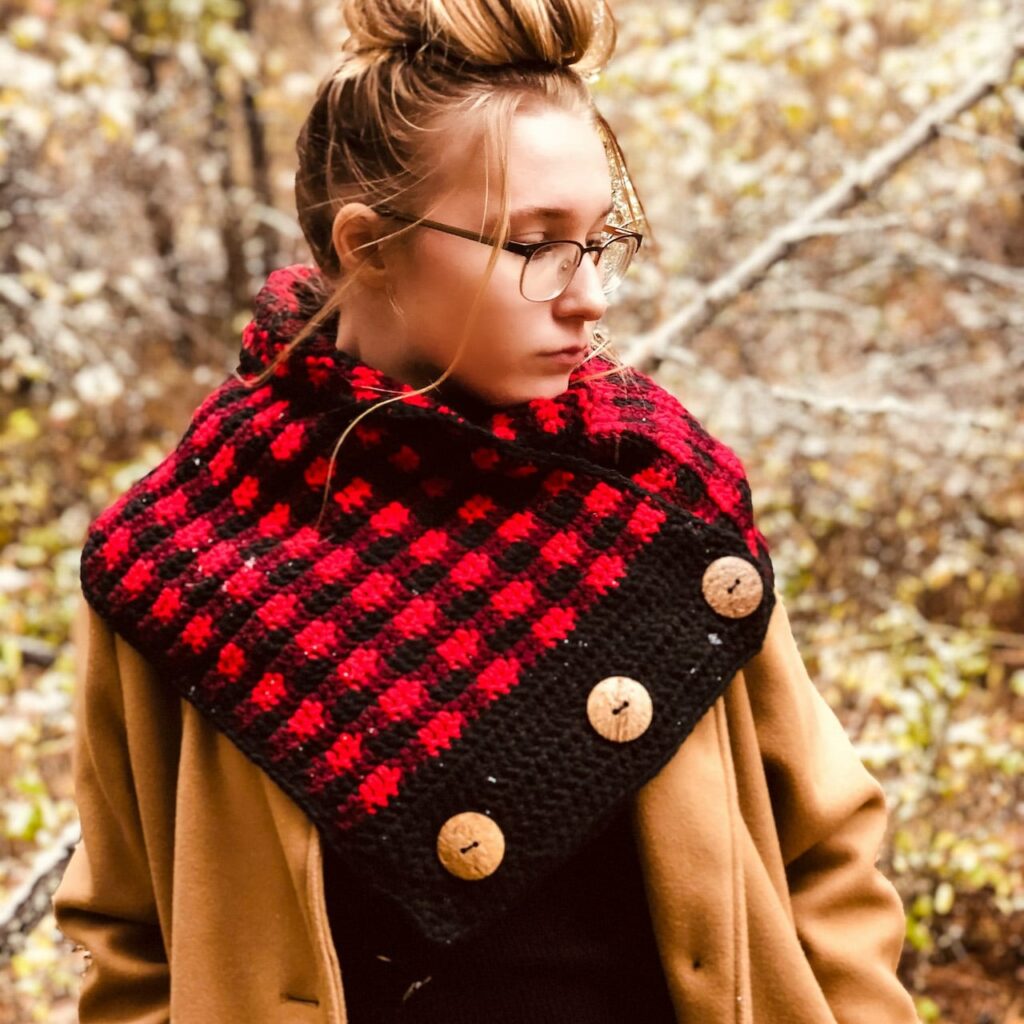
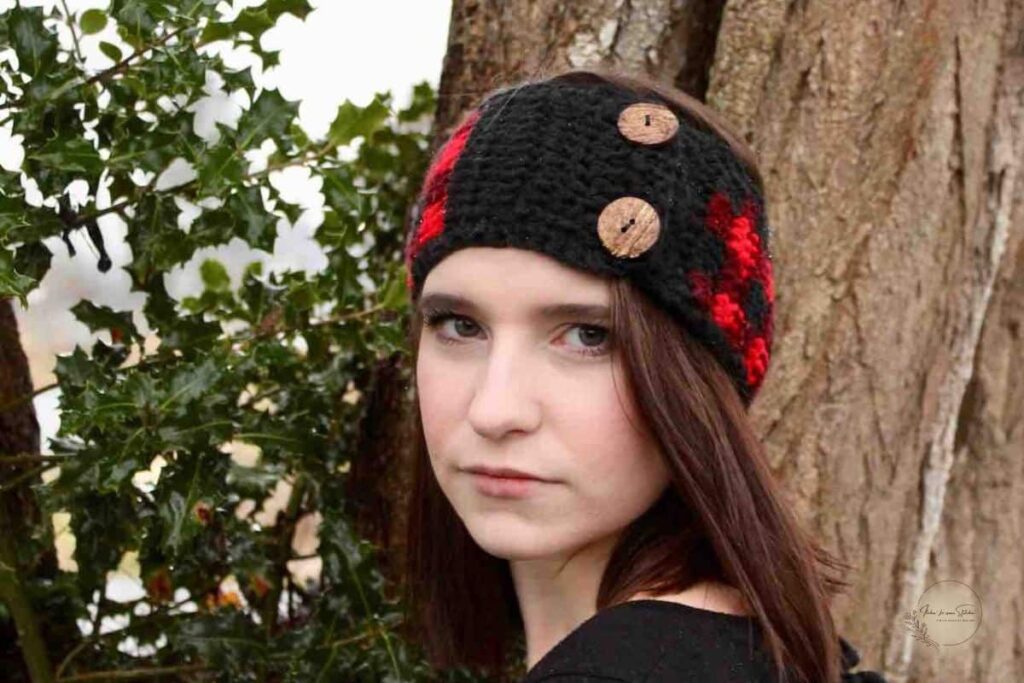
Even better, these gloves are part of my Buffalo Plaid Collection, making it easy to create a coordinated set with the matching ear warmer and cowl.
What Makes These Gloves Special
- Uses the classic plaid stitch I
- ncludes multiple sizes
- Works up quickly
- Great for gifts and craft fairs
- Coordinates with matching accessories
- Perfect for fall and winter wear

Love Pinterest? I do!
Save this post for Later and follow all my boards.
Is the Plaid Stitch Difficult?
Is the Plaid Stitch Difficult?
One of my favorite things about winter is plaid. From cozy scarves to warm accessories, there’s just something timeless about the classic buffalo plaid look.
If you’ve never tried the plaid stitch before, don’t worry. While the finished design looks intricate, it actually uses just one basic stitch: the double crochet.
The biggest challenge isn’t the stitch itself. It’s simply managing three yarn colors at the same time. Once you get comfortable with the color changes, the pattern quickly becomes repetitive and easy to follow.
If you’d like a closer look at how the technique works, be sure to check out my Plaid Stitch Crochet Tutorial, where I walk through the stitch pattern, color changes, and helpful tips for working with multiple yarns.
One tool that makes working with multiple yarn colors much easier is a yarn organizer tote. Keeping each skein in its own compartment helps prevent tangles and allows the yarn to feed smoothly while you crochet.

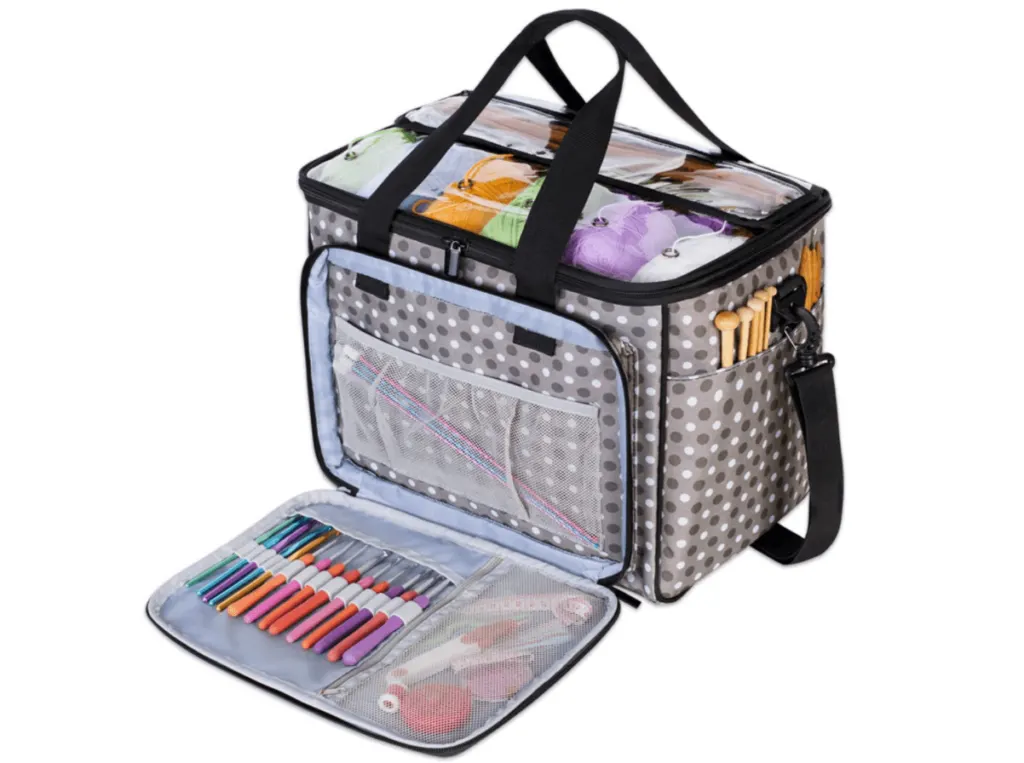
I use mine all the time when working plaid projects, and it makes a noticeable difference in keeping everything organized and frustration-free.
Materials
To make this Buffalo Plaid Fingerless Gloves Crochet Pattern, you’ll need:
Yarn:
- Medium Weight #4 Worsted Weight Yarn in three coordinating shades:
- Dark Shade
- Medium Shade
- Light Shade
Sample Colors Used:
- Red Heart Super Saver Black (Dark Shade)
- Red Heart Super Saver Claret (Medium Shade)
- Red Heart Super Saver Holly Berry (Light Shade)
Hook
- US I/9 (5.5 mm) and G/4.00mm crochet hooks
Other Materials
- Tapestry needle for seaming and shaping
- Scissors
- Coordinating sewing thread
- Sewing needle
Yarn & Yardage Requirements for the Buffalo Plaid Fingerless Gloves Crochet Pattern
One of the things I love most about this Buffalo Plaid Fingerless Gloves Crochet Pattern is that it combines style and practicality in a project that doesn’t require a huge yarn investment. Using just three coordinating colors, these gloves are a great way to put leftover yarn to good use while creating a cozy winter accessory you’ll actually wear.
Approximate Yardage
- 100 yds / 365.76m to 1092yds / 999m total of Medium Weight #4 yarn
- One dark shade
- One medium shade
- One light shade
For my sample, I used:
- Black (Dark Shade)
- Claret (Medium Shade)
- Holly Berry (Light Shade)
The medium shade should serve as a bridge between the light and dark colors. This relationship is what creates the signature depth and dimension that make buffalo plaid so recognizable.
While the traditional combination of black, burgundy, and red never goes out of style, this pattern also looks beautiful in a variety of other color palettes. Try rich browns and creams for a rustic feel, forest greens for a woodland-inspired look, classic blues for a fresh take on plaid, or soft neutrals for a more understated design. The possibilities are nearly endless, making it easy to customize these gloves to match your personal style or seasonal décor.
Skill level
Level of Difficulty – Intermediate

Gauge / Tension for the Buffalo Plaid Fingerless Gloves Crochet Pattern
Gauge is important for achieving the correct fit, especially when making an ear warmer designed to comfortably stretch around the headGauge / Tension for the Buffalo Plaid Fingerless Gloves Crochet Pattern
Gauge is important for achieving the correct fit, especially when making fingerless gloves that need to fit comfortably around the hand and wrist.
Gauge
15 stitches and 6 rows = 4 inches (10 cm) in Plaid Stitch
Gauge Tips
- Check your gauge after completing several plaid rows rather than a single solid-color row.
- If your gloves are measuring too small or feel too snug around the hand, try increasing your hook size.
- If your gloves are measuring too large or feel too loose, try decreasing your hook size.
- Maintaining consistent tension throughout the color changes will help create crisp plaid blocks and a polished finished fabric.
- Because this pattern includes multiple sizes, achieving gauge will help ensure your finished gloves match the sizing chart and provide the best fit.
Taking a few minutes to check your gauge before starting can help you avoid sizing issues and ensure your Buffalo Plaid Fingerless Gloves fit comfortably once completed.
Crochet Abbreviations & Stitches Used
Pattern is written in Standard US crochet terms.
*Click on abbreviation names for tutorials
Special Stitches / Techniques:
Single crochet two together (sc2tog) — Insert your hook into the next stitch and pull up a loop. Insert your hook into the following stitch and pull up another loop. Yarn over and pull through all three loops on the hook to combine two stitches into one and create a decrease.
Helpful Tutorials:
If you’re new to any of these techniques, the following tutorials may be helpful before you begin:
- Chainless Standing Double Crochet
- Starting and Standing Stitches (scroll to the section on standing stitches)
- How to Change Colors in Crochet
- How to Carry Yarn Through Your Work
- Plaid Stitch Tutorial
Pattern Instructions – Simply Chic Buffalo Plaid Fingerless Gloves
Now that you’ve gathered your materials and reviewed the plaid stitch basics, it’s time to start crocheting your Buffalo Plaid Fingerless Gloves.
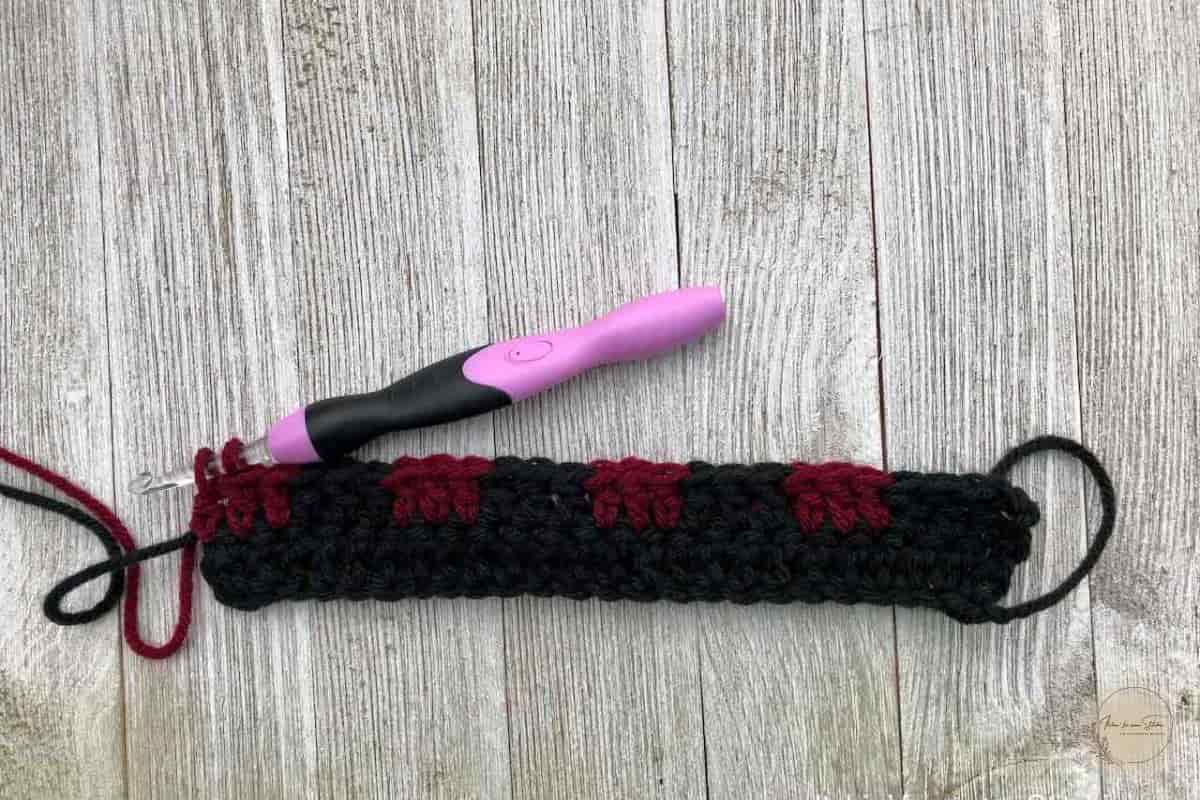
This pattern is worked flat from the wrist toward the fingers using repeating plaid rows and simple color changes to create the classic buffalo plaid design. After the main panel is complete, the gloves are folded and seamed to form the hand and thumb openings.
Take your time with the first few rows as the color placement is established. Once the plaid pattern begins to emerge, you’ll find the repeats easy to recognize and follow.
The Plaid Stitch Crochet Tutorial, complete with a downloadable plaid stitch chart, is a valuable resource for mastering the color changes and stitch placement used throughout the pattern. Keep it handy as you work to help create crisp plaid blocks and achieve the classic buffalo plaid look.
Plaid Stitch Fingerless Gloves Construction
This Buffalo Plaid Fingerless Gloves Crochet Pattern is worked flat from the wrist toward the fingers using the plaid stitch and three coordinating yarn colors.
The plaid design is created by alternating blocks of color and stacking them in specific rows to achieve the classic buffalo plaid effect. The main glove panel is worked as a flat rectangle, with shaping added near the top to create a comfortable fit around the fingers and thumb.
Once the panel is complete, it is folded and seamed to form the glove. Additional rounds are then worked around the thumb opening to create a clean, finished edge.
Prefer an Ad-Free Version?
If you’d If you’d rather crochet without interruptions, the printable PDF version of the Buffalo Plaid Fingerless Gloves Crochet Pattern is available in my shop.
The PDF includes:
- Ad-free, printer-friendly formatting
- Complete pattern instructions
- Multiple sizes from child through adult
- Step-by-step photo tutorials
- Plaid stitch chart
- Convenient digital download
- Lifetime access to save and re-download your purchase
Finished Dimensions
The Buffalo Plaid Fingerless Gloves Crochet Pattern includes three sizes ranging from child to adult. All dimensions are approximate and are based on crochet sizing standards established by The Craft Yarn Council. Finished measurements may vary slightly depending on yarn choice and individual crochet tension.
| Size | Circumference | Width (Flat) | Length |
|---|---|---|---|
| Small / Child (Ages 2–6) | 6 inches | 3 inches | 5.5 inches |
| Large Child / Women’s Medium (Ages 6–8 through Adult) | 6.5–7.5 inches | 3.5–4 inches | 7 inches |
| Large (Women’s Large / Men’s Adult) | 8–9.5 inches | 4–4.5 inches | 7 inches |
These fingerless gloves are designed to fit comfortably around the hand and wrist while allowing plenty of movement for everyday activities. For the best fit, be sure to check your gauge before beginning the project.
Additional notes:
Buffalo Plaid Fingerless Gloves Crochet Pattern
Small/child size
With color C (DARK shade) using 5.5mm hook, Ch 17
Row 1: Dc in 3rd ch from hook and in each ch across. [15] sts.
Row 2 (PLAID row 1): Turn work, ch 3 (DOES NOT count as a dc), dc in the first stitch (or a standing DC) and in the next 2 stitches. [3dc]
Change to color B (MEDIUM shade) -Dc in the next 3 stitches. [3dc]
*Change to color C (DARK shade) -Dc in the next 3 stitches. [3dc]
Change to color B (MEDIUM shade) – Dc in the next 3 stitches. [3dc]*
Repeat from * to * to end. [15 sts]
~ Should end on color C (DARK shade).
NOTE: You should be alternating color C (DARK shade) and color B (MEDIUM shade) every 3 double crochet stitches.
Row 3 (PLAID row 2): Change to color B (MEDIUM shade) – turn work, ch3, dc in the first stitch (or a standing DC) and in the next 2 stitches. [3dc]
Change to color A (LIGHT shade) – Dc in the next 3 stitches. [3dc]
*Change to color B (MEDIUM shade) – Dc in the next 3 stitches. [3dc]
Change to color A (LIGHT shade)- Dc in the next 3 stitches. [3dc]*
Repeat from * to * to end. [15 sts]
~ Should end on color B (MEDIUM shade).
NOTE: You should be alternating color A (LIGHT shade) and color B (MEDIUM shade) every 3 double crochet stitches.

NOTE: The color B (MEDIUM shade) should be above the color C (DARK shade) stitches from the previous row and the color A (LIGHT shade) stitches should be above the color B (MEDIUM shade) stitches from the previous row.
Row 4 (PLAID row 3) : Change to color C (DARK shade)- turn work, ch3, dc in the first stitch (or work a standing DC) and in the next 2 stitches. [3dc]
Change to color B (MEDIUM shade) – Dc in the next 3 stitches. [3dc]
*Change to color C (DARK shade)- Dc in the next 3 stitches. [3dc]
Change to color B (MEDIUM shade)- Dc in the next 3 stitches. [3dc]*
Repeat from * to * to end. [15 sts]
~ Should end on color C (DARK shade).
NOTE:
- You should be alternating color C (DARK shade) and color B (MEDIUM shade) every 3 double crochet stitches.
- The color C (DARK shade) stitches should be on top of the color B (MEDIUM shade) stitches from the previous row and the color B (MEDIUM shade) stitches should be on top of the color A (LIGHT shade) stitches from the previous row.
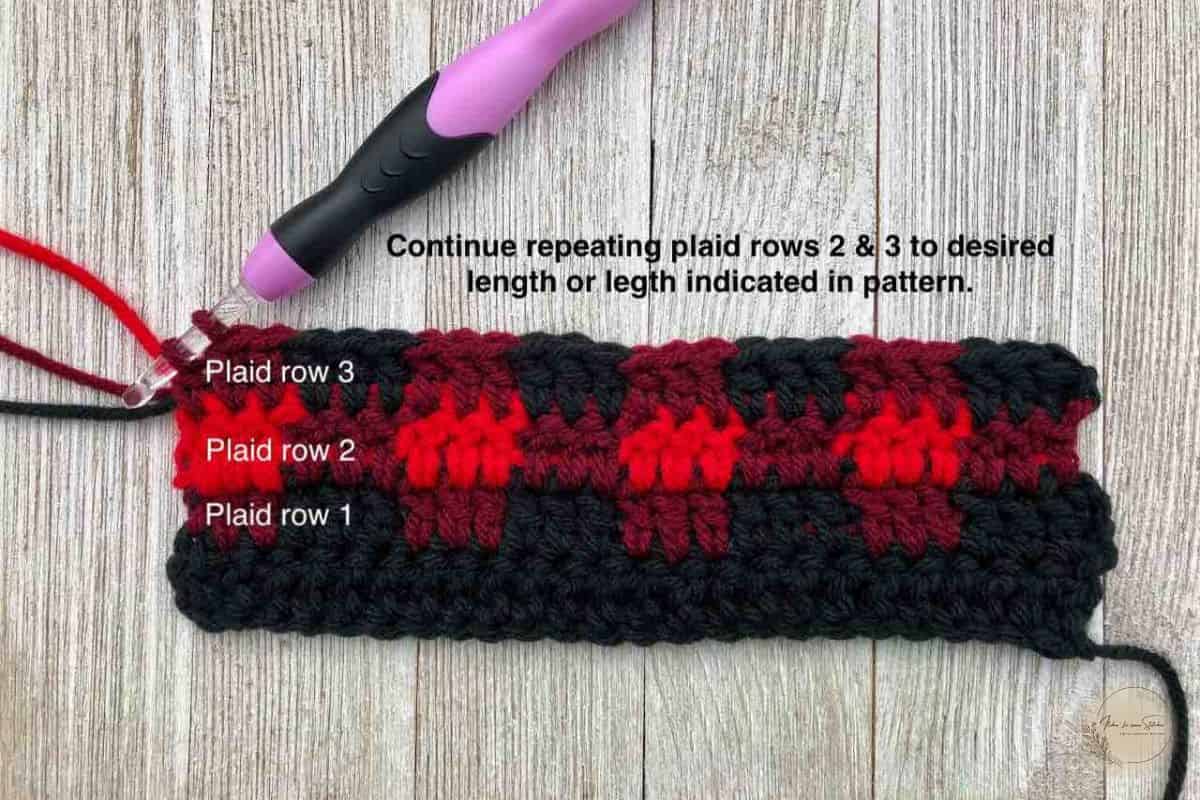
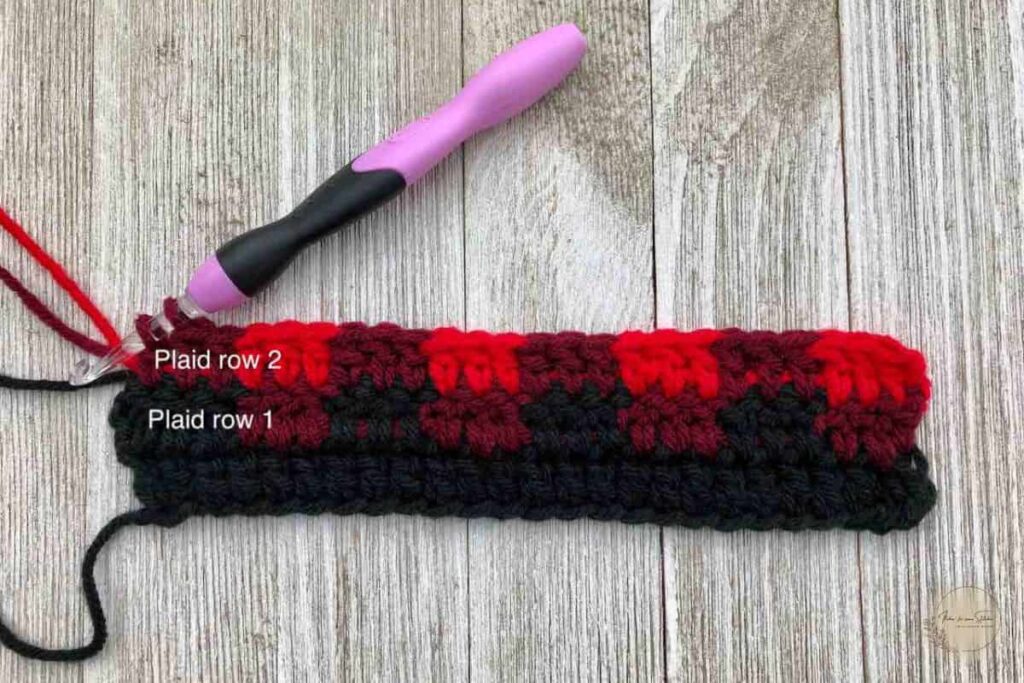
Rows 5 – 6: Repeat rows 3-4 (plaid rows 2-3) one more time.
NOTE: Will have completed 6 total rows, 5 of which are plaid rows. [15 sts]
Row 7: Change to color B (MEDIUM shade), Ch 3, turn work, Dc in the next 3 sts, change to color A (LIGHT shade), dc in the next 3 sts, change to color B (MEDIUM shade), dc in the next 3 sts, change to color A (LIGHT shade), dc in the next 3 sts, leave the last 3 sts unworked. [12 sts]
Row 8: Change to color B (MEDIUM shade), Ch 3, turn work, Dc in the next 3 sts, *change to color C (DARK shade), dc in the next 3 sts, change to color B (MEDIUM shade), dc in the next 3 sts *, Repeat from * to * to end. [12 sts]
Bind Off & Weave in ends. See Finishing.
Large child/women’s medium
With color C (DARK shade), using 5.5mm hook, Ch 20
Row 1: Dc in 3rd ch from hook and in each ch across. [18 sts]
Row 2 (PLAID row 1): Turn work, ch 3 (DOES NOT count as a dc), dc in the first stitch (or a standing DC) and in the next 2 stitches. [3dc]
Change to color B (MEDIUM shade) -Dc in the next 3 stitches. [3dc]
*Change to color C (DARK shade) -Dc in the next 3 stitches. [3dc]
Change to color B (MEDIUM shade) – Dc in the next 3 stitches. [3dc]*
Repeat from * to * to end. [18 sts]
~ Should end on color B (MEDIUM shade).
NOTE: You should be alternating color C (DARK shade) and color B (MEDIUM shade) every 3 double crochet stitches.
Row 3 (PLAID row 2): Change to color A (LIGHT shade) – turn work, ch3, dc in the first stitch (or work a standing DC) and in the next 2 stitches. [3dc]
Change to color B (MEDIUM shade) – Dc in the next 3 stitches. [3dc]
*Change to color A (LIGHT shade) – Dc in the next 3 stitches. [3dc]
Change to color B (MEDIUM shade) – Dc in the next 3 stitches. (3dc)*
Repeat from * to * to end. [18 sts]
~ Should end on color B (MEDIUM shade).
NOTE: You should be alternating color A (LIGHT shade) and color B (MEDIUM shade) every 3 double crochet stitches.
NOTE: The color B (MEDIUM shade) should be above the color C (DARK shade) stitches from the previous row and the color A (LIGHT shade) stitches should be above the color B (MEDIUM shade) stitches from the previous row.
Row 4 (PLAID row 3) : Change to color C (DARK shade)- turn work, ch3, dc in the first stitch (or work a standing DC) and in the next 2 stitches. [3dc]
Change to color B (MEDIUM shade) – Dc in the next 3 stitches. [3dc]
*Change to color C (DARK shade)- Dc in the next 3 stitches. [3dc]
Change to color B (MEDIUM shade)- Dc in the next 3 stitches. [3dc]*
Repeat from * to * to end. [18 sts]
~ Should end on color B (MEDIUM shade).
NOTE:
- You should be alternating color C (DARK shade) and color B(MEDIUM shade) every 3 double crochet stitches.
- The color C (DARK shade) stitches should be on top of the color B (MEDIUM shade) stitches from the previous row and the color B (MEDIUM shade) stitches should be on top of the color A (LIGHT shade) stitches from the previous row.
Rows 5 – 6: Repeat rows 3-4 (plaid rows 2-3) one more time.
NOTE: Will have completed 6 total rows, 5 of which are plaid rows. [18 sts]
Row 7: Change to color A (LIGHTshade), Ch 3, turn work, Dc in the next 3 sts, change to color B (MEDIUM shade), dc in the next 3 sts* Repeat from * to * to the last 6 sts – leave last 6 sts unworked. [12 sts]
Row 8: Change to color C (DARK shade), Ch 3, turn work, Dc in the next 3 sts, change to color B (MEDIUM shade), dc in the next 3 sts* Repeat from * to * to the end. [12 sts]
Bind Off & Weave in ends. See Finishing.
Large size
With color C (DARK shade), using 5.5mm hook, Ch 26
Row 1: Dc in 3rd ch from hook and in each ch across. [24sts]
Row 2 (PLAID row 1): Turn work, ch 3 (DOES NOT count as a dc), dc in the first stitch (or a standing DC) and in the next 2 stitches. [3dc]
Change to color B (MEDIUM shade) -Dc in the next 3 stitches. [3dc]
*Change to color C (DARK shade) -Dc in the next 3 stitches. [3dc]
Change to color B (MEDIUM shade) – Dc in the next 3 stitches. [3dc]*
Repeat from * to * to end. [24 sts].
~ Should end on color B (MEDIUM shade).
NOTE: You should be alternating color C (DARK shade) and color B (MEDIUM shade) every 3 double crochet stitches.
Row 3 (PLAID row 2): Change to color A (LIGHT shade) – turn work, ch3, dc in the first stitch (or work a standing DC) and in the next 2 stitches. [3dc]
Change to color B (MEDIUM shade)- Dc in the next 3 stitches. [3dc]
*Change to color A (LIGHT shade) – Dc in the next 3 stitches. [3dc]
Change to color B (MEDIUM shade)- Dc in the next 3 stitches. [3dc]*
Repeat from * to * to end. [24 sts]
~ Should end on color B (MEDIUM shade).
NOTE: You should be alternating color A (LIGHT shade) and color B (MEDIUM shade) every 3 double crochet stitches.
NOTE: The color B (MEDIUM shade) should be above the color C (DARK shade) stitches from the previous row and the color A (LIGHT shade) stitches should be above the color B (MEDIUM shade) stitches from the previous row.
Row 4 (PLAID row 3) : Change to color C (DARK shade)- turn work, ch3, dc in the first stitch (or work a standing DC) and in the next 2 stitches. [3dc]
Change to color B (MEDIUM shade) – Dc in the next 3 stitches. [3dc]
*Change to color C (DARK shade)- Dc in the next 3 stitches. [3dc]
Change to color B (MEDIUM shade)- Dc in the next 3 stitches. [3dc]*
Repeat from * to * to end. [24 sts]
~ Should end on color B (MEDIUM shade).
NOTE:
- You should be alternating color C (DARK shade) and color B (MEDIUM shade) every 3 double crochet stitches.
- The color C (DARK shade) stitches should be on top of the color B (MEDIUM shade) stitches from the previous row and the color B (MEDIUM shade) stitches should be on top of the color A (LIGHT shade) stitches from the previous row.
Rows 5 – 6: Repeat rows 3-4 (plaid rows 2-3) one more time.
NOTE: Will have completed 6 total rows, 5 of which are plaid rows. [24 sts]
Row 7: Change to color A (LIGHT shade), Ch 3, turn work, Dc in the next 3 sts, change to color B (MEDIUM shade), dc in the next 3 sts* Repeat from * to * to the last 6 sts – leave last 6 sts unworked. [18 sts]
Row 8: Change to color C (DARK shade), Ch 3, turn work, Dc in the next 3 sts, change to color B (MEDIUM shade), dc in the next 3 sts* Repeat from * to * to the end. [18 sts]
Bind Off & Weave in ends. See Finishing.
Finishing:
Form the gloves
NOTE: For Large child/women’s medium and Large sizes, If the area around the fingers seems too tight, please see the “Adjustment” section below BEFORE finishing.
NOTE: For seaming, you can use any coordinating color of yarn and your preferred seaming technique.
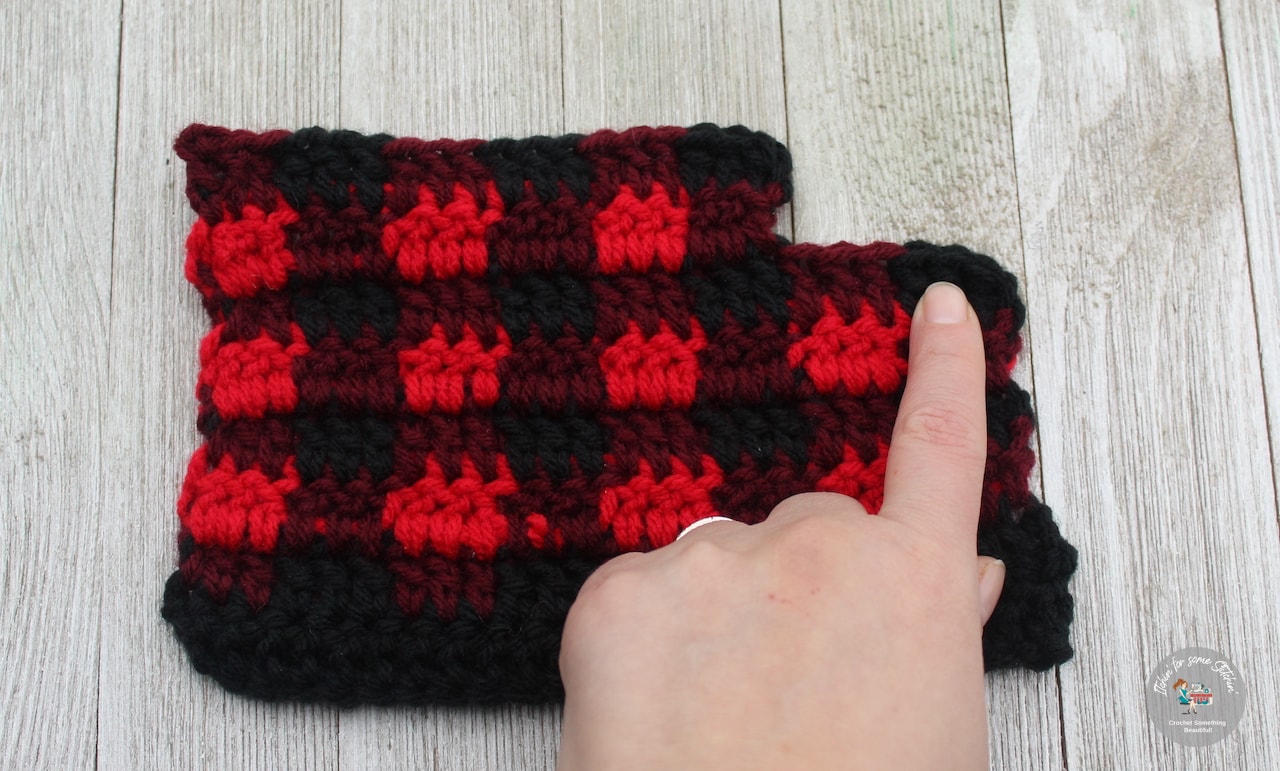
For the LEFT glove, lay the crochet piece as shown in the photo below with the wrong side down.

- Fold & seam the glove as shown below. Right side should be on the inside.
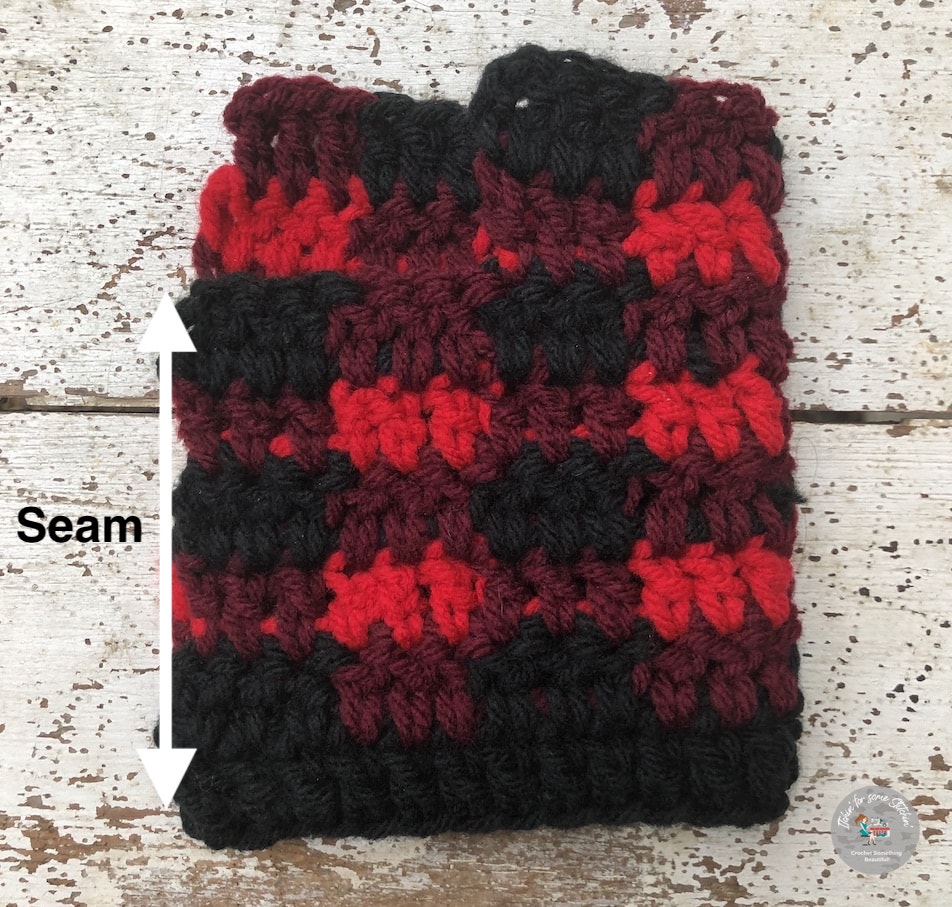
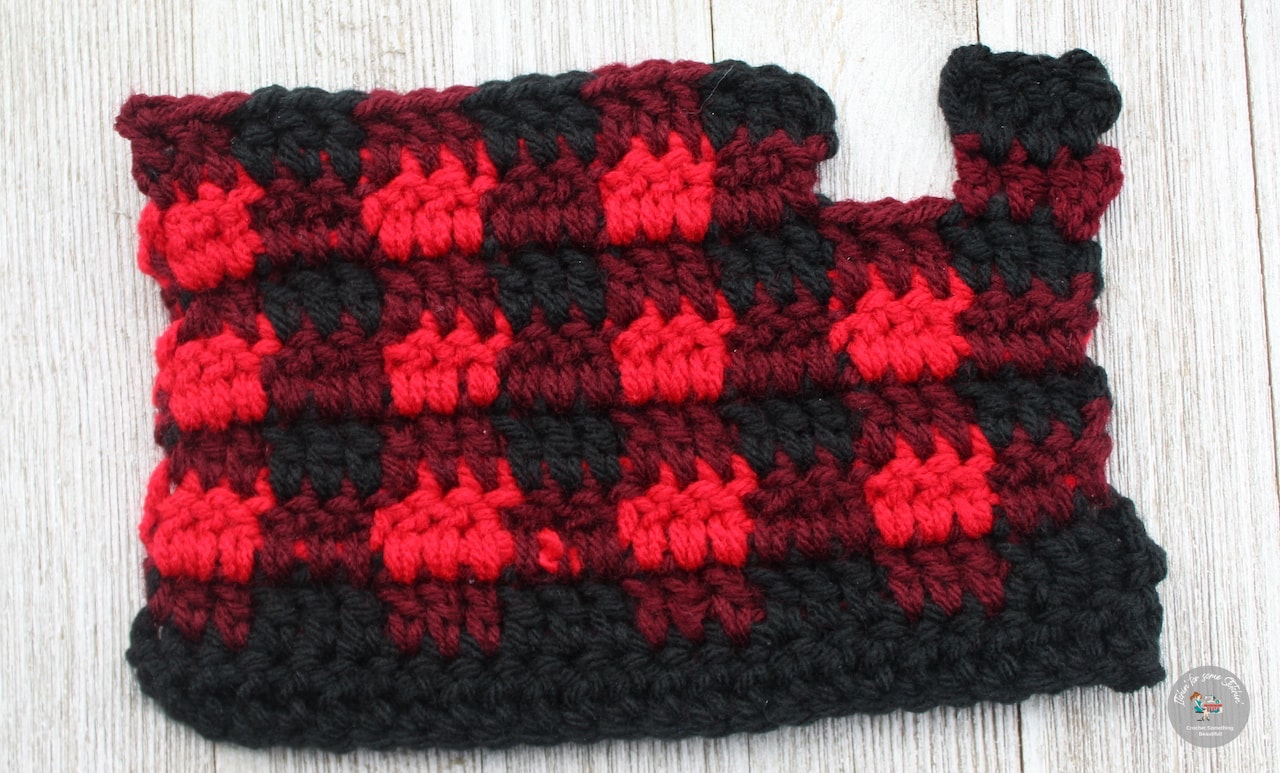
- For the RIGHT glove, lay the crochet piece as shown in the photo below with the wrong side down.

- Fold & seam the glove as shown in the image below. Right side should be on the inside.

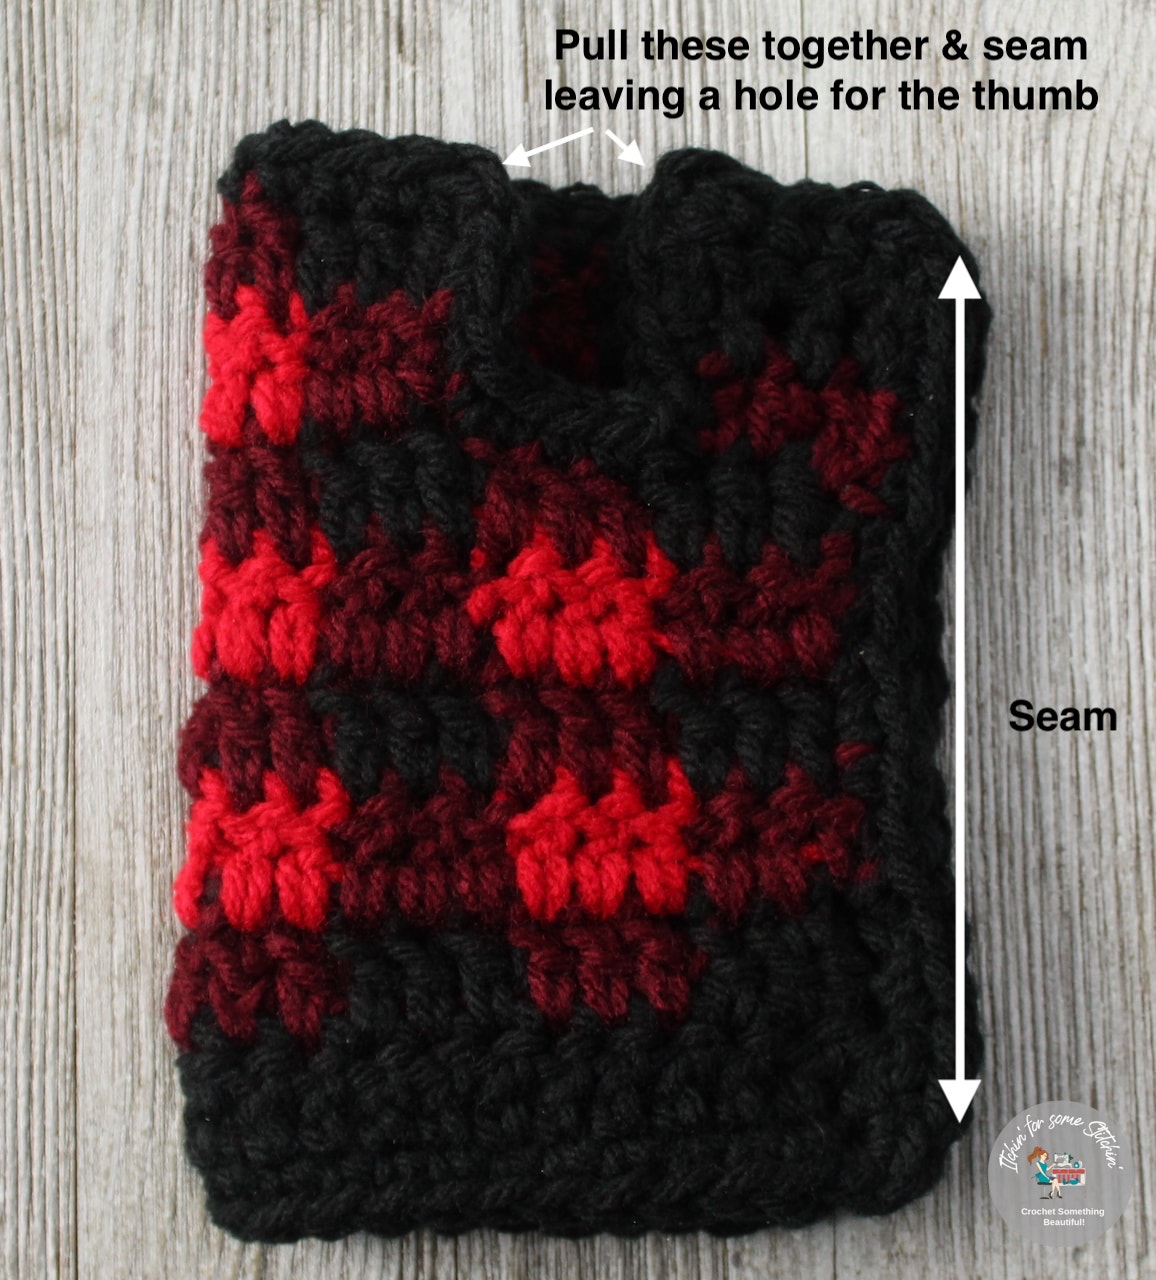
For BOTH gloves, (keep them inside out) bring the two top corners of the glove together and seam along one entire plaid stitch or simply along a length that will properly fit the thumb for which you are crocheting the gloves. Be sure to leave a hole of appropriate thumb size.

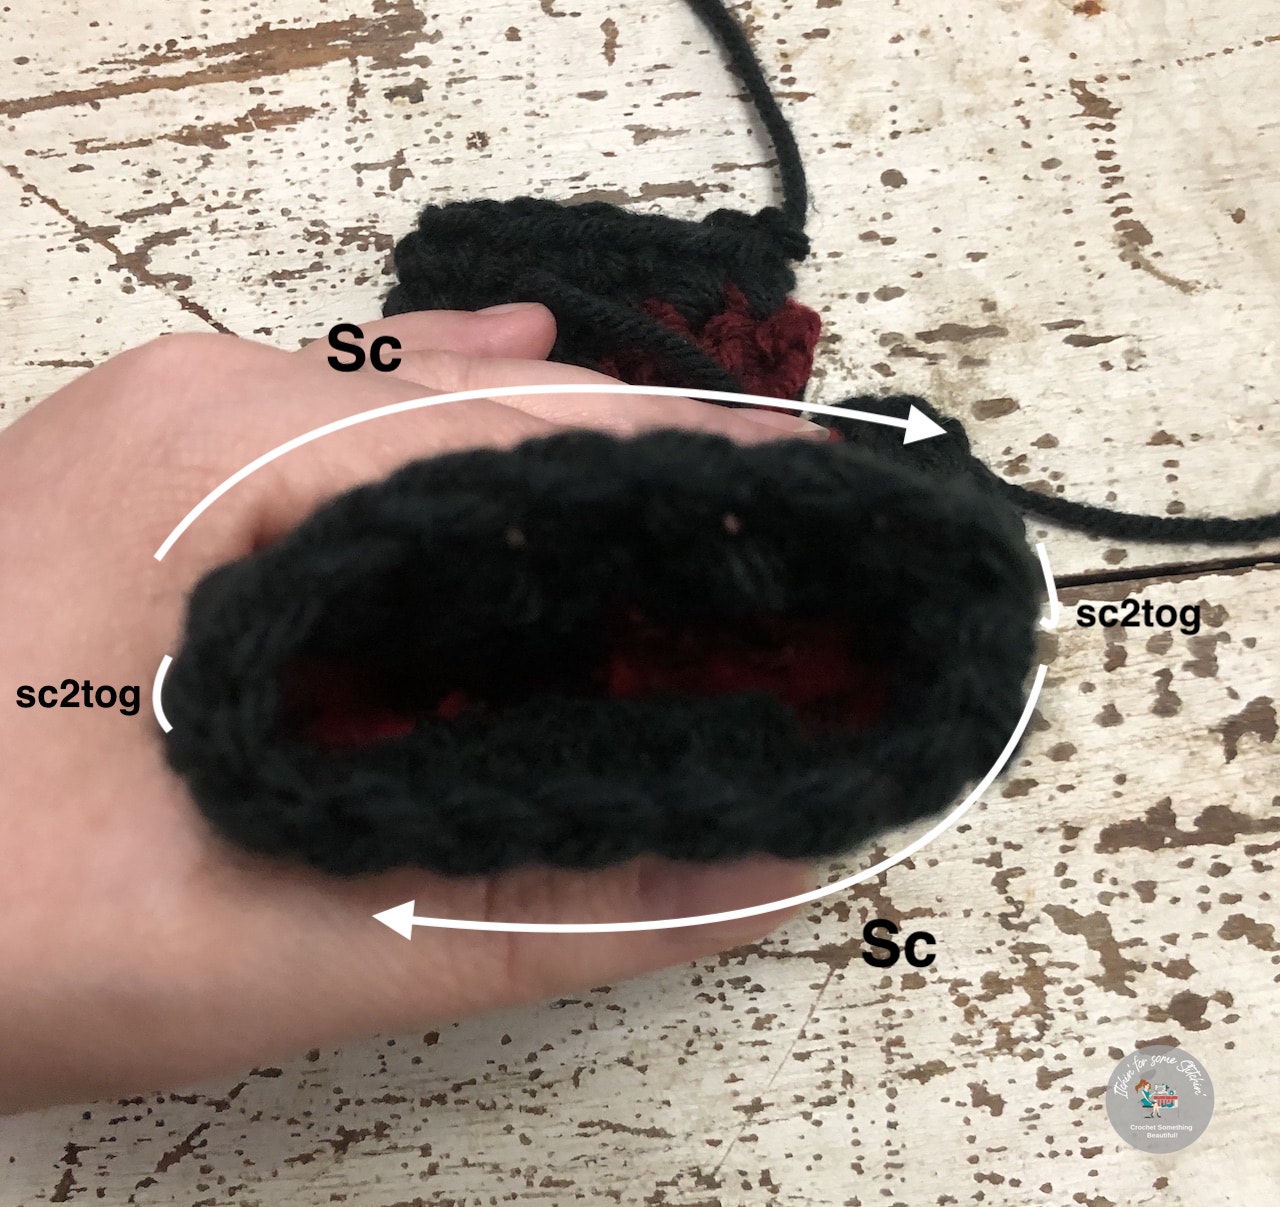
- Keeping the glove inside out, switch to the 4.00mm hook, attach black yarn to any stitch around the thumb hole and sc around the thumb opening, when you get back to the first sc do NOT slp-st to close or turn work, simply continue working sc sts around the thumb opening. The number of sc does NOT matter. For the small/child size do 2 rounds of sc. For the large child/women’s medium and Large sizes do 3 rounds.
- Flip the glove right side out and with the 5.5mm hook and using black yarn, sc around the top of the gloves. The number of sc does NOT matter. Do 2 rounds in continuous fashion (as you did for the thumb) for the small/child size and 3 continuous rounds for the Large child/women’s medium and large sizes.
- With the 5.5mm hook and using black yarn, sc around the bottom of the gloves working a sc2tog on each side of the wrist. The number of sc does NOT matter. Do 2 rounds in continuous fashion (as you did for the thumb) for the small/child size and 3 continuous rounds for the Large child/women’s medium and large sizes.
Adjustments:
If the area around the fingers seems as if it may be too tight for your fingers (Large child/women’s medium & Large sizes) you can make this area looser by adding two rows of one segment (3 dc sts) of plaid stitches to the end of the gloves. So that the gloves, BEFORE you go to the finishing section looks like the one below.
To finish, follow instructions in the “Finishing” section for LEFT and RIGHT gloves, but seam the entire edge instead and then seam the thumb section as outlined in the “Finishing” section.
Frequently Asked Questions – Buffalo Plaid Fingerless Gloves
Have questions while making your buffalo plaid crochet gloves? These FAQs cover the most common beginner concerns and tips for success.
Love This Pattern? Keep It Forever.
Grab the ad-free, printable PDF version and crochet with ease, no scrolling required.
The full PDF includes:
- Complete Buffalo Plaid Fingerless Gloves Crochet Pattern
- Child through Adult sizing
- Printable plaid stitch chart
- Step-by-step photo tutorials
- Lifetime access to download and save
Perfect for crocheting on the go, printing for your project binder, or keeping in your digital library.
Shop the Pattern Here or access it in the Crochet Conservatory.
I hope you enjoyed making this Buffalo Plaid Fingerless Gloves Crochet Pattern as much as I enjoyed designing it. These cozy gloves are a wonderful addition to any winter wardrobe and make thoughtful handmade gifts for family and friends.
I’d love to see your finished project! Share your photos on Instagram and Facebook, tag @itchinforsomestitchin, and use #IFSS_BuffaloPlaidFingerlessGloves and #itchinforsomestitchin so I can admire your beautiful work. Don’t forget to follow me for more crochet patterns, tips, and inspiration!
If you’d like a cozy place to share your projects, ask questions, and connect with fellow crocheters, you’re always welcome inside my Itchin’ for Some Stitchin’ Crochet Community on Facebook.
Part of the Simply Chic Buffalo Plaid Collection
Looking for more plaid crochet projects?
Be sure to check out the matching Buffalo Plaid Ear Warmer, Buffalo Plaid Cowl, and Buffalo Plaid Beanie to complete your collection.
Click on images to view the patterns or Browse the collection here


Thank you
I sincerely appreciate you visiting my blog! By sharing my content and/or making a purchase you are making it possible for me to continue producing and sharing free content for everyone to enjoy. Your support is amazing!

Check Out These Other Patterns I LOVE!
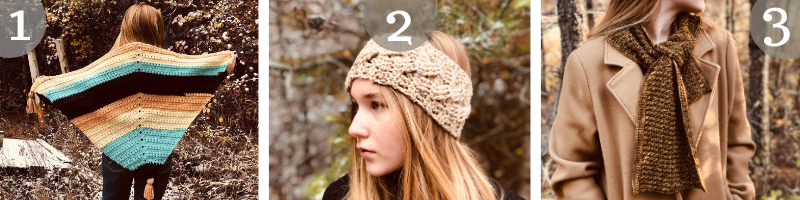
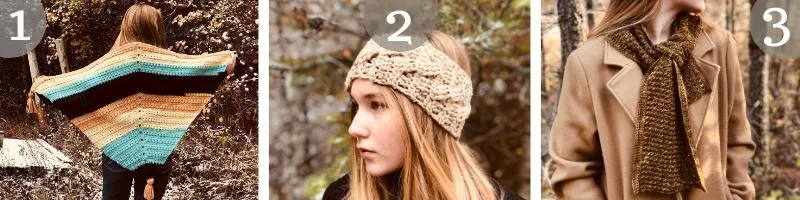
1. Winter Wonderland Triangle Shawl / 2. Simply Classic Cable Head Warmer / 3. Alpine Ridges Comfort Scarf