There’s something about cozy handmade pumpkins that makes autumn feel complete.
This Classic Ribbed Pumpkin crochet pattern is simple, beginner-friendly, and adds a touch of modern vintage charm to any space.

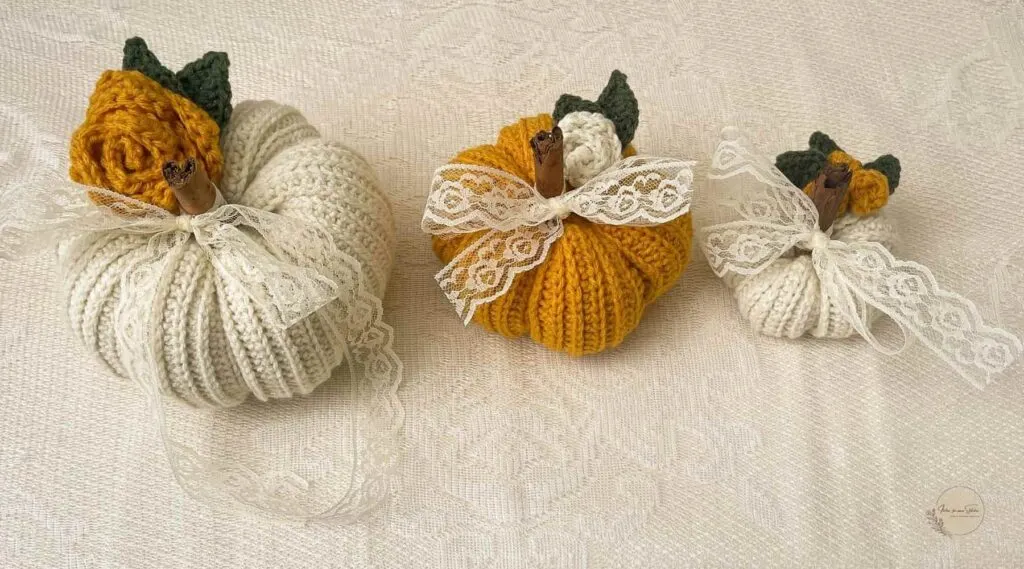
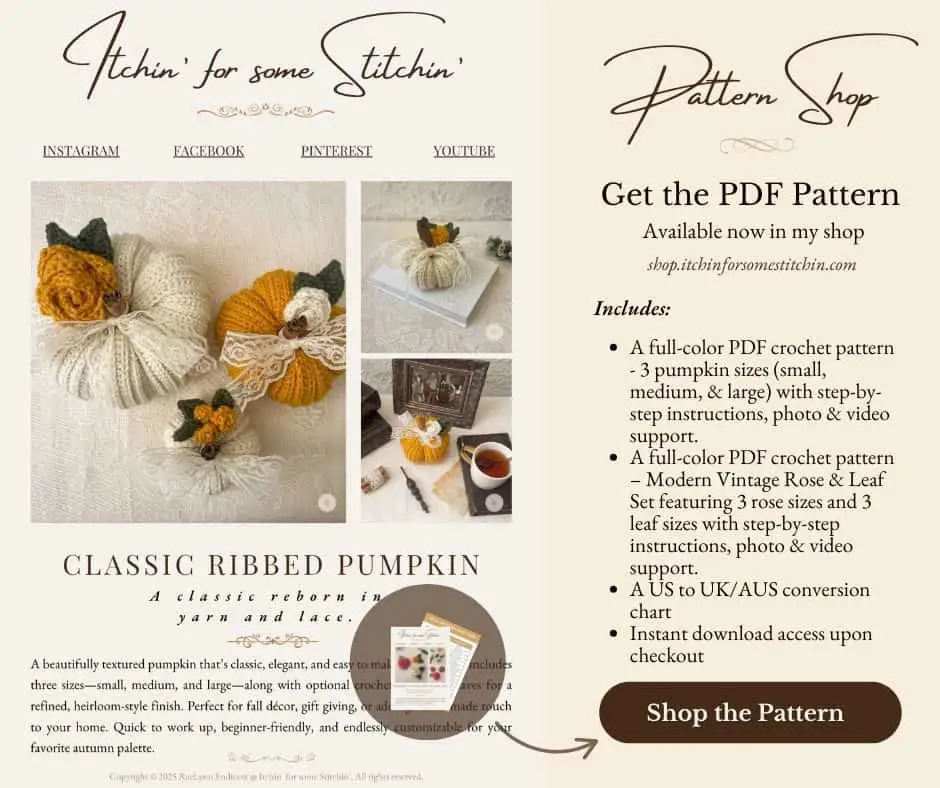
Fall is the perfect time for cozy handmade décor, and this free ribbed crochet pumpkin pattern is the perfect quick make to bring a touch of rustic elegance to your home. This post includes the small size pumpkin pattern — simple, classic, and perfect for beginners.
The matching Modern Vintage Roses & Leaves shown in the photos are re not available as free patterns yet. However, you can watch the step-by-step video tutorials for both here:
How to Crochet an Easy Large Rose
How to Crochet a Classic Leaf
If you’d like to continue working in this style, you have two options:
• Individual pattern access
The complete ad-free printable PDF — including all three pumpkin sizes (small, medium, and large) and the full Modern Vintage Rose & Leaf Set is available now in my shop.
• Ongoing access inside VIP
VIP members receive every pattern in this aesthetic, all sizes, and full video support — all in one place, without having to purchase each design separately.
If you enjoy calm, cohesive crochet projects like this, VIP is where everything in this style lives.
If you love cozy fall crochet patterns, you’ll also enjoy my Pumpkin Pie Baby Se — a sweet, beginner-friendly project that’s perfect for seasonal gifting or handmade autumn décor.
What You’ll Find Inside this Pattern:
Let’s take a quick peek at the project details before we jump into the pattern instructions.
At a Glance
Behind the Design

How This Crochet Pumpkin Came to Life
When fall rolls around, I always find myself craving cozy, timeless projects that capture the heart of the season — something that feels both classic and handmade. I’ve created many patterns over the years, but this one is special: it’s my very first pumpkin design.
As I began updating my brand aesthetic to reflect a Modern Vintage style — warm neutrals, soft textures, and a touch of old-world charm — I knew I wanted to design something that embodied that feeling. The result is the Classic Ribbed Pumpkin: simple yet elegant, rustic yet refined, and authentically me.
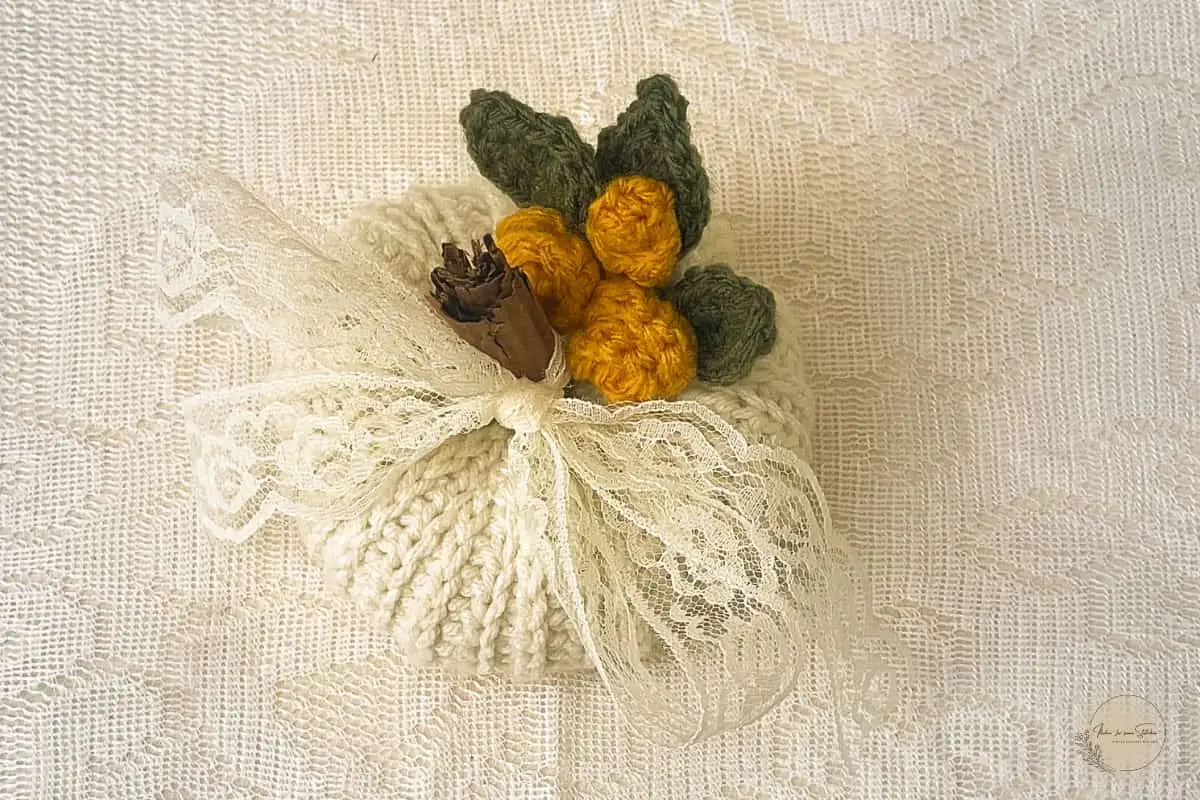
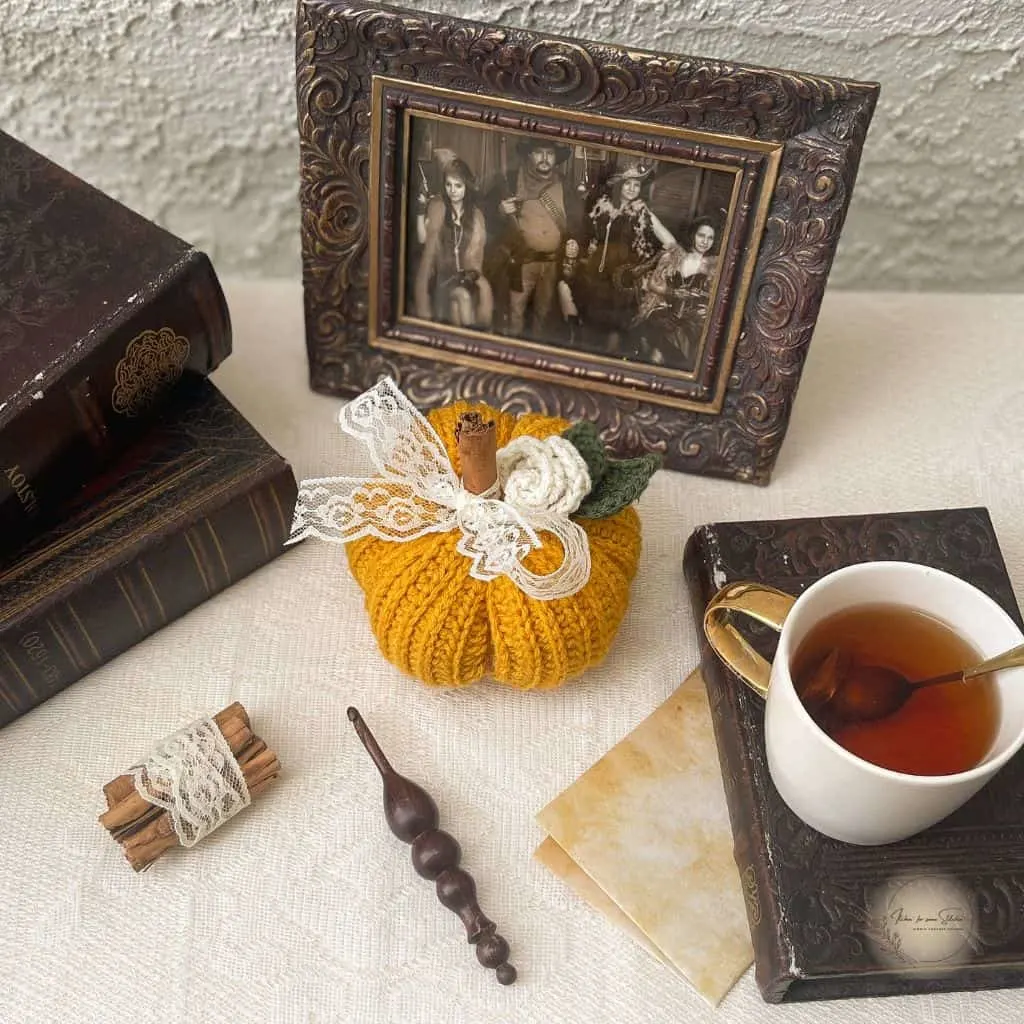
From the lace ribbon to the faux knit ribbing, every detail of this pattern was chosen to blend vintage beauty with modern simplicity. Whether you make just one for your fall table or a whole patch for your home, I hope this little pumpkin brings that same cozy sense of comfort and creativity to your space.

Ready to make your Classic Ribbed Pumpkin uniquely yours? Let’s explore a few timeless ways to style it for your home or gift-giving season.
Timeless Ways to Style Your Classic Ribbed Pumpkins

One of my favorite things about this crochet pumpkin pattern is how effortlessly it blends into any fall aesthetic. Whether you prefer rustic farmhouse charm or a more refined modern vintage look, these pumpkins add the perfect handmade touch to your home.
Display them on a bookshelf beside old books and teacups, use them as table centerpieces with cinnamon sticks and lace ribbon, or gather a few in a woven basket for that cozy autumn vibe. They also make beautiful seasonal gifts — just wrap one in tissue paper with a handwritten tag for a heartfelt touch.
Each size tells its own story: the small pumpkins make lovely accents, while the larger ones become the statement pieces that anchor your fall décor. However you choose to use them, they’ll bring warmth and a bit of timeless elegance to your space.
Love Pinterest? I do!
Save this post for Later and follow all my boards.
Now that your pumpkins are looking timeless and charming, let’s make sure they’re just as lovely up close. Here are a few helpful hints for the most beautiful results.
Helpful Hints for Beautiful Results
Crochet Pumpkin Tips for Beginners
Keep your stitches consistent
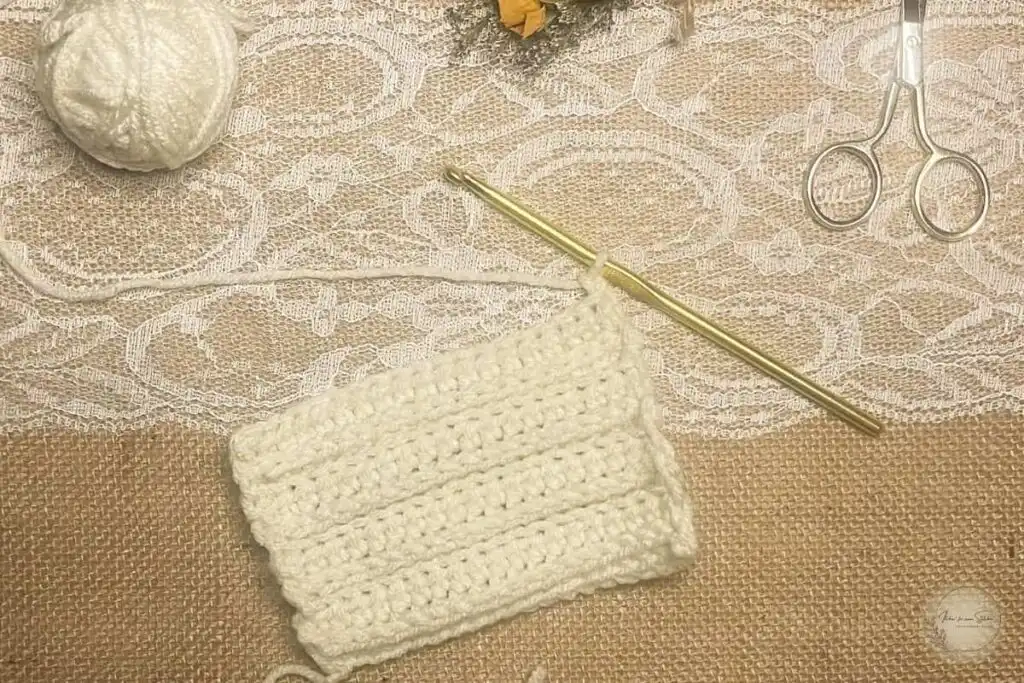
This pattern uses the Faux Knit Rib Stitch (FKR), which alternates between half double crochet in the 3rd loop and in the back loop only (BLO). Even tension is key! Keeping your stitches snug but not tight will give your pumpkin a beautifully defined ribbed texture and help it hold its shape after stuffing.
Choose yarn that fits your style
Soft acrylics or velvety yarns create plump, cozy pumpkins, while cotton gives a more structured, farmhouse look. Experiment with neutrals for timeless elegance or rich mustard, rust, and cream for that warm vintage fall palette.
Stuff lightly for the perfect shape
Too much stuffing can make your pumpkin round and stiff, while too little can cause it to sag. Start with a small handful and adjust as you cinch until it feels balanced and full but still pliable.
Secure the shaping yarn well
When cinching your pumpkin, pull firmly but not too tight to avoid breaking the yarn. Wrap the shaping yarn around several times to form even ridges before tying it off securely.
Add personality with embellishments
Cinnamon stick stems, lace ribbons, burlap twine, or crocheted roses and leaves (included in the Modern Vintage Rose & Leaf Set) bring the perfect finishing touch. Try mixing textures for a layered, heirloom look.
Think outside the patch
Beyond home décor, these pumpkins make lovely hostess gifts, market best-sellers, or table accents for weddings and fall events. You can even downsize them for ornaments or gift toppers!
Prefer to follow along visually? This step-by-step crochet video tutorial shows you exactly how to make the Classic Ribbed Pumpkin—from the very first stitch to the final bow. It’s perfect for visual learners or anyone who loves cozy, fall-inspired crochet projects.
I hope this video helps you create a pumpkin that’s uniquely yours—simple, timeless, and full of handmade charm. You can pause, rewind, and crochet right along with me at your own pace.
Now that you’ve seen how it’s made, let’s gather everything you’ll need to crochet your own Classic Ribbed Pumpkin. This easy fall décor project is perfect for adding a handmade touch to your home or gifting to someone who loves cozy, seasonal accents.
Materials
To crochet the small Classic Ribbed Pumpkin, you’ll just need a few simple supplies. This project is beginner-friendly, stash-buster–approved (especially if you have half-skeins or partial balls waiting for their moment to shine), and works beautifully with soft, medium-weight yarns.
Recommended Yarn:
- Loops & Threads Impeccable – Off White (100% acrylic, Medium #4)
Approx. 50–60 yards for the small pumpkin (not including roses & leaves)
You can substitute with any medium #4 acrylic or cotton yarn in your preferred color palette. Creams, mustards, and soft neutrals give a beautiful modern vintage feel.
Yarn Alternatives:
- Red Heart Soft (Ivory, Wheat, or Toast)
- Lion Brand Vanna’s Choice (Beige or Fisherman)
- Paintbox Yarns Simply Aran (Vanilla Cream or Mustard Yellow)
- Bernat Premium (Cream or Linen)
Hook
- US I/9 (5.5 mm) crochet hook
Other Materials
- Tapestry needle for seaming and shaping
- Polyfill stuffing
- Cinnamon stick or small wooden dowel (for stem)
- Lace ribbon or burlap twine (optional for embellishing)
- Scissors
Yarn & Yardage Requirements for the Classic Ribbed Pumpkin
One of the best things about this crochet pumpkin pattern is that it uses very little yarn — making it perfect for small seasonal projects or using up leftover skeins from your stash.
- Approx. 50–60 yards (46–55 m) of yarn for the small pumpkin body
(not including roses & leaves)
Because the yardage is minimal, this design is a great way to turn leftover yarn into timeless fall décor. You can easily create several pumpkins in coordinating shades — think creamy neutrals, mustard, and soft taupe — to decorate your home, gift to friends, or sell at markets.
Even one skein of medium-weight yarn will go a surprisingly long way, giving you enough to make a charming little pumpkin patch of your own.
Skill level
Level of Difficulty – Advanced Beginner


Gauge / Tension for the Classic Ribbed Pumpkin
Exact gauge is overly not critical for this pattern, but it will affect your pumpkin’s final size and fullness. Because this project is worked flat and shaped afterward, maintaining even tension helps the finished pumpkin keep its rounded form.
- Gauge reference: 17 sts × 12 rows = 4″ (10 cm) in half double crochet ribbing
- Adjust your hook size up or down if your stitches are too tight or loose.
- For best results, keep tension even, firm, and consistent — this ensures your pumpkin looks plush, not stiff or lumpy.
Note: After assembly and stuffing, the finished pumpkin will appear smaller and puffier than the flat piece — this is normal and part of the design’s charm.
Before we continue on to the pattern, here are the stitches and terms you’ll need to know.
Crochet Abbreviations & Stitches Used
Pattern is written in Standard US crochet terms.
*Click on abbreviation names for tutorials
Special Stitches and Techniques:
Faux Knit Rib Stitch (FKR)
This stitch pattern alternates rows of hdc in the 3rd loop and hdc in the back loop only (BLO) to create a soft, knit-like ribbed texture. It gives your pumpkin its classic ridged shape and plush structure.
Half Double Crochet in the 3rd Loop (Camel Stitch)
Instead of working into the top two loops of the stitch, insert your hook into the horizontal loop just behind the top loops (on the side facing you when working flat). This pushes the top loops forward, creating a smooth, knit-like line on the front.
Back Loop Only (BLO)
Work into the back loop only of each stitch (the loop farthest from you). This creates gentle ridges and flexibility in the fabric — perfect for shaping your pumpkin.
For visual demonstrations of both stitches, see the Faux Knit Rib Stitch video linked in the pattern.
Pattern Instructions – Classic Ribbed Pumpkin
Let’s get started! Follow the step-by-step instructions below to crochet your own Classic Ribbed Pumpkin.
This cozy autumn project works up quickly, is beginner-friendly, and makes a beautiful addition to your fall décor or handmade gifts. The small size is included free here on the blog, while the full pattern PDF includes all three sizes — small, medium, and large — plus matching roses and leaves for an elegant finishing touch.
When you’re finished, be sure to explore the Creative Ways to Use Your Ribbed Crochet Pumpkin section for creative inspiration. And if you need a little extra help, don’t miss the Helpful Hints for Beautiful Results and FAQs for added guidance along the way.
Crochet Ribbed Pumpkin Construction
This crochet pumpkin is made in one piece, worked flat and then assembled.
- The body is crocheted flat in rows using the Faux Knit Rib Stitch (FKR) — alternating rows of hdc in the 3rd loop and hdc in the back loop only (BLO).
- Once the body panel is complete, it’s seamed along the short edges, cinched at both ends, and stuffed to form the pumpkin shape.
- The top and bottom are gathered tightly to create the classic ribbed silhouette.
- A cinnamon stick is added as the stem, along with optional crocheted roses and leaves for embellishment.
Because this project doesn’t rely on exact sizing, gauge isn’t critical — just keep your tension even for a neat and polished finish.
Want to see how it all comes together visually?
The ad-free, printable PDF pattern includes:
- Detailed instructions for three pumpkin sizes, plus matching roses and leaves
- Full step-by-step construction photos
- Video tutorial for the small pumpkin
Finished Dimensions
The size of your Classic Ribbed Pumpkin will vary slightly depending on yarn, hook, and tension.
For the small pumpkin shown here (made with Loops & Threads Impeccable, medium weight #4, and a 5.5 mm hook), the finished piece measures approximately:
- Height: 2–2.5 inches (5–6.5 cm) after stuffing and shaping
- Circumference: 15 inches (38 cm)
Because this pattern is worked flat and then assembled, finished measurements may vary depending on how firmly you stuff and cinch the ends.
Want to make a matching set?
The ad-free printable PDF pattern includes three sizes — small, medium, and large — plus the coordinating Modern Vintage Roses & Leaves Set to complete your display.
Notes:
Need extra guidance? A full step-by-step video tutorial for the small pumpkin is available, and the ad-free printable PDF includes detailed construction photos and all three sizes, plus the matching roses and leaves.
Ribbed Pumpkin Pattern
Body
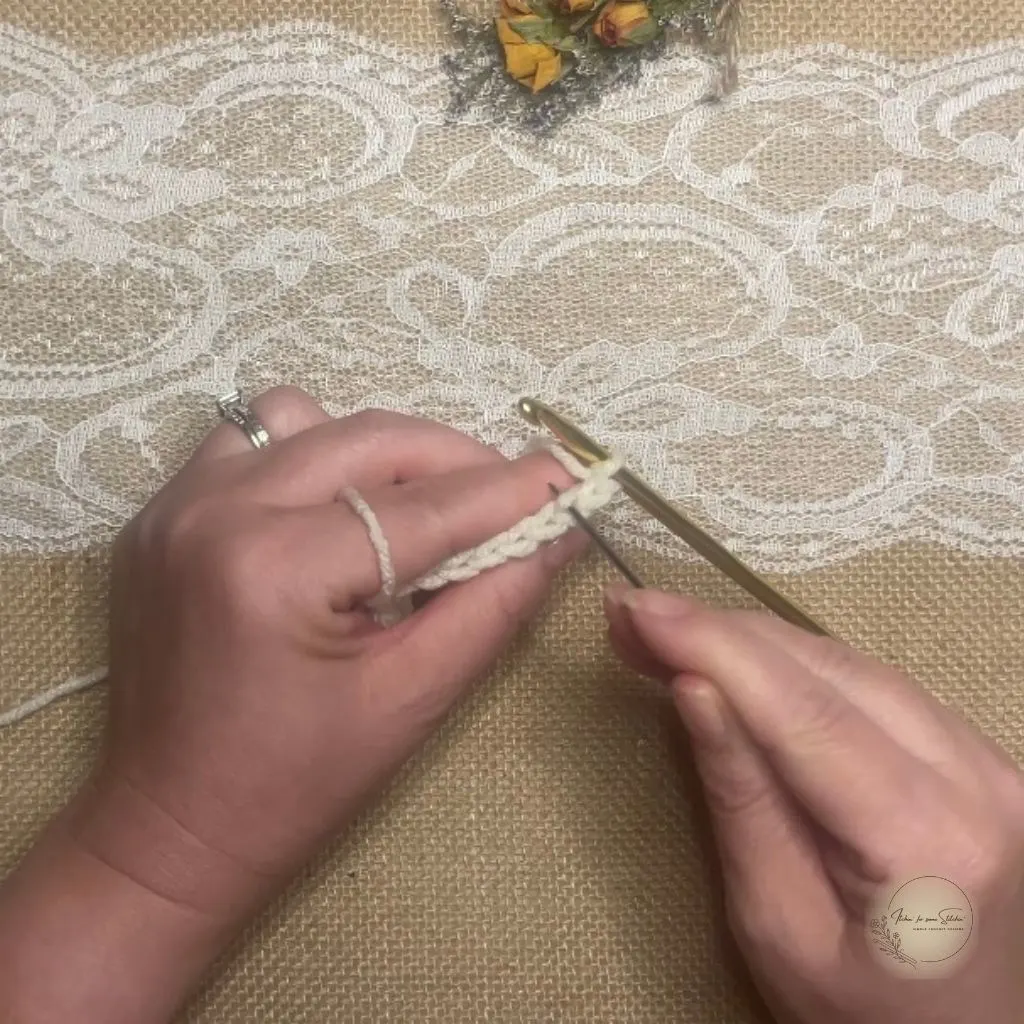
Chain 20
Row 1: Hdc in 2nd ch from hook and in each ch across. Ch 2, turn work. [19 sts]
Row 2: Hdc in the 3rd loop only across. Ch 2, turn work. [19 sts]

Row 2: Hdc in the back loop only across. Ch 2, turn work. [19 sts]

Repeat Rows 2–3 until your piece measures approximately 12 inches wide (about 31 rows total).
Fasten off, leaving a 24+ inch tail for seaming.


Assembly
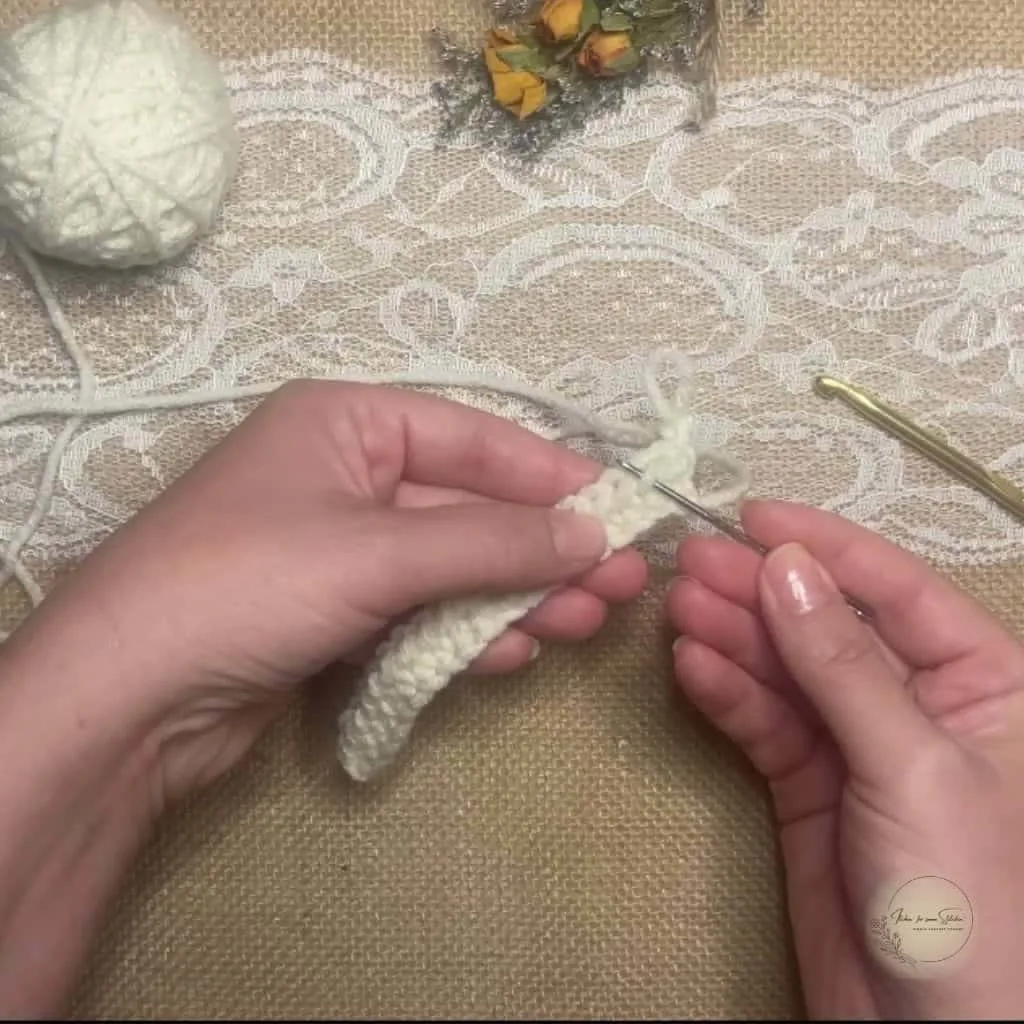
Form the pumpkin: Bring short ends together and whipstitch to form a tube.

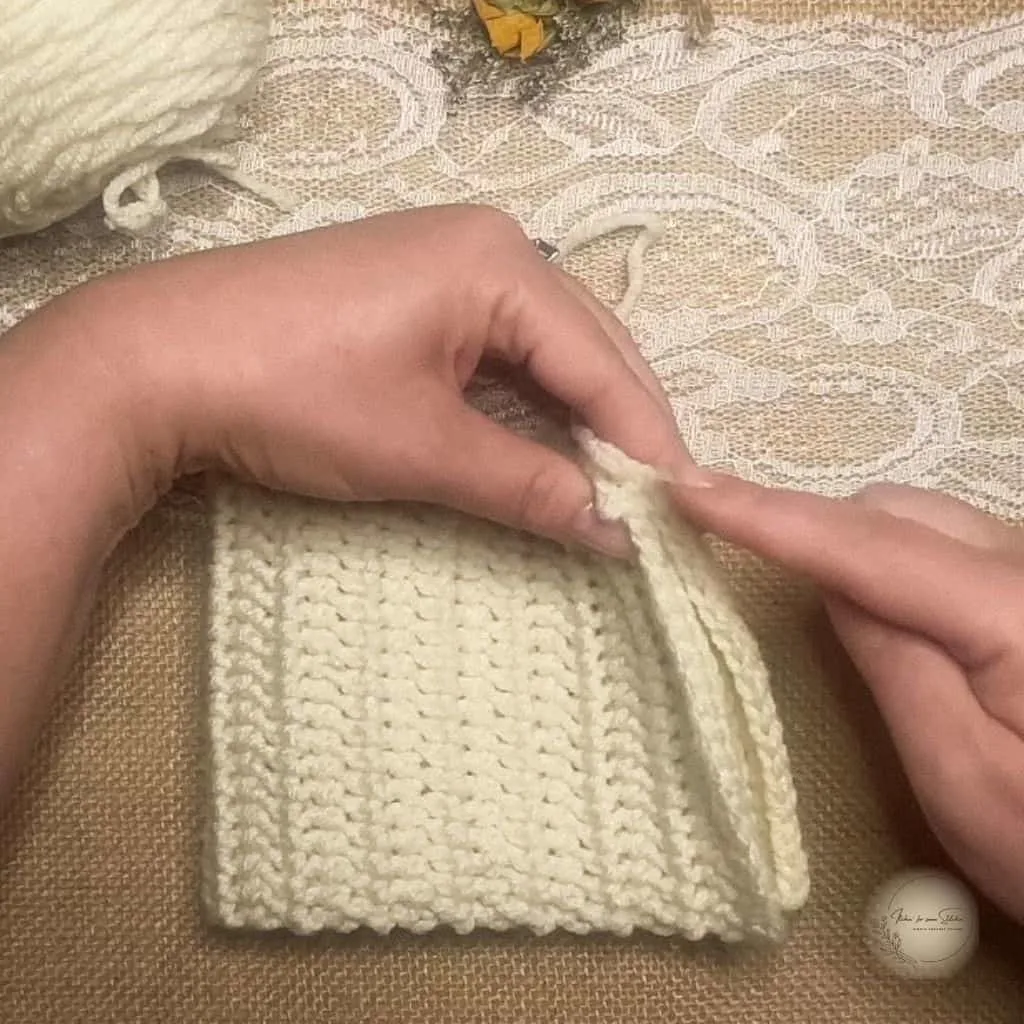
Close one end: With a yarn needle, weave the yarn tail through one edge of the tube and pull tight to cinch closed. Secure and weave in end.

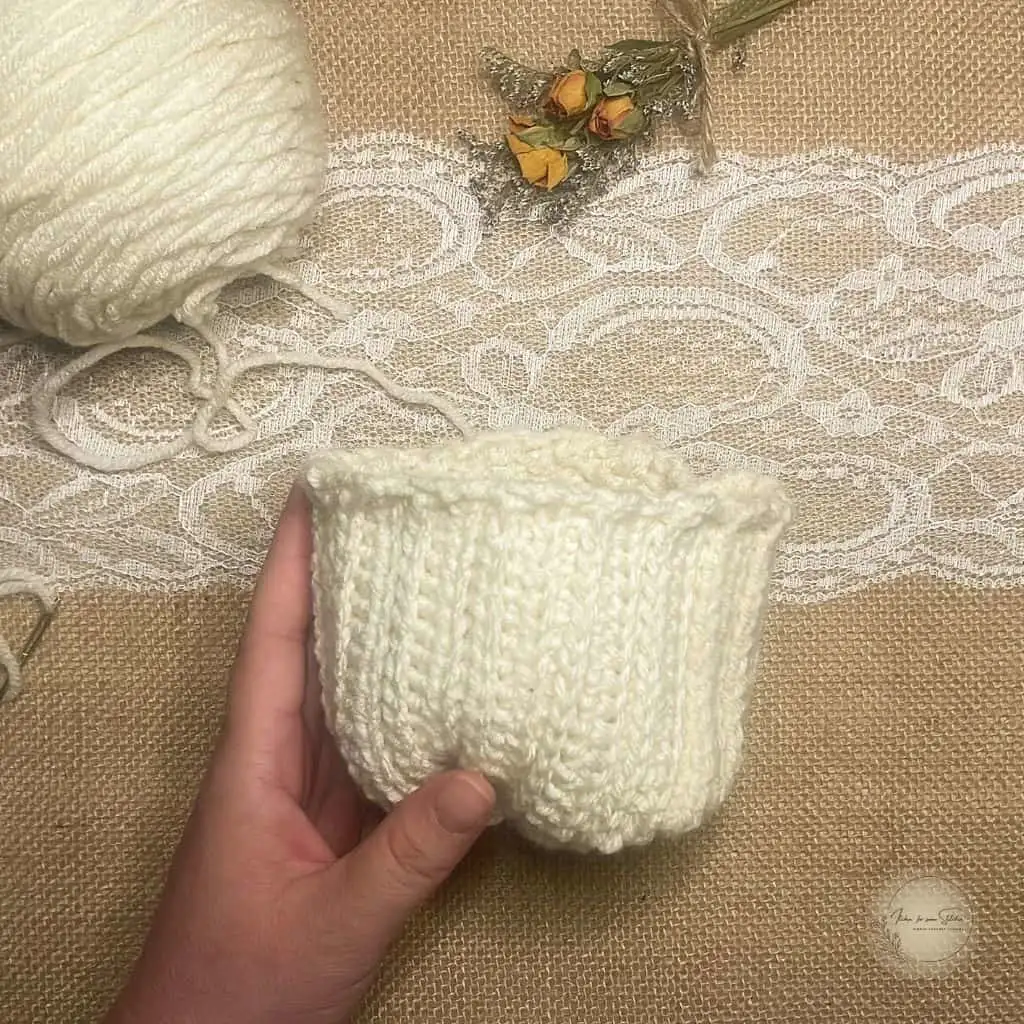
Stuff: Fill the pumpkin lightly with polyfill stuffing.

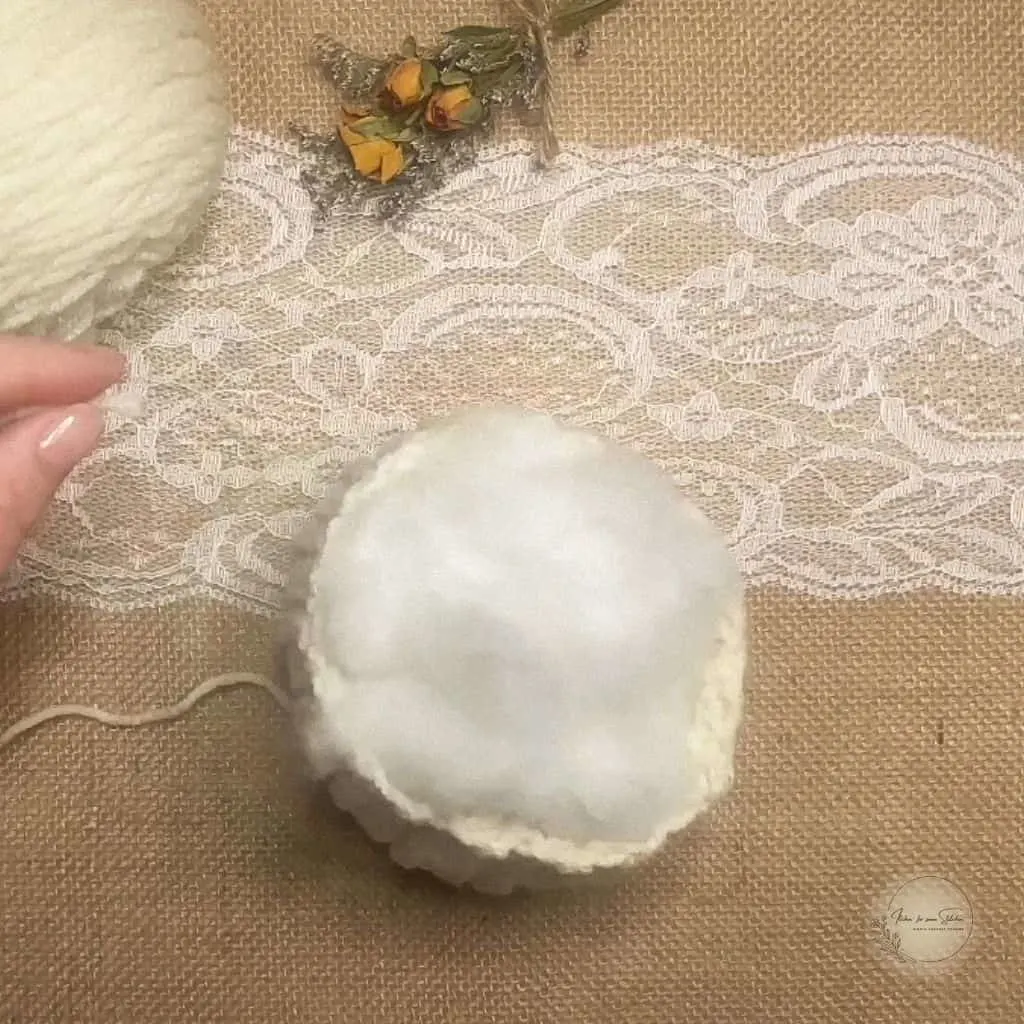
Close the top: Thread the needle with the starting tail, weave around the top edge, and pull tightly to close. Secure.
Shape the ridges: Wrap yarn around the pumpkin several times from top to bottom, pulling snugly to create the ribbed sections. Tie off and weave in ends

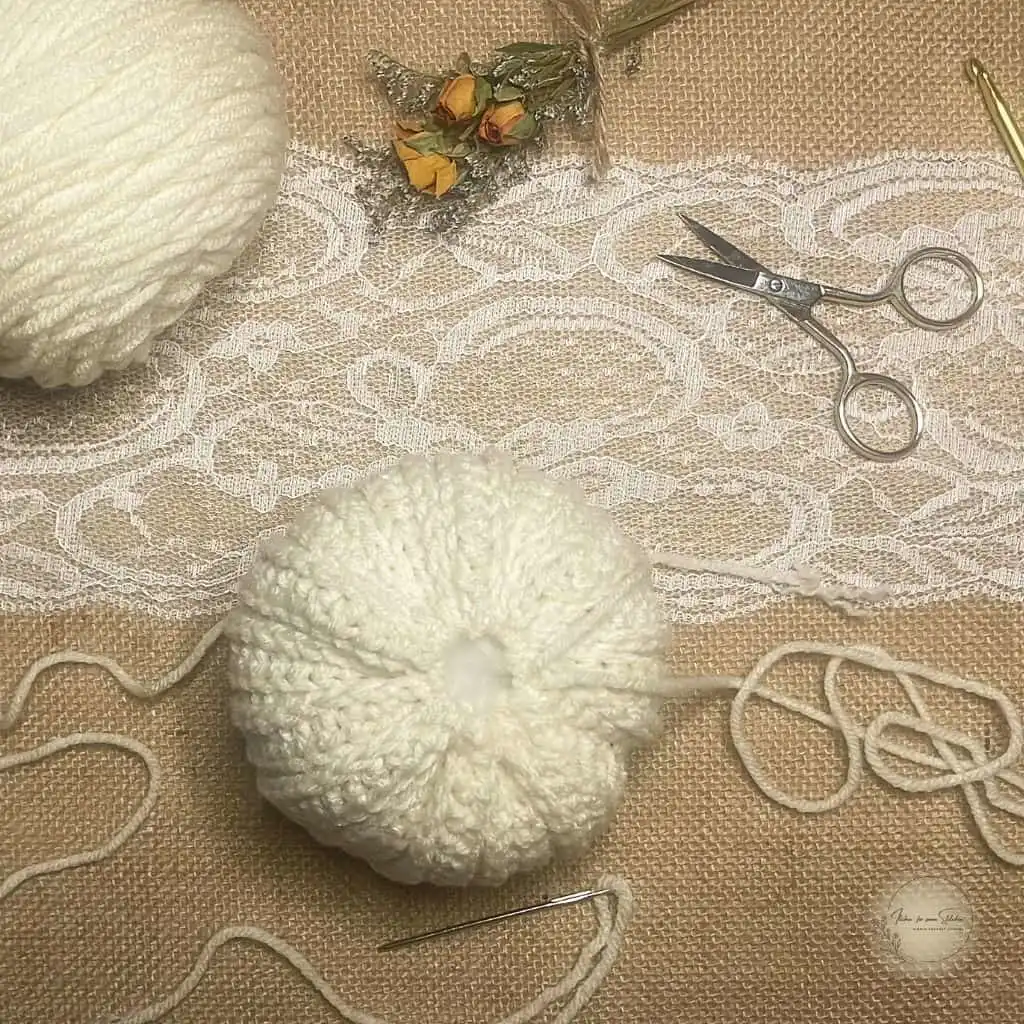
Bind off and weave in ends.
Stem & Optional Details
- Insert a cinnamon stick for a natural stem, or crochet a short chain (about 6 ch) and sew in place.
- Add lace, burlap twine, or the Modern Vintage Rose & Leaf Set for extra charm.
Not sure how to form the ridges?
Watch the video tutorial for a clear step-by-step demonstration.
Creative Fall Décor Ideas for Your Crochet Pumpkins
Wondering how to use your finished pumpkins? Whether you’re decorating your home for fall or creating handmade gifts, these ideas will help you make the most of your finished crochet pumpkins. This cozy crochet pattern is more than just a seasonal make — it’s a versatile, beginner-friendly project that adds handmade elegance wherever you place it.
Here are some creative ideas:
These pumpkins are cozy, classic, and endlessly adaptable. Whether you’re decorating your home, making gifts, or preparing inventory for fall markets, they bring that perfect touch of autumn warmth and modern vintage charm to every project
Frequently Asked Questions – Classic Ribbed Crochet Pumpkin
Have questions while making your pumpkin? These FAQs cover the most common beginner concerns and tips for success.
If you’d like to crochet this again next year, the printable version makes it easy!
Love This Pattern? Keep It Forever.
Download the ad-free printable version and crochet with ease — no scrolling needed.
- The full PDF includes:
- All three pumpkin sizes (Small, Medium & Large)
- The complete Modern Vintage Roses & Leaves Set (3 rose sizes + 3 leaf styles)
- Step-by-step photo guidance and video links for visual learners
Create your own collection of cozy, heirloom-quality pumpkins and floral accents to enjoy year after year.
Shop the Pattern Here or access it in the VIP Vault.

I’d love to see your finished project! Share your photos on Instagram and Facebook, tag @itchinforsomestitchin, and use #IFSS_ClassicRibbedPumpkin and #itchinforsomestitchin so I can admire your beautiful work. Don’t forget to follow me for more crochet patterns, tips, and inspiration!
If you’d like a cozy place to share your projects, ask questions, and connect with fellow crocheters, you’re always welcome inside my Itchin’ for Some Stitchin’ Crochet Community on Facebook.
Looking for your next cozy make? Here are a few more patterns you’ll love!
More to Love
I hope this free crochet pumpkin pattern inspires your next cozy fall project — thank you for being part of the Itchin’ for Some Stitchin’ community!


Thank you
I sincerely appreciate you visiting my blog! By sharing my content and/or making a purchase you are making it possible for me to continue producing and sharing free content for everyone to enjoy. Your support is amazing!