* This post contains affiliate links. See my full Disclosure Policy for details.
Hi folks! If you’ve just bought your first sewing machine or are completely new to sewing then you’ve come to the right place. When my fiancé bought me a sewing machine four years ago, I had no sewing experience. You read that right folks. I had NO sewing experience. I didn’t even hand sew.
Folks, you have to understand. Danny, my fiancé, didn’t just buy me a cheap beginner sewing machine. Oh no… he bought me a Husqvarna Viking Designer Diamond Royale. The KING of all sewing machines. Hailed as the best on the market. At least that’s what the sales lady said. 🙂
The point is that I had no idea what I was doing. I was so intimidated by this machine that it sat, untouched for over 4 months, on a table in my craft room. I was terrified by it. I had no idea what to do with it. Then finally, one day, I took the bull by the horns and grabbed the user guide. What’s the first thing I looked at? Yep, you guessed it. The parts of my sewing machine and their functions.
It’s important, right? How are you supposed to use a sewing machine if you don’t even know what the parts are or what they do? So, if you’re sitting there like I was 4 years ago, scared of your sewing machine and unsure where to begin, let me help ease your fear. I’m going to hold your hand as I walk you through each sewing machine part and help you to understand what they do.
In general, a sewing machine is a machine that stitches fabric, paper, card and/or other material together with thread. Although there are many types of sewing machines, the basic structure is the same whether it is a treadle, hand-operated, or electric sewing machine.
Anatomy of a Sewing Machine
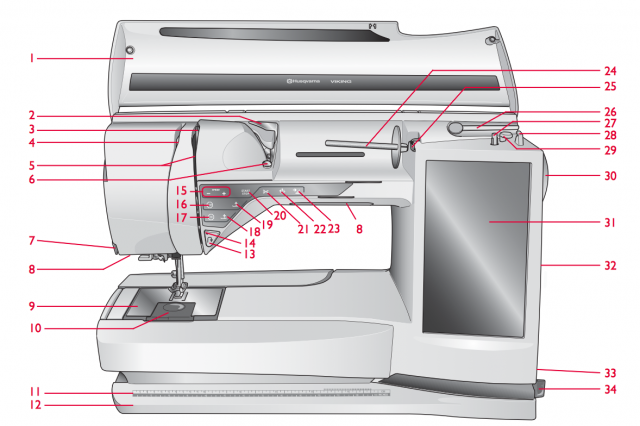
Image courtesy of Husqvarna Viking.
NOTE: All schematics in this tutorial are from my Husqvarna Viking Designer Diamond Royale User’s Guide and has many options not available on a standard sewing machine. I am listing all parts available on the Diamond Royale sewing machine to avoid confusion, but only those parts listed in blue are considered part of the basic sewing machine structure. These parts are followed by a brief description.
1. Lid
2. Pre-Tension Thread guide
- The thread guide holds the thread in place from the spool to the needle.
3. Thread tension discs
- These are two concave discs put together with the convex sides facing each other. They squeeze the thread as it passes between them, adjusting the pressure applied to the thread for an even feed to the needle to create an even stitch. The tension of the thread is adjusted by a spring and nut, called the tension regulator, which increases or decreases pressure on the discs. Together the tension discs and the tension regulator make up the tension assembly.
- When threading the sewing machine you should always have the presser foot raised. This ensures that the discs are not engaged and are open to accept the thread.
4. Thread Take-up lever
- In many modern sewing machines, the thread take-up lever is located at the top, but hidden inside the body of the machine. Its job is to bring the sewing machine needle to its highest position. It should always be all the way to the top when placing or removing fabric from under the pressure foot. This prevents snagging and bending the needle.
- It also takes the thread up and down to the needle as you sew. When threading the sewing machine, the thread must go through the take-up lever to keep the thread tension at the proper level and your stitching even. If the thread is not in the take up lever it can knot up and jam in the machine creating a tangled mess.
See Why Sewing Machine Thread Bunches Up and How to Fix It if you have a problem with your thread becoming tangled.
5. Thread slots
6. Thread tension disc for bobbin winding
7. Thread cutter
8. Adjustable E LIGHT system
9. Needle Plate/Throat Plate
- This is the metal plate under the needle & pressure foot and depending on your machine, might be on top of the bobbin case. Needle plates often have seam guides, which are helpful when your sewing project calls for specific seam measurements.
- The needle plate has holes and/or slots for the needle to pass through as it moves up and down to stitch the fabric. It also covers the feed dogs, which are two rough pieces of metal that emerge through a large opening (or two) in the needle plate to grip and push the fabric along as you sew.
10. Bobbin cover/Slide plate
- This is a rectangular plate that slides out of the sewing machine to allow the removal of the bobbin case.
Although the schematic for my sewing machine doesn’t denote the bobbin case, most sewers consider the bobbin case part of the basic sewing machine structure.
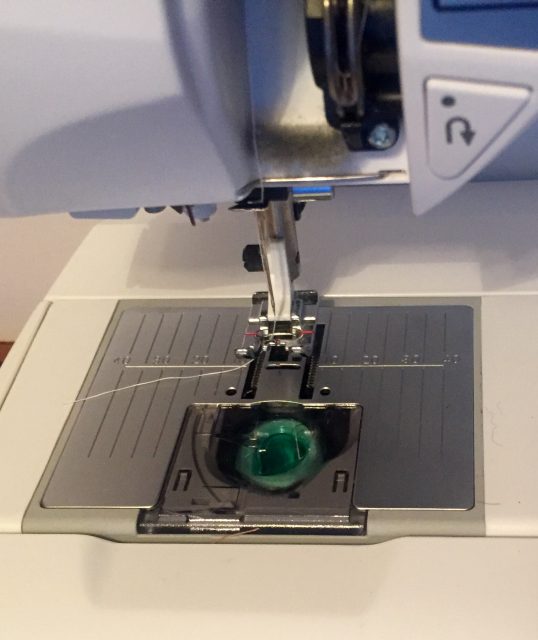
Needle plate area showing slide plate with bobbin inside bobbin case.
- The bobbin case is the case that the bobbin sits in. The bobbin is a small spindle that is wound with thread by the bobbin winder. It supplies the bottom thread of the stitches. When loaded with the bobbin, the bobbin case moves into position to grab the top thread and form the stitch as the needle is lowered into the bobbin chamber.
11. Button ruler and built-in tape measure
12. Base plate
13. Reverse/Back-sew button
- Located on the front of the machine, this button is used to sew backwards. Sewing backwards is done at the end of every seam to tie it off. This is exactly like regular sewing just in the opposite direction (reverse).
14. Reverse indicator
15. Speed + and –
16. STOP
17. FIX
18. Sensor Foot Down and Pivot
19. Pressure foot lifter
- This is a lever attached to the presser bar used for raising and lowering the presser foot.
- The presser foot presses and holds the fabric on the needle plate so it can be sewn smoothly. During sewing, the presser foot should be down. Lift it up with the presser foot lifter when you’re done sewing to release the fabric.
NOTE: If you have a Husqvarna Viking Designer Diamond Royale, this is called the Sensor Foot Up and Extra Lift.
20. Start/Stop
21. Selective Thread Cutter button
22. Needle Stop Up/Down
23. Stitch Re-start
24. Spool holder/Pin (Main spool pin)
- The spool holder holds the spool of thread, but it also controls the direction of the thread as it goes through the machine.
- Some sewing machines, like the Husqvarna Viking Designer Diamond Royale, have more than one spool holder so you can use a double-eyed needle to sew decorative stitches. If this is also the case for your sewing machine, one of the spool pins will typically be called an auxiliary spool pin and the instructions for its use would be in your manual.
- Depending on the machine, the spool holder can be horizontal or vertical. The schematic of my sewing machine shows both the main spool pin and auxiliary spool pin in the horizontal position. However, the auxiliary spool pin actually flips up to become vertical. So, in the case of my sewing machine, there is one horizontal and one vertical spool pin.
25. Bobbin winding thread guide
26. Auxiliary spool pin
27. Bobbin winder
- Bobbin winders are a simple mechanism used to wind thread onto the empty bobbin. They are sometimes called the spool pin for bobbin winding because a spool of thread is placed on it at the time of bobbin winding. Bobbin winders can be at the top, front or end of the machine. On my sewing machine, it is found on the top.
28. Thread cutter for bobbin winding
29. Bobbin winding lever
30. Hand wheel (Fly wheel)
- This is used to manually move the needle up and down, which is often needed when sewing an extremely thick piece of fabric, pulling the thread of the bobbin up through the needle plate or simply when you need to sew carefully. When rotated, the clutch or thumb screw that is located in the center of the fly wheel engages and disengages the stitching mechanism.
31. Ultimate Interactive Screen
Okay, your sewing machine most likely will not have an ultimate interactive screen. So why have I included it in the list of basic sewing machine parts? Because if it does, this is where you will find the stitch length adjustment and stitch pattern adjustment that is usually found separately on other sewing machines. If it doesn’t, then you should have two knobs or buttons for the stitch length adjustment and stitch pattern adjustment.
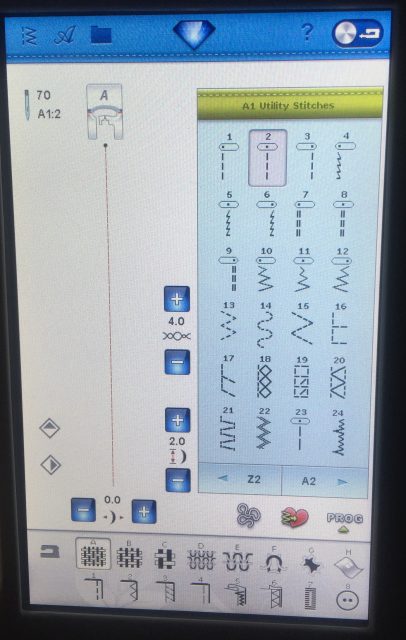
Stitch pattern adjustment & stitch length adjustment on the Husqvarna Viking Designer Diamond Royale Ultimate Interactive Screen.
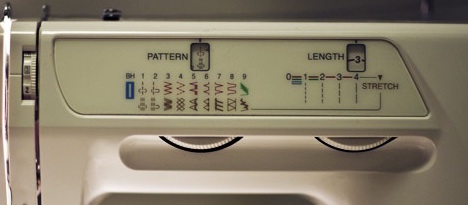
Example of a sewing machine where stitch pattern adjustment and stitch length adjustment are separate.
Stitch length adjustment
- The stitch length adjustment controls the length of every individual stitch. The stitch length needed is determined by the type of fabric and thread in use. Thus, you should sew on a scrap piece of fabric to test for the correct stitch length for that particular fabric.
Stitch pattern adjustment
- There are many different stitch types, including the straight stitch, the zig-zag stitch, the buttonhole stitch, and even decorative stitches. The stitch pattern adjustment is where you will choose which stitch you are going to sew. The choice of stitches usually depends on your sewing machine and can be found in your user manual.
32. Built-in USB ports
33. ON/OFF switch, connectors for power and foot control
- It may seem silly, but it’s true–most sewing machines run on electricity (generally). There should be a cord attached to the foot pedal that plugs into the wall and the sewing machine. The power switch is usually located on the right side of the machine.
34. Stylus holder
Sewing Machine Needle Area
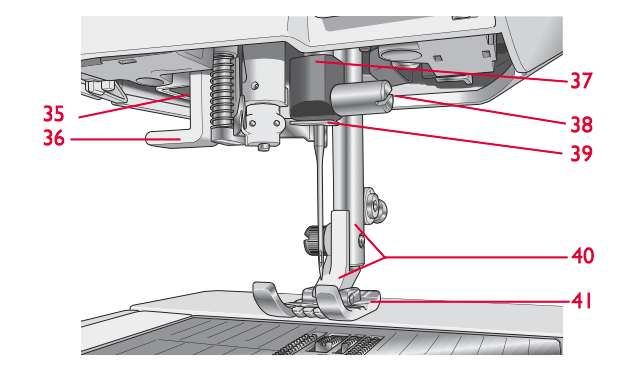
Image courtesy of Husqvarna Viking.
35. Sensor One-Step Buttonhole Foot socket
36. Built-In needle threader
37. Needle bar
- A steel rod that holds the needle in place with the help of a needle clamp. Its main function is to give motion to the needle.
38. Needle clamp
- A small screw that holds the needle in place in the needle bar.
39. Needle thread guide
40. Presser foot bar and pressure foot ankle
41. Presser foot
- The presser foot is fixed to the presser bar and when lowered holds the fabric firmly in position. During sewing, it puts pressure on the fabric to keep it moving smoothly along and prevent wrinkles that may disrupt the stitch. There are many different kinds of presser feet and each one performs a specific function(s). Presser feet snap on and off via the presser foot lever on the back of the presser foot.
Sewing Machine Foot Pedal
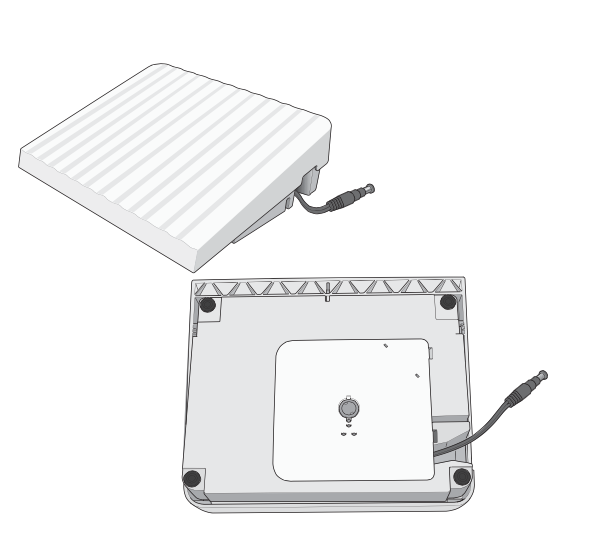
Image courtesy of Husqvarna Viking.
42. Foot pedal
- The foot pedal operates exactly like a car pedal; the more pressure you apply to the pedal, the faster you sew. It’s best for beginning sewers to press the foot pedal very slowly and gently until they get used to the speed and rate of the foot pedal.
User Manual
Okay, you got me, this technically isn’t part of the sewing machine. But, it is an essential tool for knowing and understanding the parts and function of your specific sewing machine. Although most sewing machines have the same basic design/construction, but there may be slight differences among them. Your instruction manual is probably the most important tool you need for sewing with a machine.
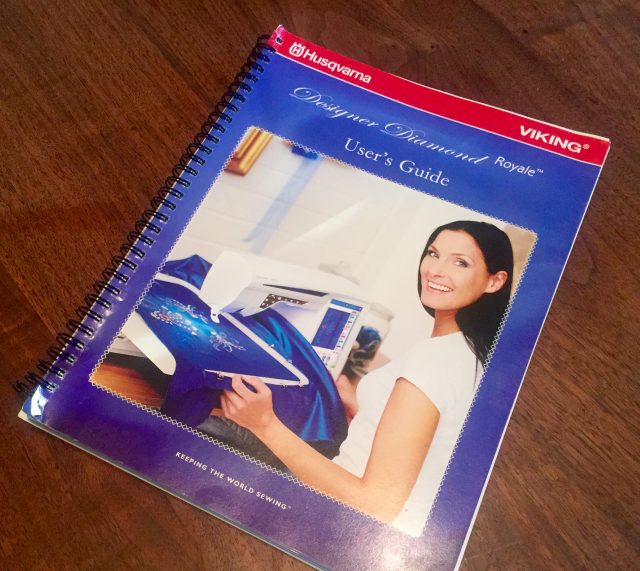
My sewing machine user guide.
This photo and the accompanying descriptions are for my personal sewing machine. Consult your sewing machine user guide to clarify any differences.
Okay, now that you’ve come to understand your sewing machine a bit more, it’s time to start thinking about your first sewing project. This FREE ebook will help prepare you and give you the confidence to take your first steps towards sewing success!
Which sewing machine parts confuse you?
Until next time… Happy Sewing!
