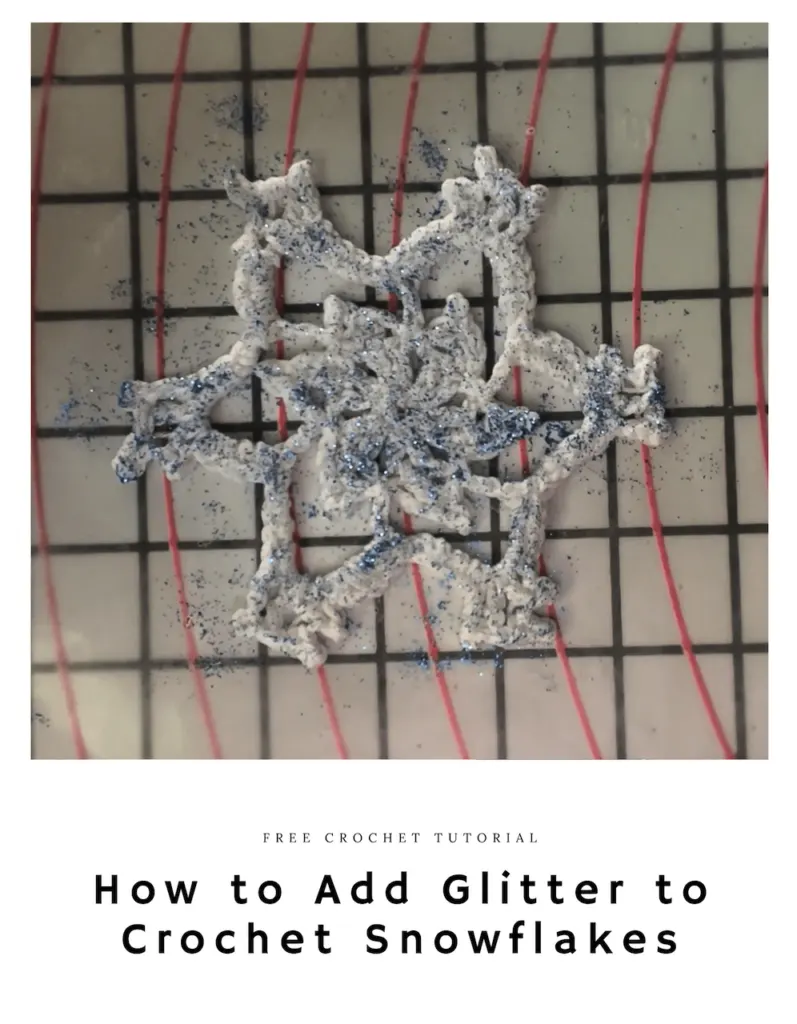
Learn multiple ways to add glitter to crochet snowflakes and how to add ribbon both when there is and isn’t an obvious hole.
Crochet snowflakes are beautiful on their own, but adding glitter and ribbon can transform them into dazzling, festive decorations.
Whether you’re looking to create sparkly ornaments, elegant gift tags, or eye-catching garlands, this guide will show you how to use fine glitter, glitter glue, glitter spray, and ribbon to elevate your crochet snowflakes.
I’ll cover techniques for adding glitter in different ways and how to incorporate ribbon, whether your snowflake has obvious openings or none at all.
Let’s get started!
Why Add Glitter and Ribbon?
Glitter and ribbon enhance the beauty and functionality of crochet snowflakes.
Here’s why you should try it:
- Glitter adds sparkle and makes your snowflakes stand out as decorative pieces.
- Ribbon adds versatility, allowing you to turn snowflakes into ornaments, garlands, or gift accents.
- Combining glitter and ribbon creates unique, personalized designs.
Supplies You’ll Need
Here’s what you’ll need to get started:
For Glitter:
- Fine glitter (color of your choice)
- Glitter glue (available at craft stores)
- Glitter spray (for uniform application)
- Small paintbrush
- Adhesive spray (optional for securing loose glitter)
- Wax paper or plastic wrap (to protect your workspace)
For Ribbon:
- Satin, grosgrain, or organza ribbon in your chosen color (1/8 inch to 1/2 inch width)
- Scissors
- Glue gun or fabric glue (optional)
- Needle and thread (optional for sewing ribbon onto snowflakes)
Additional Items:
- Crochet snowflakes (stiffened for most methods; wet for one method) – learn how to stiffen crochet snowflakes in the step-by-step comprehensive How to Stiffen Crochet Snowflakes Guide.
- Corkboard or foam board
- Rust-proof straight pins
- Tweezers (optional for precision)
- Clear spray sealant (optional for glitter longevity)
Part 1: Adding Glitter to Crochet Snowflakes
Method 1: Using Fine Glitter
Fine glitter is versatile and perfect for adding shimmer.
There are two effective ways to apply it:
Way 1: Using Adhesive and Sprinkling Glitter
This method works well for precise glitter placement.
- Prepare Your Workspace: Cover your corkboard or foam board with wax paper or plastic wrap to protect it from glitter and glue.
- Apply Adhesive: Use a small paintbrush to apply glue evenly over the areas you want to glitter.
- For full coverage, coat the entire snowflake.
- For accents, focus on edges or center details.
- Sprinkle the Glitter: Generously sprinkle fine glitter over the adhesive.
- Tap Off Excess: Tap the snowflake gently to remove excess glitter and collect it for reuse.
- Dry and Seal: Allow the snowflake to dry completely (1-2 hours), then spray with a clear sealant if desired to prevent shedding.
Way 2: Using Freshly Soaked Snowflakes (Preferred Method)
This method is faster and ensures even coverage, especially if your snowflakes are fresh from the stiffening process.
- Prepare Glitter: Pour fine glitter into a shallow plate or dish. (image 1)
- Press and Sprinkle:
- While the snowflake is still damp from the stiffening solution, press one side of it gently into the plate of glitter. (images 2)
- Sprinkle glitter on top of the snowflake to fill in any missed spots. (image 3)
- Flip and Repeat: Turn the snowflake over and press the other side into the glitter. Sprinkle additional glitter on top if needed. (repeat images 1-3)
- Dry and Shake Off Excess: Place the glittered snowflake on wax paper to dry. Shake off any excess glitter once dry. (image 4)
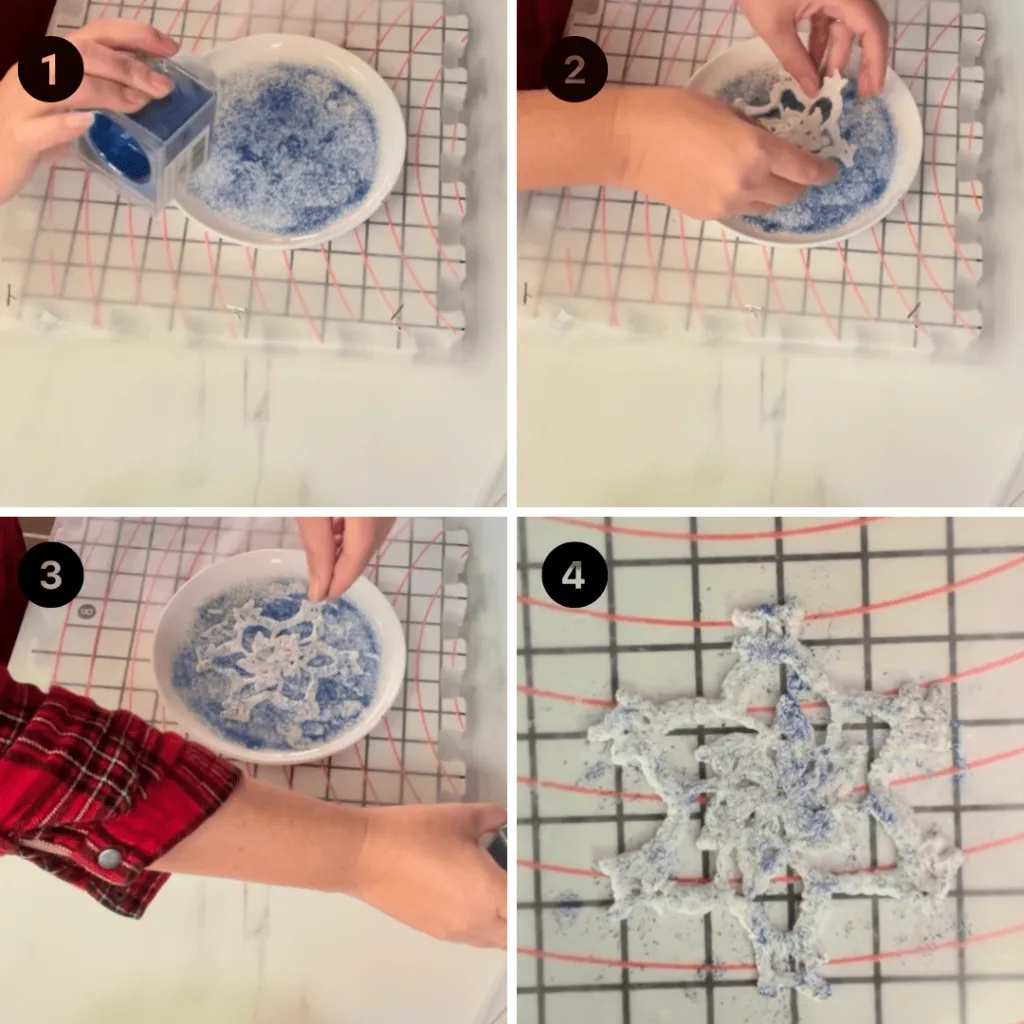
Both methods yield beautiful, sparkling results. Choose the one that best fits your workflow and desired effect!
Method 2: Using Glitter Glue
Glitter glue is less messy and great for creating patterns.
Step 1: Apply Glitter Glue
- Squeeze glitter glue directly onto the snowflake.
- Use a small paintbrush or your finger to spread it evenly over desired areas.
Step 2: Add Layers (Optional)
- Let the first layer dry for a few hours.
- Add additional layers for a more dramatic effect.
Method 3: Using Glitter Spray
Glitter spray is ideal for a uniform shimmer.
Step 1: Spray the Snowflake
- Hold the spray can 6-8 inches away from the snowflake.
- Apply a light, even coat.
Step 2: Add Multiple Coats
- Let the first coat dry for 15-20 minutes.
- Apply additional coats until you achieve the desired sparkle.
Step 3: Let It Dry
Allow the snowflake to dry completely before handling.
Part 2: Adding Ribbon to Crochet Snowflakes
When the Snowflake Has an Obvious Hole
Snowflakes with large openings make it easy to add ribbon.
Here’s how:
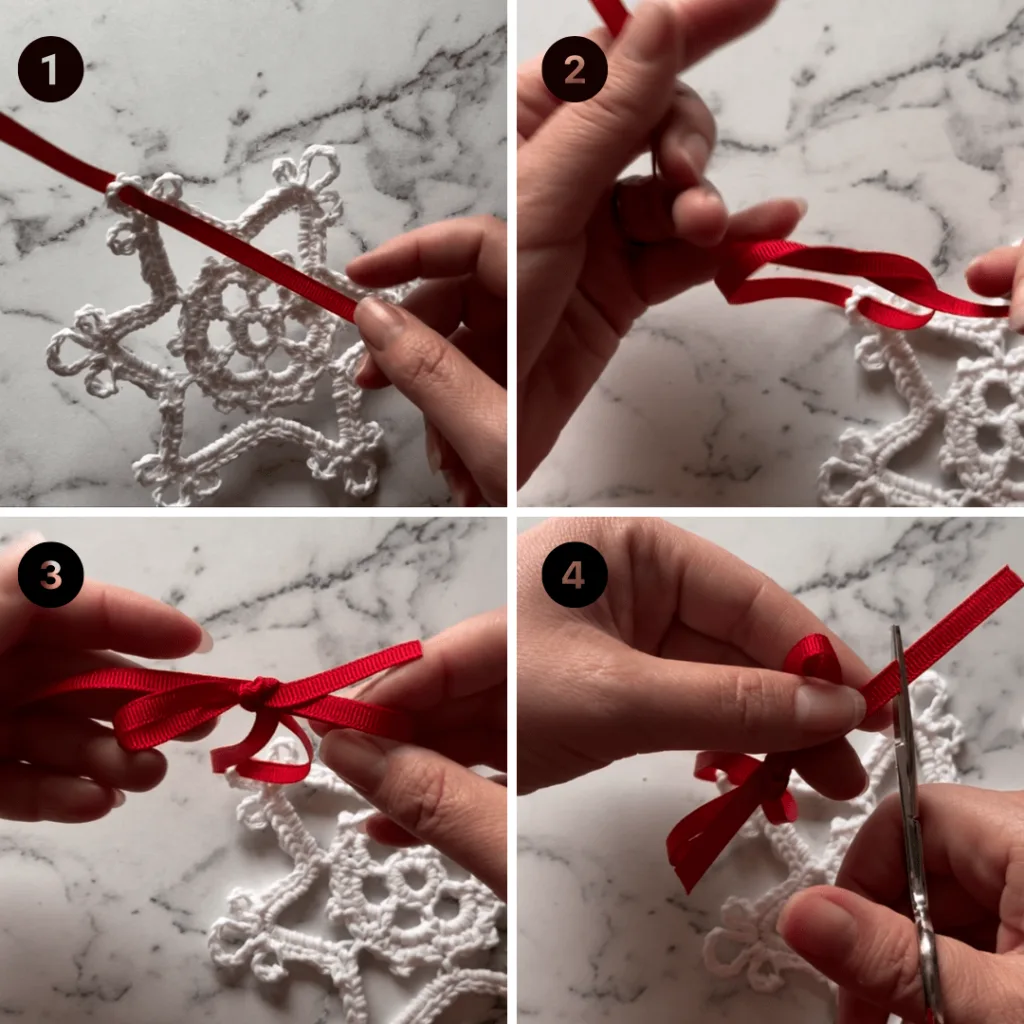
Step 1: Thread the Ribbon (image 1)
- Cut a piece of ribbon about 8-10 inches long.
- Thread the ribbon through the largest opening in the snowflake.
- Pull the ribbon ends together to form a loop.
Step 2: Secure the Ribbon (images 2-3)
- Tie the ribbon ends into a bow or knot.
- Adjust the length of the loop if you’re making an ornament.
Step 3: Clip Ribbon Ends (Image 4)
- Use scissors to clip the ribbon ends so that they are even.
When the Snowflake Has No Obvious Hole
If your snowflake doesn’t have a large, visible opening, you can still attach ribbon by threading it through smaller spaces using a tapestry needle.
Here’s how:
- Prepare the Ribbon: Cut a piece of ribbon about 8-10 inches long.
- Thread the Needle: Insert the ribbon through the eye of a large tapestry needle. Make sure the ribbon is flat and smooth. (image 1)
- Find a Small Space: Locate a small opening in the snowflake where the needle can pass through without damaging the stitches. (image 1)
- Push the Needle Through: Gently guide the needle through the small space, pulling the ribbon along with it. (image 2)
- Secure the Ribbon: (images 3-4)
- Pull the ribbon through until the ends are even.
- Tie the ribbon into a bow or knot to create a hanging loop.
- Adjust the position of the ribbon if needed to ensure the snowflake hangs evenly.
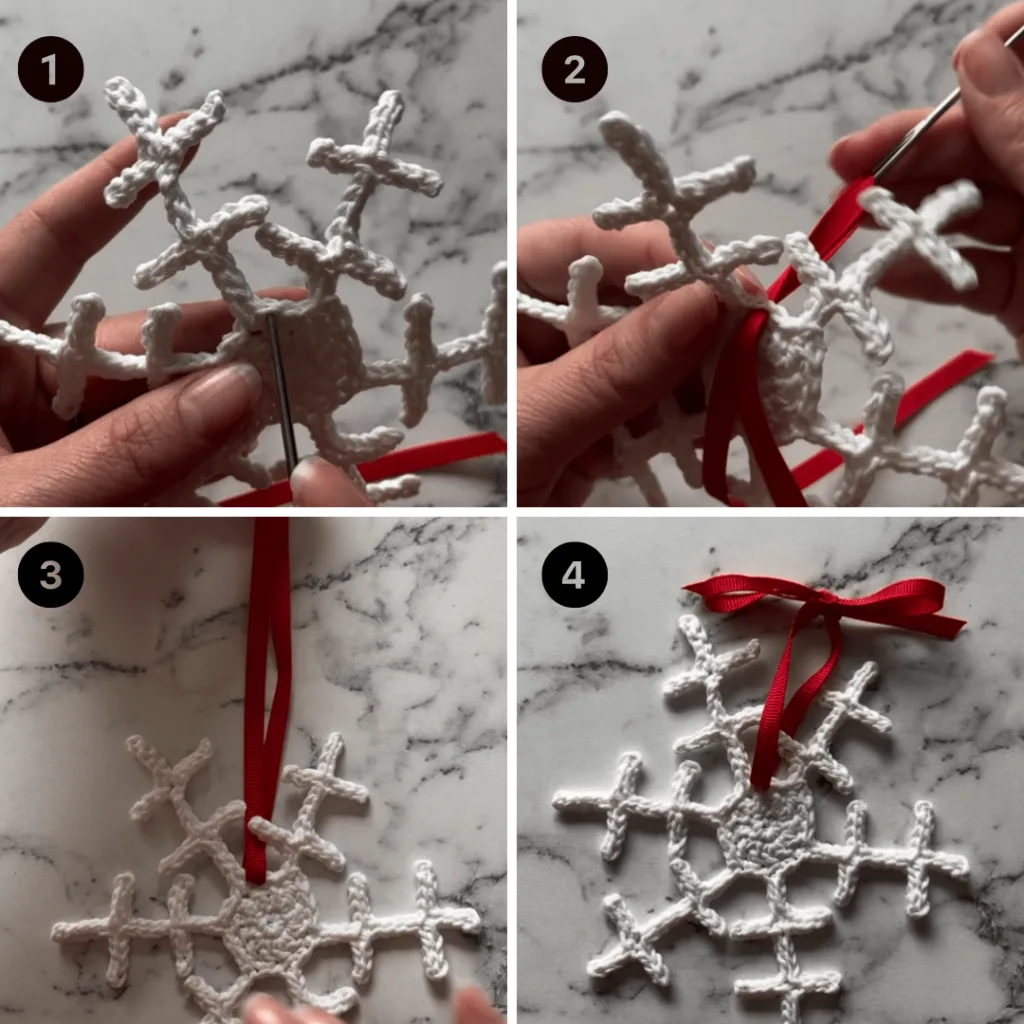
Both methods ensure your snowflake can be adorned with a ribbon, even if there’s no large opening. The tapestry needle technique provides a clean, seamless look, while gluing is quick and effective for intricate designs.
Combining Glitter and Ribbon
For a truly festive look, combine both embellishments on your crochet snowflakes.
Here’s how:
- Apply Glitter First: Use one of the glitter methods above and let the snowflake dry completely.
- Add Ribbon Next: Attach the ribbon after the glitter is sealed to avoid sticking or smudging.
Creative Ideas for Glitter and Ribbon Combinations
- Elegant Ornaments: Use white glitter and sheer white ribbon for a classic look.
- Whimsical Snowflakes: Combine pastel glitter with satin ribbons in coordinating colors.
- Festive Flair: Add gold glitter with red grosgrain ribbon for a holiday vibe.
- Layered Sparkle: Use two glitter colors (e.g., silver and blue) with a two-tone ribbon for a dimensional effect.
Care Tips for Glittered and Ribboned Snowflakes
- Store Carefully: Place them flat in a box, separated by tissue paper or wax paper.
- Avoid Moisture: Keep snowflakes dry to preserve the glitter and ribbon.
- Refresh as Needed: Reapply glitter or replace ribbon if it fades over time.
Final Thoughts
Adding glitter and ribbon to your crochet snowflakes is an easy way to elevate them into stunning decorations. Whether you’re crafting for yourself, gifting handmade ornaments, or creating festive garlands, these embellishments make your snowflakes truly shine.
Have fun experimenting with glitter, ribbons, and different designs to make each snowflake unique. Don’t forget to share your creations with us!
For more crochet snowflake ideas, check out the Let It Snow! Crochet Collection and available for free on the website to get started today!
Frequently Asked Questions
Q: What type of ribbon works best for crochet snowflakes?
A: Thin ribbons like satin, grosgrain, or organza work best. Use widths between 1/8 inch and 1/2 inch for weaving or outlining, and wider ribbons for hanging loops or decorative bows.
Q: Can I use glitter glue instead of loose glitter?
A: Absolutely! Glitter glue is less messy and easier to apply. It’s ideal for creating detailed accents or patterns on your snowflakes.
Q: How do I prevent glitter from shedding?
A: After applying glitter, seal the snowflake with a clear spray sealant, Mod Podge, or even hairspray. This helps keep the glitter in place and prevents shedding.
Q: Can I wash snowflakes with glitter and ribbon?
A: No, washing can damage the embellishments. If your snowflakes get dusty, gently brush them with a soft, dry brush or blow off dust with a can of compressed air.
Q: Can I combine ribbons and glitter on the same snowflake?
A: Yes! Combining ribbons and glitter can create stunning designs. For example, you can outline the edges with glitter and add a ribbon bow in the center for extra elegance.
Q: What’s the best way to store snowflakes with ribbons and glitter?
A: Store them flat in a box, separated by tissue paper or wax paper to prevent ribbons from creasing and glitter from transferring. Avoid stacking heavy items on top of them.
Q: Are glitter and ribbon safe for kids’ decorations?
A: Loose glitter can be messy and hazardous for small children. If crafting for kids, opt for glitter glue or non-toxic glitter, and securely attach ribbons to prevent choking hazards.




Connie Dews
Thursday 12th of December 2024
Thank you so much for these instructions.
Itchin4Stitchin
Wednesday 8th of January 2025
Hi Connie,
You are very welcome!
Best wishes,
RaeLynn