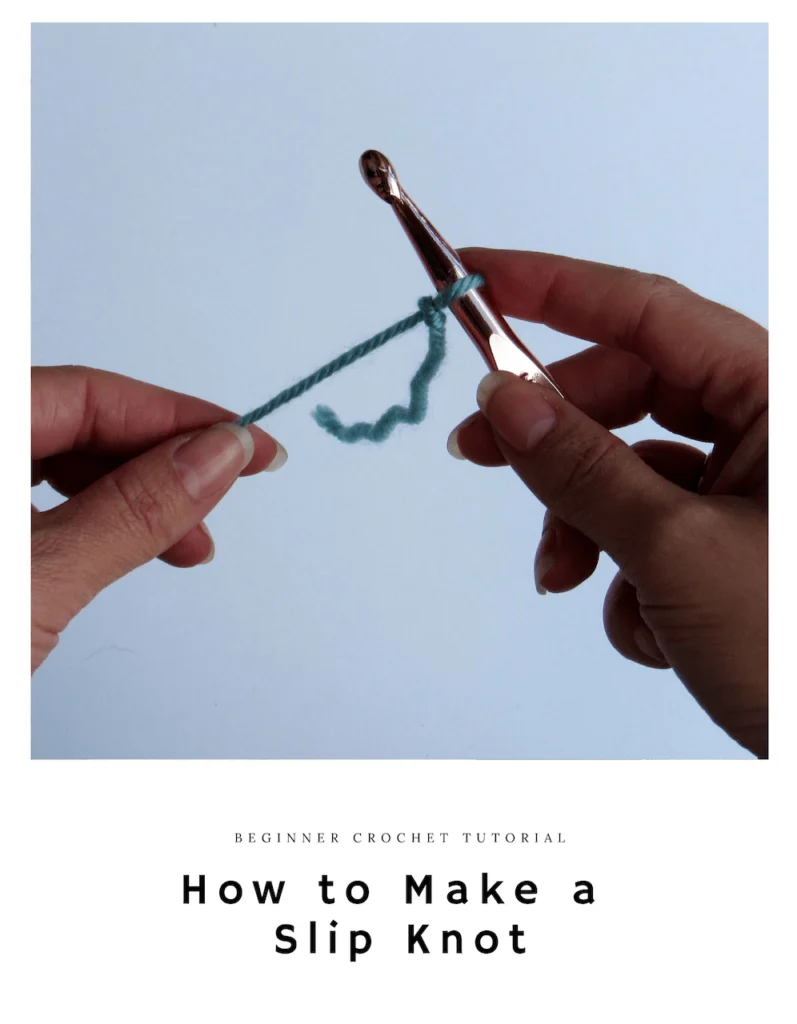
The slip knot is a fundamental technique in crochet that lays the foundation for every project. Whether you’re a beginner or an experienced crocheter, understanding how to make a slip knot correctly is crucial. In this comprehensive guide, we’ll address how to make a slip knot as well as the most common questions, mistakes, and problems related to the slip knot. Tutorial includes photos and video.
Welcome to the first lesson in my crochet beginner series!
Today I want to show you how to make a slip-knot, the absolute first step in crochet, no matter your skill level.
This is a super easy technique, but also a vital one because you simply cannot start any crochet project without doing it!
And since I don’t want to start this beginner crochet series assuming that you know anything at all about crochet, I am actually going to assume that you are an absolute beginner – someone who may have never even picked up a crochet hook before.
Thus, I want to start with the very first step in crochet, no matter how easy it may be.
And making a slip-knot is quite literally the absolute first thing you do when you start a crochet project.
Time to jump in and master this essential crochet skill!
What is a Slip-knot?
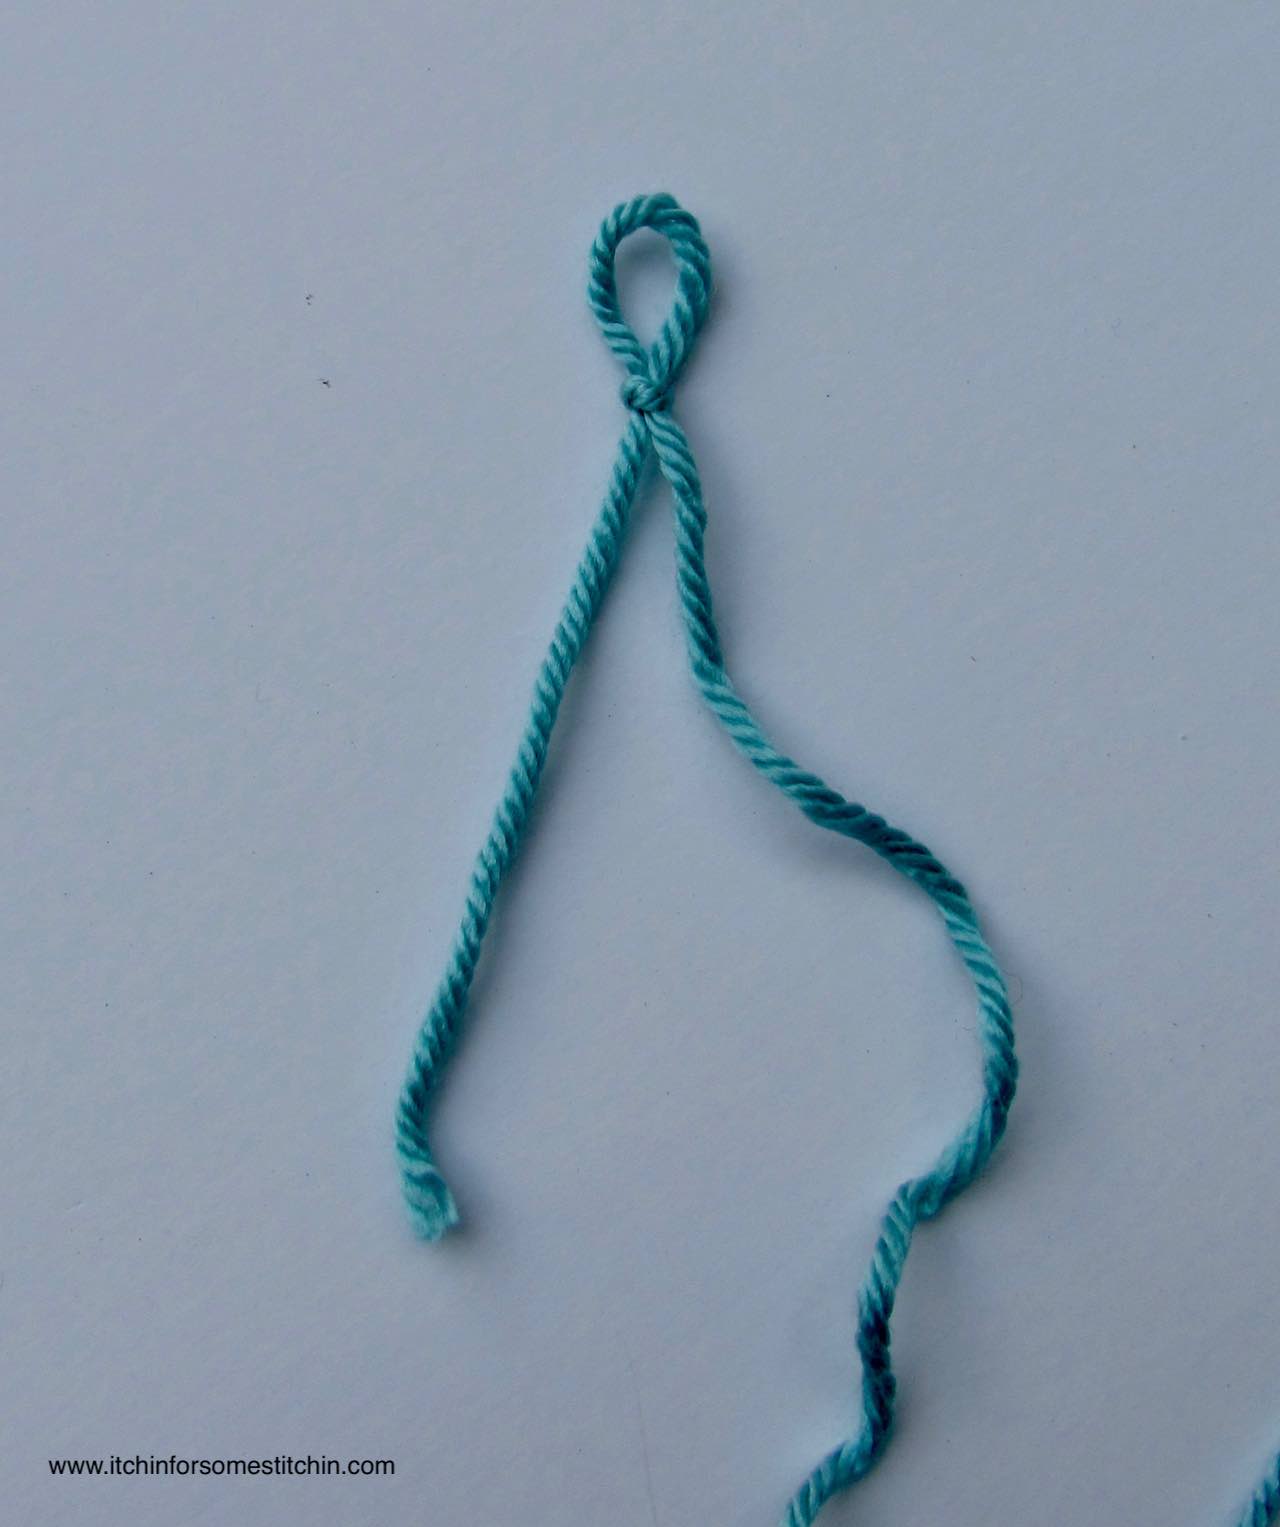
First, let’s go over exactly what a slip-knot is.
A slip-knot is often called a running knot and it is quite simply a knot that can be undone or “slipped” by pulling on the free end.
Slip-knots are made by tying an overhand knot around the standing part of a piece of rope or yarn in the case of crochet (and knitting as well).
The knot can then slip along the yarn around which it is made. So when you tug on it, it comes completely undone.
What’s the purpose of a slip-knot in crochet?
A slip knot used in crochet to create a loop that can be easily adjusted and tightened.
It serves as the starting point for most crochet projects, allowing you to secure the yarn to the crochet hook before beginning your stitches.
The slip knot provides flexibility and control over the tension of your work, ensuring that your stitches are even and consistent.
Thus, it is an essential technique that every crocheter needs to master to create beautiful and well-crafted crochet projects!
Of course, there are many ways to make a slip knot for crocheting.
In this tutorial, I will show you what I believe is the easiest method and the one I use personally.
Why is a slip knot necessary for necessary for starting a crochet project?
A slip knot securely attaches the yarn to the crochet hook, providing a stable foundation for your stitches.
It also allows you to control the tension of the yarn as you work, ensuring that your stitches are uniform and consistent.
Additionally, the slip knot also allows you to easily adjust the size of the starting loop, which is important for achieving the desired size and shape of your project.
Plus, the slip knot enables you to easily unravel (a.k.a “frogging”) your work if needed, making it easier to correct any mistakes or make adjustments along the way.
So you can see that the slip knot is an essential starting point in crochet because it ensures the stability, control, and flexibility necessary for creating beautiful crochet projects.
How to Make a Slip-knot
Step One:
Hold the yarn in your “yarn hand”. This is the hand that does not hold the crochet hook, but instead, controls the flow of your yarn.
For me, this is my left hand as I crochet with my right hand.
- Start by laying the yarn on your pointer and middle fingers so that it can be held against these two fingers by your thumb.
Step Two:
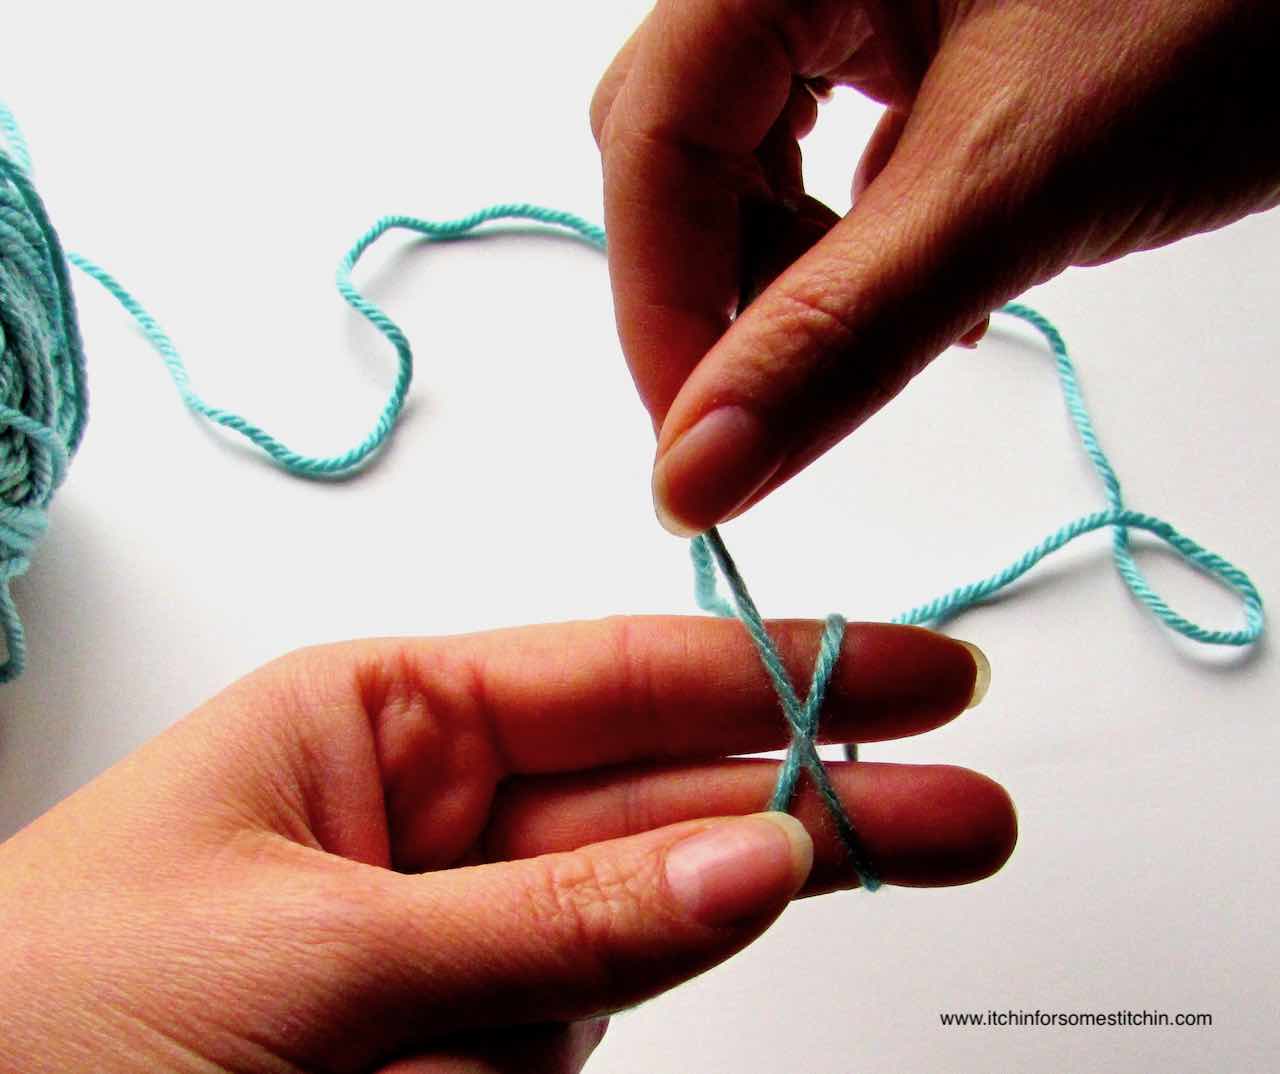
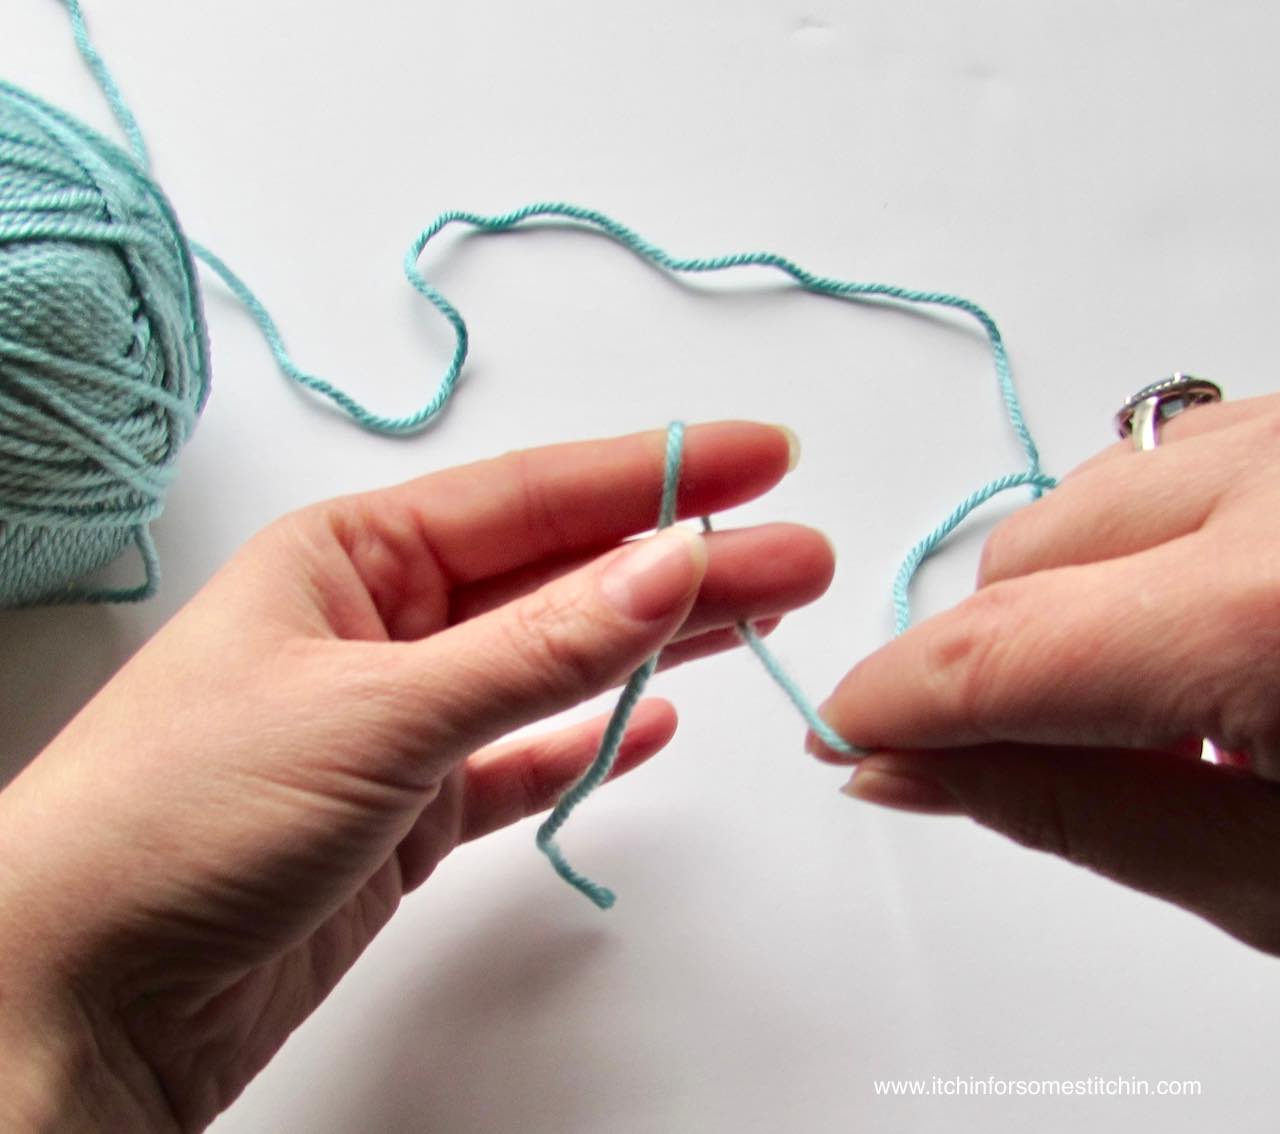
Using your crochet hand (the hand that will hold your crochet hook), wrap the yarn around the back of your pointer and middle fingers and bring it up making a cross over the yarn already laying on the inside of your two fingers from step one.
Step Three:
Do NOT let go of the yarn being held by your crochet hand. Place your thumb (on your yarn hand) on the center of the X you have made with the yarn. Then gently slip your pointer and middle fingers out of the loop.
Step Four:
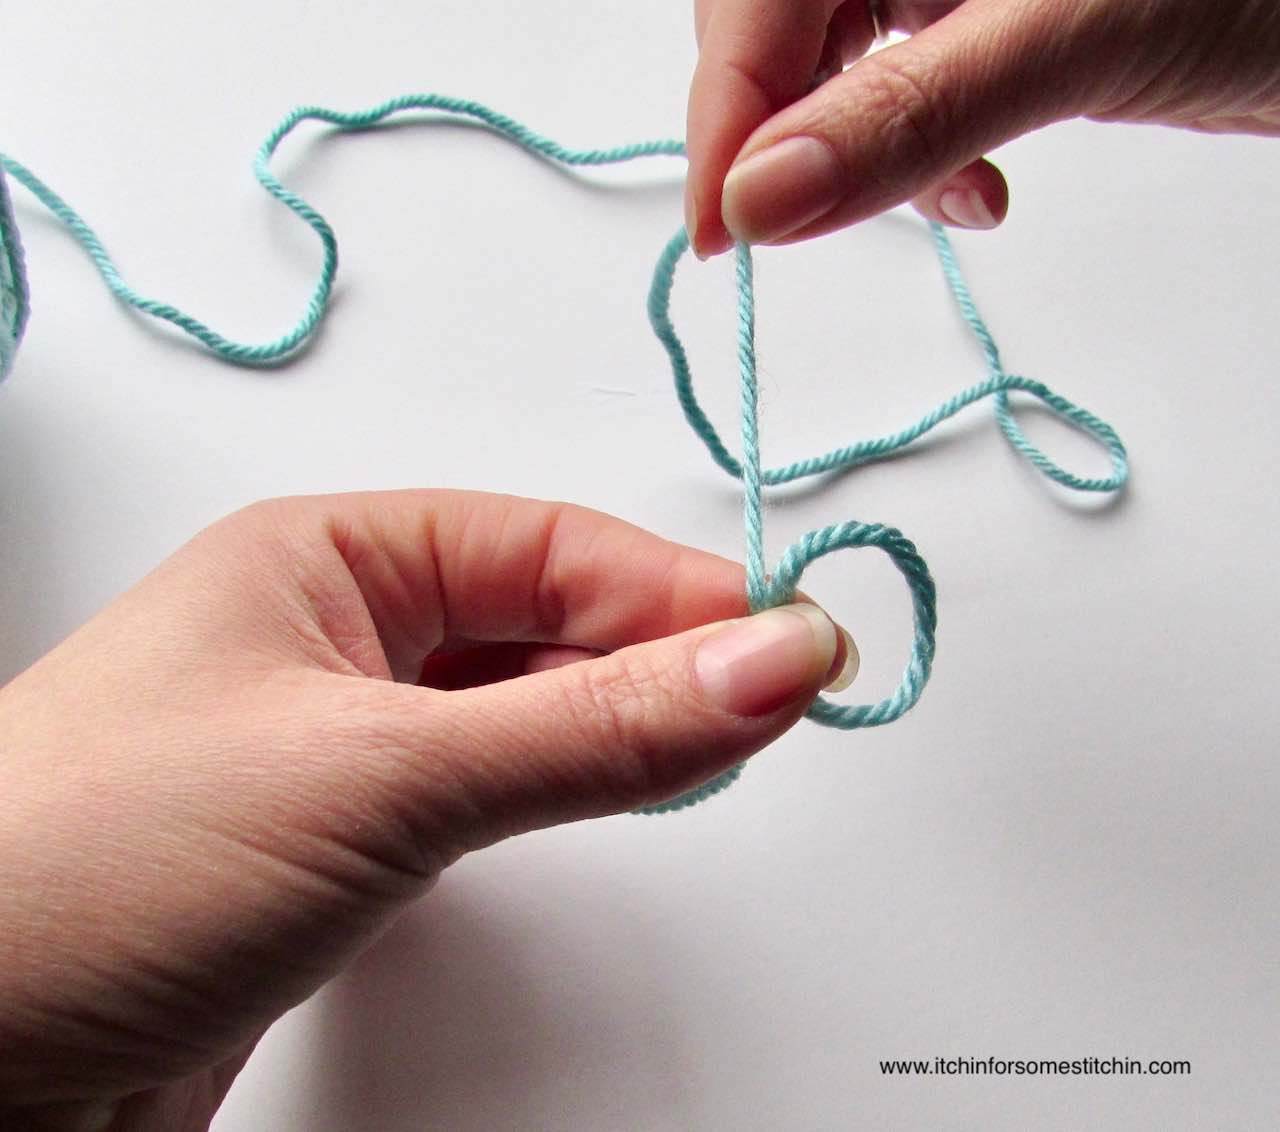
You should still be holding the tail of the yarn in your crochet hand. Take that tail and pull it down so that it now crosses along the backside of the loop.
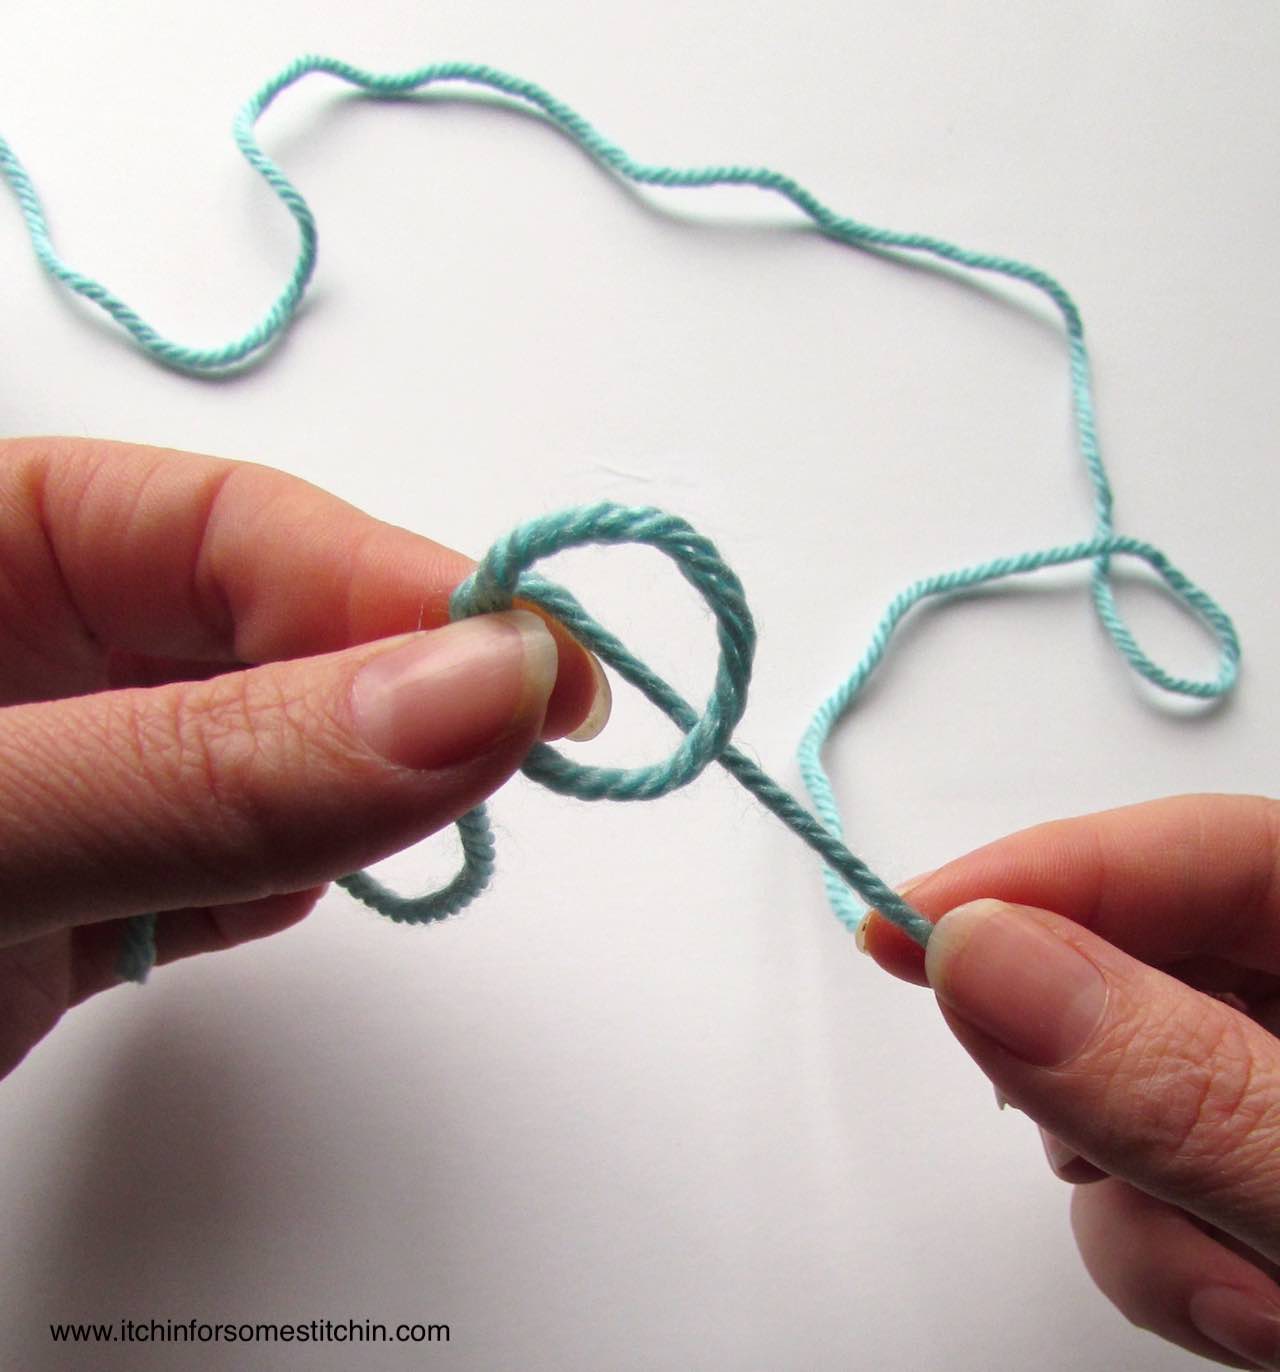
Step Five:
Drop the yarn from your crochet hand and now pull it through the center of the loop.
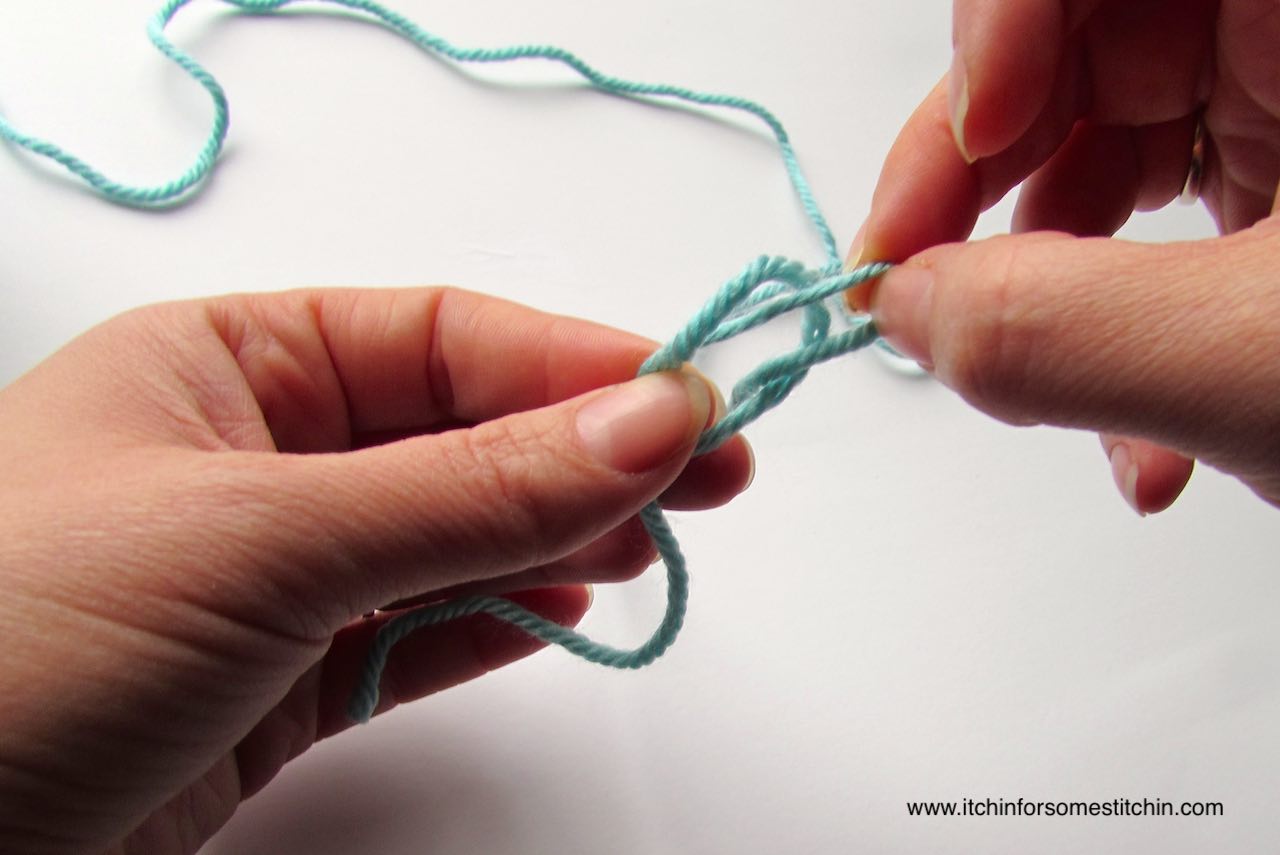
Step Six:
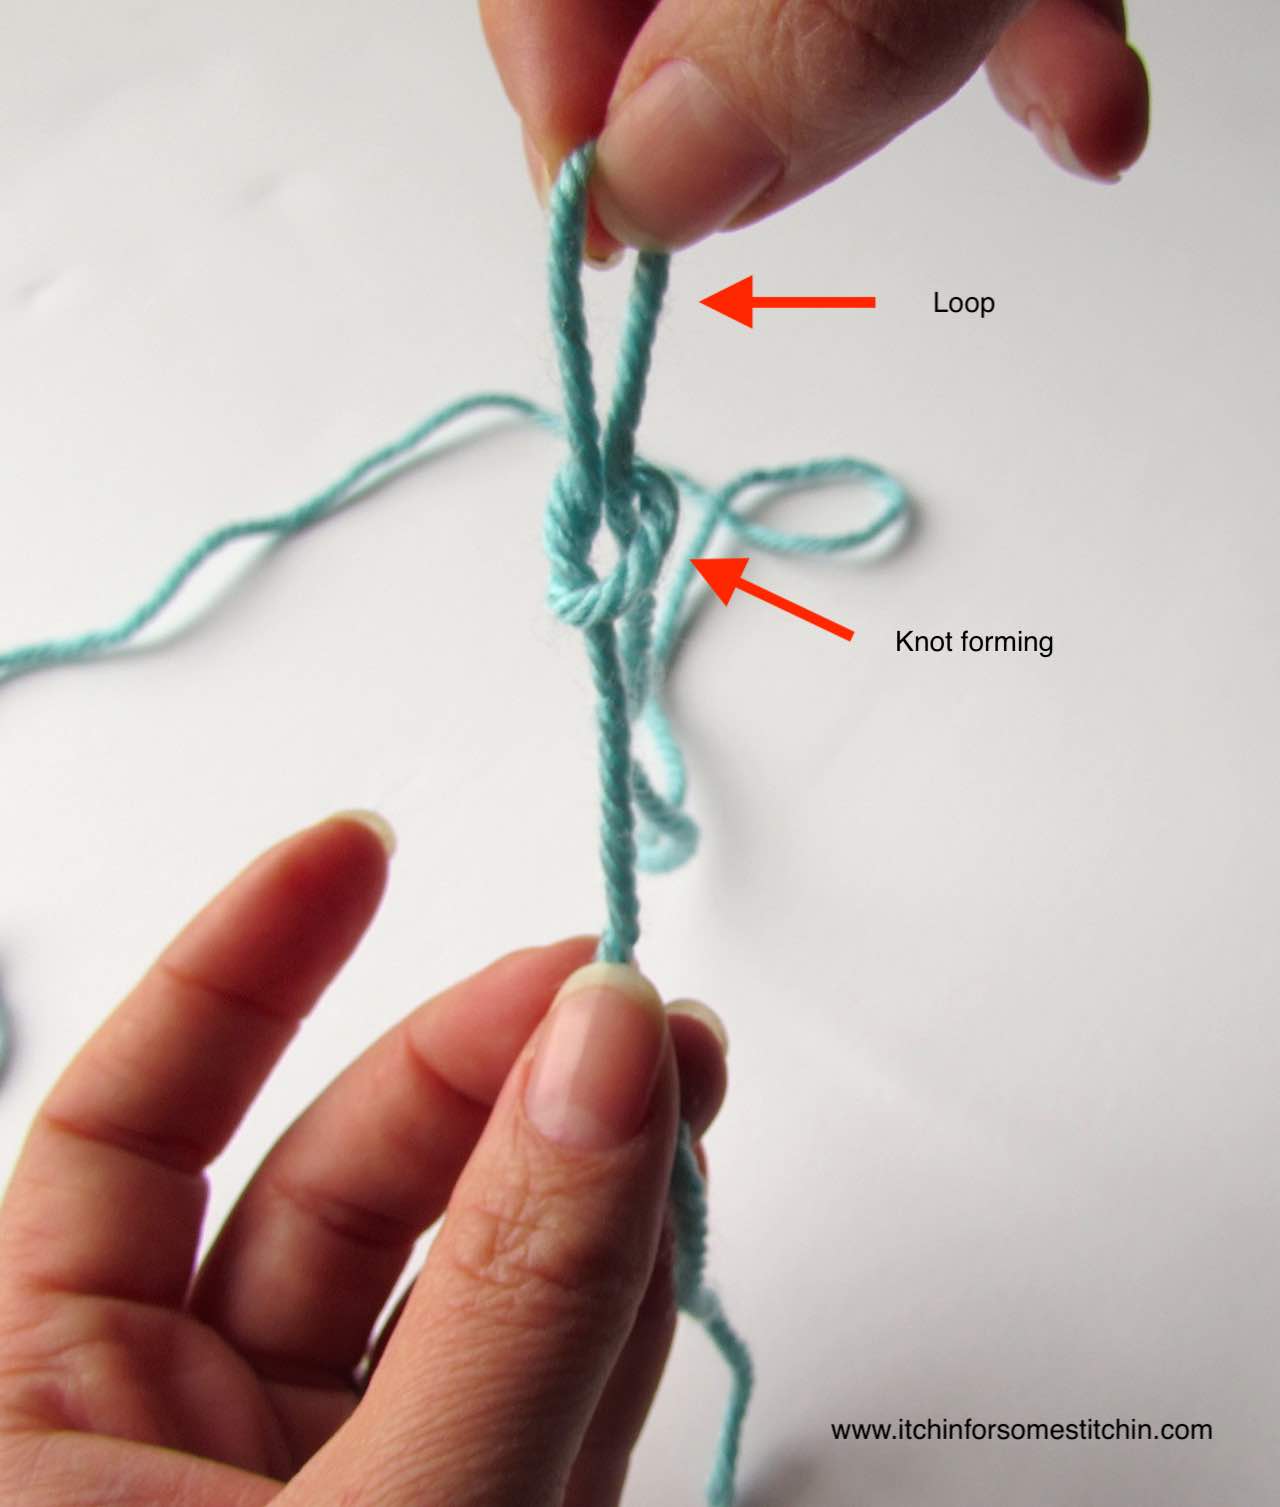
While you are pulling the yarn through the loop with your crochet hand, slide your yarn hand down to the loose tail of yarn and pull it. You should be pulling the tail down and pulling the yarn through the loop at the same time.
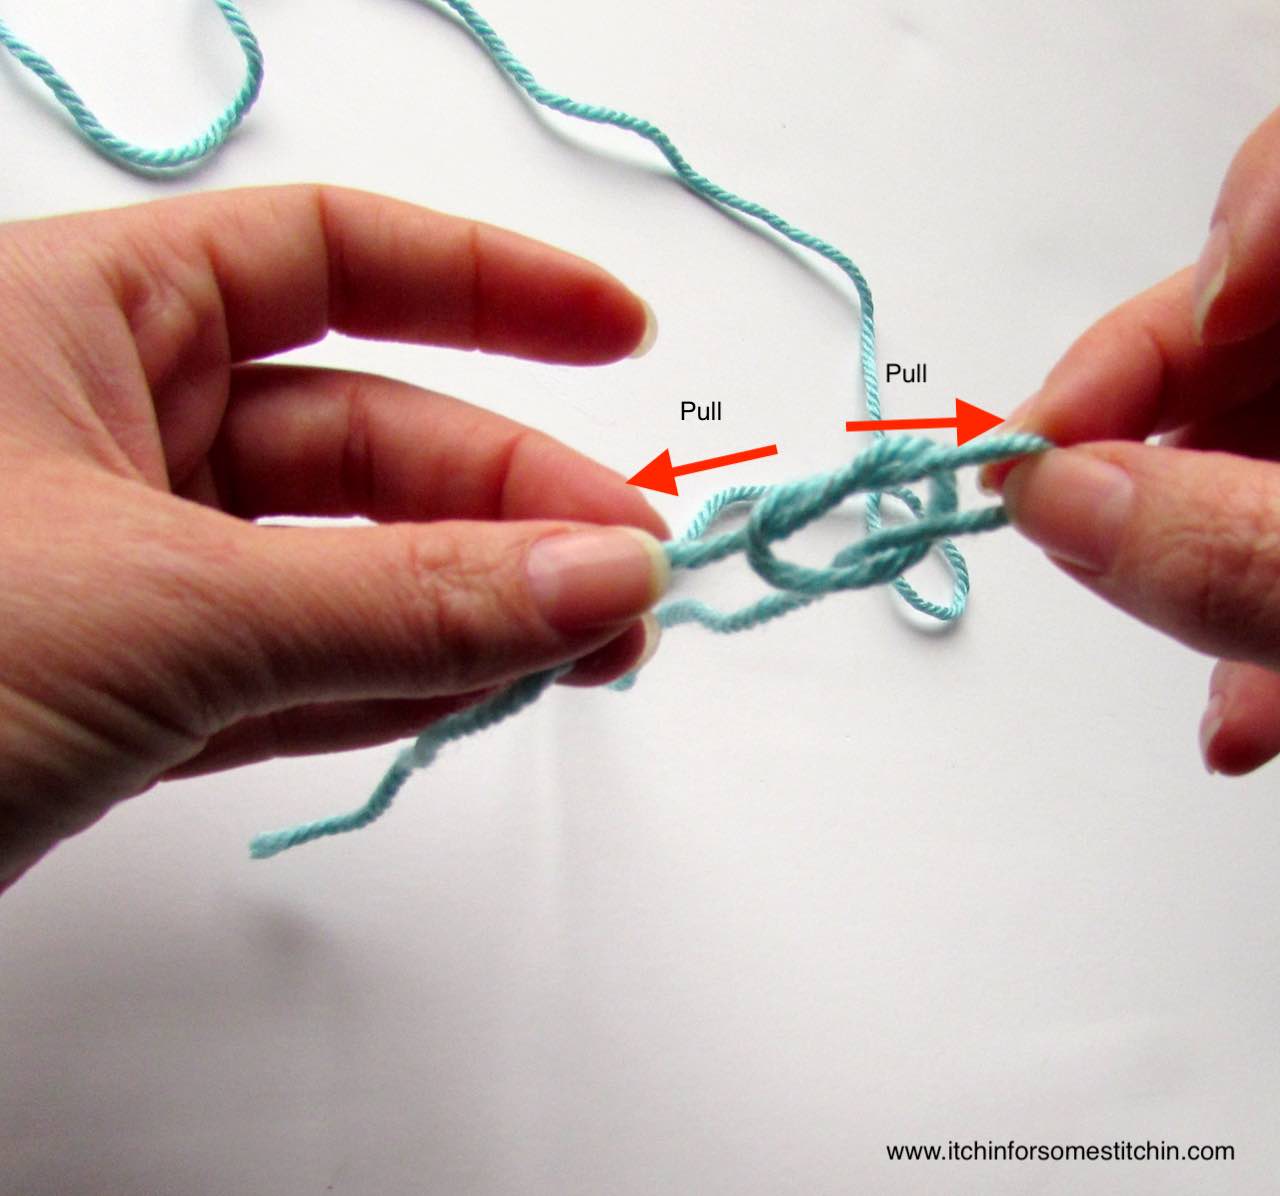
As you pull, a knot will form with a loop on the end.
Step Seven:
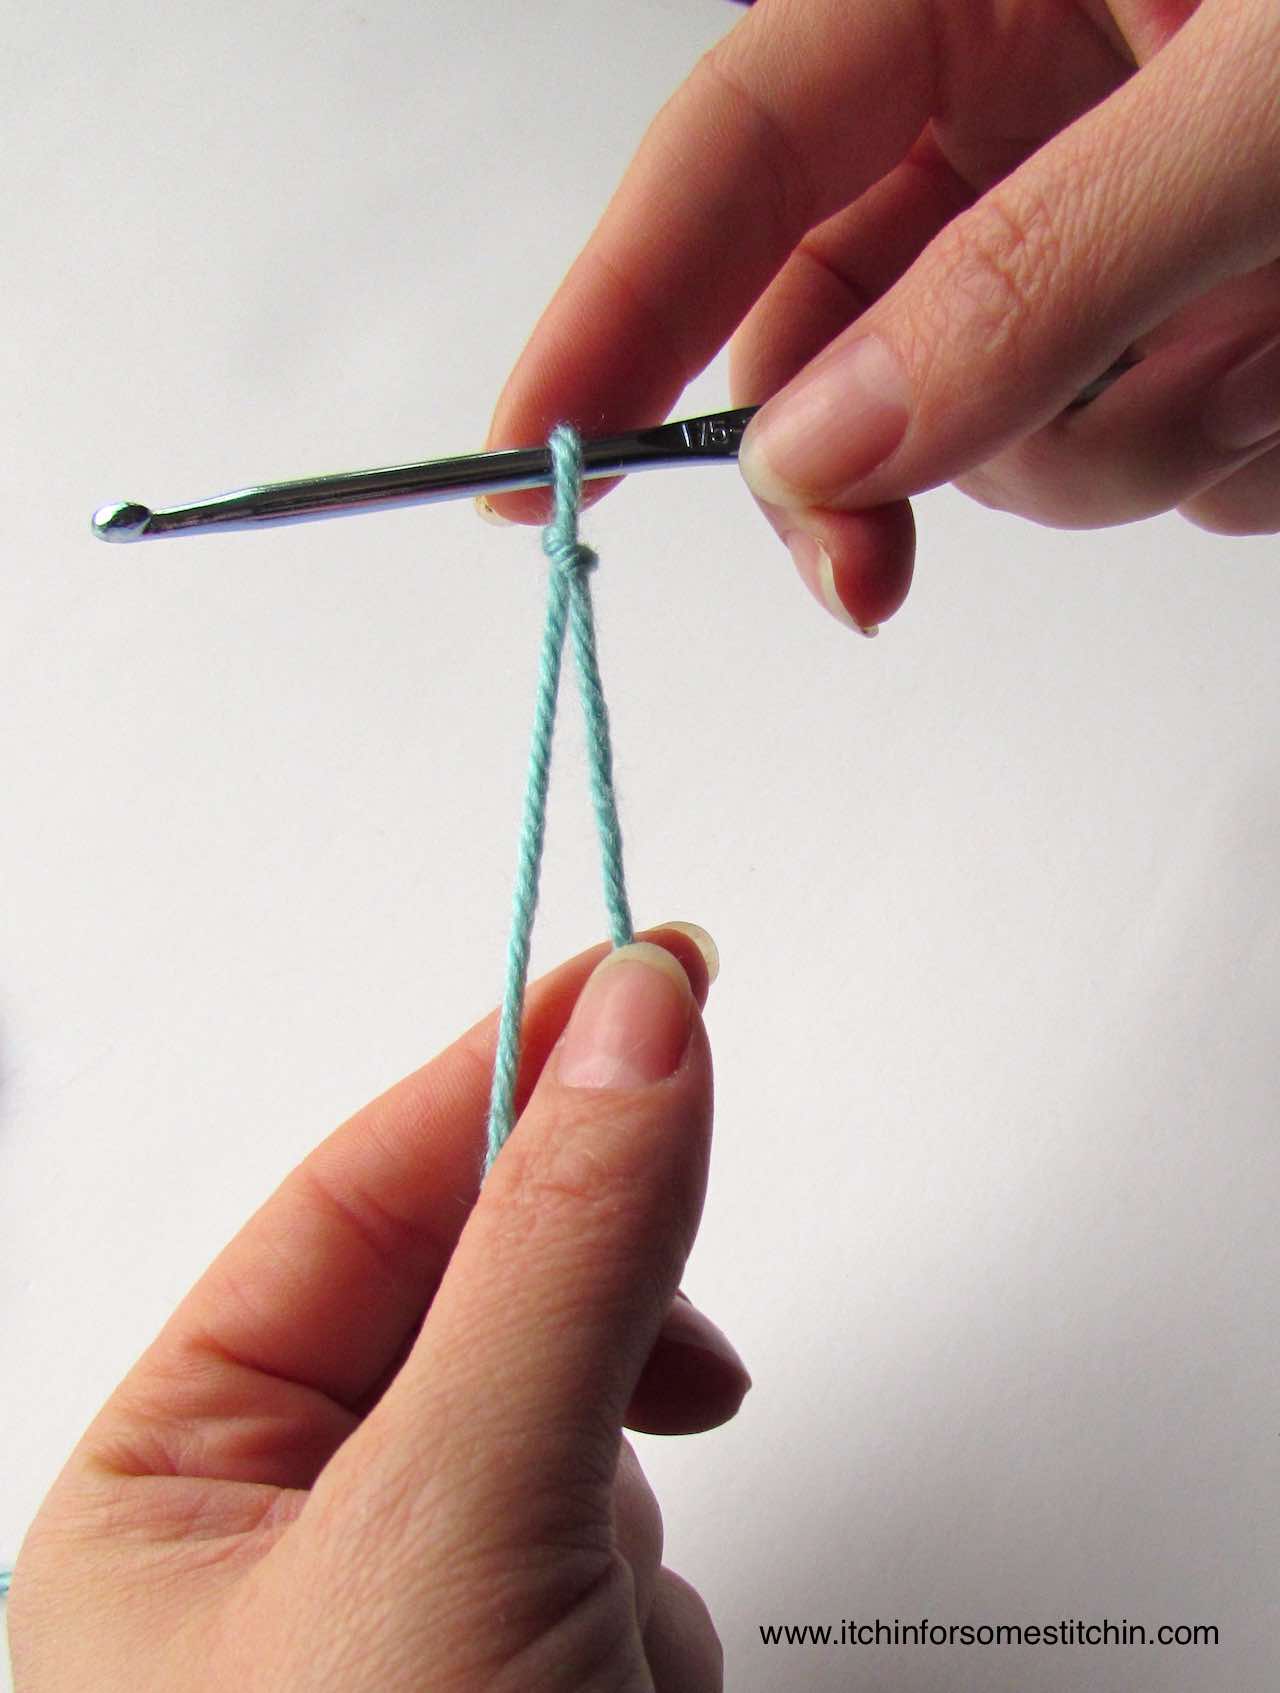
Once you have your knot, slip your crochet hook into the loop and slide the knot up to tighten.
Common Mistakes to Avoid
Having trouble forming a slip knot?
Slip-knot Video Tutorial
Need to see it in action? Check out this video!
I’ve found that sometimes it’s easier to watch it in action where you can pause and rewind while you practice.
You can do just that by checking out the video link above.
It may also help to review some of the common errors crocheters run into when making a slip knot.
Common slip knot errors in crochet can include:
- Tension too tight: Pulling the slip knot too tightly can make it difficult to work the first few stitches or create tension issues throughout your project.
- Tension too loose: If the slip knot is too loose, it can result in loose stitches and an overall sloppy appearance.
- Misaligned loop: Failing to align the loop properly can cause the slip knot to twist or become unstable, affecting the integrity of your starting stitch.
- Knot too big or small: The size of the slip knot matters. If it’s too big, it can create an uneven starting point, while if it’s too small, it may be challenging to insert your hook.
- Unraveling: A slip knot that unravels easily can cause frustration and difficulties in keeping your work secure.
To avoid these errors, it’s important to practice creating slip knots!
You need to find the right balance of tension, ensure the loop is aligned and sized correctly, and double-check its stability before starting your crochet project.
With practice, you’ll develop the skills to create neat and secure slip knots consistent.
If you’re having issues with any of these common errors, don’t worry, I got you!
Keep reading for solutions to these slip knot errors.
Things to know before you start your first crochet project:
2 Popular Ways to Hold the Crochet Hook
How to Crochet: Basic Steps for Beginners
10 Best Crochet Tips for Absolute Beginners
My other Crochet Resources
Troubleshooting Slip Knot Issues
Let’s explore some some practical tips and solutions for tackling some of the most common slip knot problems.
- Problem: Knot is too tight.
- Solution: When creating the slip knot, avoid pulling the yarn too tightly. Maintain a moderate tension to allow the loop to slide easily along the yarn.
- Problem: Knot is too loose.
- Solution: Apply a slightly firmer tension when forming the slip knot. Ensure that the loop is snug but not too loose.
- Problem: Difficulty in adjusting the knot’s tightness.
- Solution: If you find it challenging to adjust the tightness of the slip knot, try using a larger crochet hook. This will create a looser knot that can be easily adjusted later.
- Problem: Slip knot slides and becomes loose during crocheting.
- Solution: Before starting your project, ensure that the slip knot is secured tightly around the hook. Pull on both ends of the yarn to tighten the knot and prevent it from slipping.
- Problem: Slip knot is uneven or misshapen.
- Solution: Pay attention to the size and shape of the slip knot. Adjust the tension and size of the loop to create a neatly formed, symmetrical knot.
- Problem: Slip knot becomes tangled or difficult to work with.
- Solution: When creating the slip knot, ensure that the yarn is not twisted or tangled. Keep the strands smooth and untangled for a hassle-free crochet experience.
- Problem: Slip knot slips out.
- Solution: Make sure to tighten the slip knot properly before you start crocheting. Pull both ends of the yarn firmly to secure the knot. You can also try using a hook one size smaller to create a tighter slip knot.
- Problem: Slip knot unravels during crocheting.
- Solution: If the slip knot keeps unraveling while you crochet, try adding an extra twist to the loop before pulling it through. This twist can help lock the knot and prevent it from coming undone.
- Problem: Slip knot becomes loose over time.
- Solution: As you work on your crochet project, you’ll need to check the tension of the slip knot every once in a while. If it becomes loose, tighten it by pulling on both ends of the yarn. Ensure that the knot remains snug throughout your work.
- Problem: Slip knot doesn’t hold well with slippery or fine yarn.
- Solution: Slippery or fine yarns can be more challenging to work with. In such cases, consider using a different type of knot that provides more security, such as a double or magic ring. These alternative methods can help prevent the slip knot from slipping or unraveling.
- Problem: Yarn end slips out of the slip knot.
- Solution: To avoid the yarn end from slipping out, ensure that you leave a sufficient tail when creating the slip knot. A longer tail will provide better stability and reduce the chances of the yarn slipping out.
Love Pinterest?
I do!
PIN this pattern to your Pinterest boards for later.
You can also follow all my boards!
Tips for Achieving Consistent Tension
- Practice proper yarn tension: Maintain a consistent and moderate tension on the yarn as you create the slip knot. Avoid pulling too tightly or letting it become too loose.
- Adjust your grip: Experiment with different ways of holding the yarn and the crochet hook to find a comfortable and efficient grip that allows you to control the tension.
- Use the correct hook size: Ensure you are using the appropriate hook size for your yarn weight. Using a hook that is too small can result in tight stitches and slip knots, while using a hook that is too large can create loose stitches.
- Pay attention to the slip knot loop: Make sure the loop of the slip knot is neither too big nor too small. It should be large enough to easily insert your crochet hook but not excessively loose.
- Practice consistency: Aim to create slip knots of similar size and tension throughout your project. Consistency in your technique will help maintain uniformity in your stitches.
- Adjust your tension as needed: If you notice your slip knots are consistently too tight or too loose, take a moment to assess your tension and make necessary adjustments. Experiment with slightly altering your grip or the amount of tension you apply to the yarn.
- Take your time: Creating slip knots may require some practice and patience. Take your time to ensure each slip knot is formed neatly and consistently.
By using these tips, you can overcome common slip knot problems and ensure that your crochet work stays secure and intact throughout your project.
Remember, practice plays a vital role in achieving the desired tension and consistency in your slip knots.
Experiment with different techniques and adjust your tension as needed until you find what works best for you.
With time and experience, you’ll develop the skills to create perfectly balanced slip knots for your crochet projects.
Additionally, remember to adjust your technique as needed for different yarn types and project requirements.
Don’t know how to adjust the slip knot?
Let me help you!
Adjusting the slip knot
To adjust the size of the slip knot for different hook sizes or yarn weights in crochet, follow these steps:
- For a smaller slip knot:
- If you’re using a smaller hook size or working with a finer yarn, you’ll want a smaller slip knot to match.
- Start by leaving a shorter tail of yarn when creating the slip knot. This will reduce the size of the loop.
- Pull the yarn ends to tighten the slip knot, making sure it is snug but not too tight.
- For a larger slip knot:
- If you’re using a larger hook size or working with a bulkier yarn, you’ll need a larger slip knot.
- Leave a longer tail of yarn when making the slip knot, creating a larger loop.
- Adjust the size of the slip knot by pulling the yarn ends to make it looser or tighter as needed.
- Experiment and make adjustments:
- It’s important to experiment and make adjustments to achieve the desired size for your slip knot.
- If your slip knot feels too loose or too tight, you can undo it and try again, adjusting the length of the tail and the tension of the knot until it fits your needs.
- Remember that the slip knot should be secure enough to hold your stitches but not overly tight, as it needs to allow your hook to pass through easily.
Adjusting the size of the slip knot based on your hook size and yarn weight ensures that your crochet work starts off with the appropriate foundation and achieve the desired results for your project.
Crochet slip knot FAQs
Let me answer some of the most common questions people ask me about regarding slip knots.
- Can the slip knot be used in other crafts like knitting or macramé?
Absolutely! The slip knot serves as a starting point for creating a secure loop to begin your projects in these crafts as well.
Learning how to make a slip knot is a versatile skill that can be applied across various fiber arts, expanding your creative possibilities.
- Can you reuse a slip knot for multiple projects?
Generally not.
As you work your crochet project, the slip knot is incorporated into that specific piece of work.
You’ll need to create a new slip knot for each crochet project you make.
- Can the slip knot be adjusted after it’s made?
Definitely!
Please review the “Adjusting the slip knot” section of this post for tips on how to make your slip not tighter or looser.
The slip knot is vital in crochet as it creates a secure starting point, ensuring stability, preventing unraveling, and enabling consistent tension for beautiful and well-formed stitches.
Mastering the art of making a slip knot is key to unlocking your crochet potential. Practice diligently, refine your technique, and embrace the joy of creating beautiful projects with confidence and skill. Keep at it, and watch your crochet journey unfold in amazing ways!
Ready to learn some more crochet? Then check these out!
How to Make a Foundation Chain (Chain stitch)
How to Crochet a Turning Chain
How to Crochet the Single Crochet (sc)
Thank you for coming to my blog! By sharing my content and/or making a purchase you are making it possible for me to continue producing and sharing free content for everyone to enjoy. I sincerely appreciate your support!
Until next time… Happy Crocheting!

Please Share!

Deborah
Tuesday 7th of January 2020
Thank you! I've been crocheting for over a decade but never could understand the slip knot so I just tied a knot to start. This was easy to understand and complete!
Itchin4Stitchin
Thursday 9th of January 2020
Hi Deborah,
Wow! That's honestly incredible. It never occurred to me that this tutorial might help a seasoned crocheter, but I am so glad to hear that it did! No more knots for you from now on! :)
Best wishes,
RaeLynn
How to Crochet a Foundation Chain - Itchin' for some Stitchin'
Tuesday 25th of June 2019
[…] This stitch is so important that it is literally the second thing you should learn in crochet after learning how to make a slip-knot. […]